
ChevyMan.ru
Mazda Mitsubishi Toyota Land Rover Honda Kia Nissan
English Русский
Български
Беларускі
Український
Српски
Hrvatski
Română
Polski
Slovenský
Magyar
|
Articles | Sitemap | Contacts |


Home   Aveo   Captiva   Cruze   Lacetti   Lanos   Niva   Tahoe   Others  
Lacetti 1 (2002-2009)
  • Home
  • Lacetti
  • J200 (2002-2009)
  • Body
  • Repair of body elements
  • Removal the engine compartment mudguards

Removal the engine compartment mudguards (Chevrolet Lacetti J200)

            0

We remove the right shield if it is necessary to access the auxiliary drive belts and the engine timing belt, or if the mud shield is damaged.

We remove the left shield to access the lower part of the engine compartment on the left side.

Next we will show the removal of the left shield, the right one is removed in the same way.
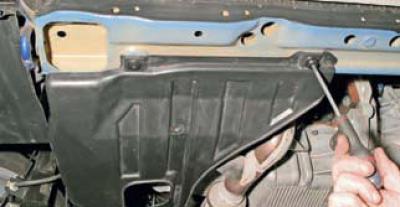
Next we will show the removal of the left shield, the right one is removed in the same way.


Using a Phillips screwdriver, unscrew the retainer of the piston that secures the mudguard to the lower cross member of the radiator frame
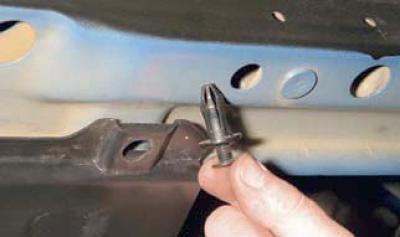
Using a Phillips screwdriver, unscrew the retainer of the piston that secures the mudguard to the…


and take out the piston.

We also remove the other piston of the front shield mount
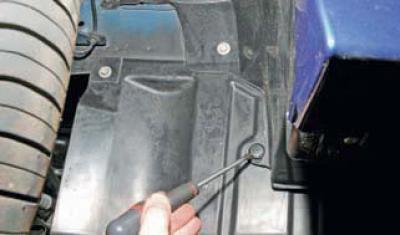
We also remove the other piston of the front shield mount


and a piston connecting the shield to the fender liner.


Using a 10 mm spanner, unscrew the two bolts securing the engine compartment mudguard to the side member
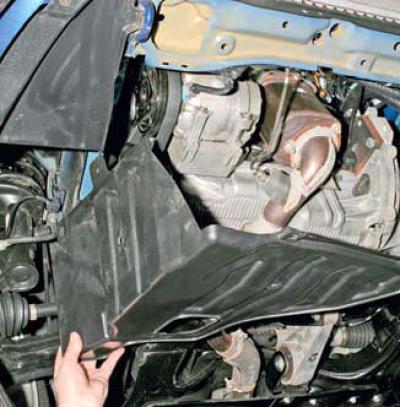
Using a 10 mm spanner, unscrew the two bolts securing the engine compartment mudguard to the side…


and remove the shield.

We install the mudguard in the reverse order.

(The original article can be found on the resource: ChevyMan.ru)

The article was checked: Vladimir Romannikov
This article is available at russian, bulgarian, belarusian, ukrainian, serbian, croatian, romanian, polish, slovak, hungarian

Share information:

Previous articles
Lacetti 1: Repair of body elements
Next articles

Removal the radiator grille
Car body structure
Removal the front wheel arch liners
Removal the hood lock, replacing the lock drive cable
Removal the hood
Removal the front bumper
Removal the rear bumper


See similar articles on the topic of Chevrolet cars:
Scheme 1 a. Consumers connected via the engine compartment mounting block Chevrolet Aveo T300 (2012-2018)
General view of the engine compartment Chevrolet Captiva 1 (2006-2018)
Removal and installation engine mudguards Chevrolet Cruze 1 (2008-2016)
Starting the engine from another car's battery (jump-starting) Chevrolet Lanos T150 (2002-2009)
Starting the engine Chevrolet Niva 1 (2002-2016)
Checking the engine compartment Chevrolet Tahoe 1 (1992-2000)
Fuse and relay boxes in the engine compartment Chevrolet Orlando 1 (2010-2018)
Link in different formats to this page


Visitor comments

No comments yet


How much will 33 + 15 =


Lacetti 1 (2002-2009) 
  • General information
  • User manual
  • Maintenance
  • Power unit
  • Engine repair
  • Control system
  • Supply system
  • Cooling system
  • Exhaust system
  • Transmission
  • Clutch
  • Manual gearbox
  • Front wheel drives
  • Chassis
  • Front suspension
  • Rear suspension
  • Steering
  • Brake system
  • Body
  • Repair of body elements
  • Heating and air conditioning
  • Electrical equipment
  • Engine electrics
  • Lighting and lamps
  • Equipment and devices
  • Electrical circuits


ChevyMan.ru © 2017-2026 · Mobile version · Feedback · Site search · Interesting to read · Sitemap: EN BG BY UA RS HR RO PL SK HU

Aveo 2003-2008 · Aveo 2006-2011 · Aveo 2012-2018 · Captiva 2006-2018 · Cruze 2008-2016 · Lacetti 2002-2009 · Lanos 2002-2009 · Niva 2002-2016 · Tahoe 1992-2000 · Tahoe 2000-2014 · Lumina 1 1989-1994 · Trailblazer 1 2001-2008 · Orlando 1 2010-2018 ·
🛡️ For your security and to improve our service, this site uses cookies. You can disable them in your browser.