


If the engine of a car with a discharged battery is in good condition, it will start immediately when jump-started. An engine with problems in the power supply or control systems and a discharged battery (from unsuccessful attempts to start a faulty engine) there is no point in starting the engine with a battery by "jump-starting". If after starting the engine from the battery of the "donor" car and then recharging the discharged battery, the starter again refuses to turn the engine crankshaft, then the battery is faulty and needs to be replaced.
To "light" a cigarette, you need a set of two connecting cables, necessarily from the factory (not homemade!) manufacturing. The most important parameter of a cable is the cross-section of its conductor (excluding insulation thickness). It should be at least 16 mm² or approximately equal to the cross-section of the wire connecting the battery to the starter (also without taking into account the thickness of the insulation). The length of each cable must be at least 1 m (optimally 1.2–1.5 m).
At the ends of each cable, clamps are installed in the factory version for fastening to the terminals of the storage batteries. In order not to confuse the polarity when connecting, one of the cables or only the handles of its clamps are painted red. This cable is usually used to connect the "positive" terminals of the storage batteries. The cable connected to the "negative" terminal of the storage battery of the "donor" car is black or blue.
When "lighting", it is necessary to adhere to the following order of actions. We turn on the parking brake on each car and set the gear shift lever to the neutral position.
We turn off the ignition on both cars and all devices and instruments that have a power supply.
We lift the plastic protective cover from the negative terminal of the discharged battery.
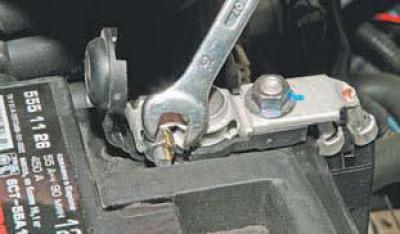
Using a 10 mm spanner, loosen the nut on the terminal mounting bolt…
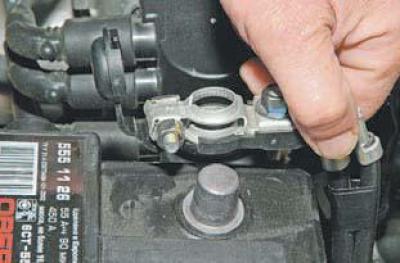
…and disconnect the terminal of the wires from the negative terminal of the discharged battery.
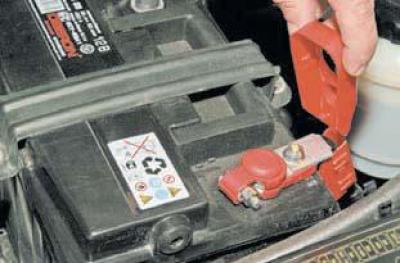
We lift the protective cover of the wires of the positive terminal of the discharged battery.
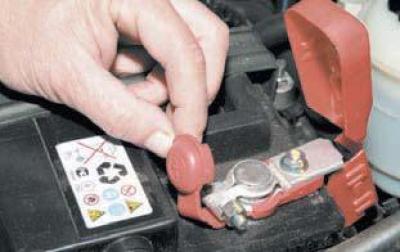
We lift the protective cover of the positive terminal of the discharged battery.
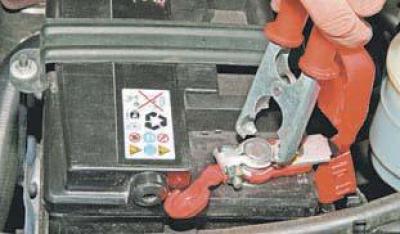
We connect the clamp of the "positive" (red) connecting cable to the "positive" terminal of the discharged battery..
...and the second clamp is with the positive terminal of the donor car battery.
Connect the "negative" clip (black or blue) cable with the negative terminal of the donor car battery.
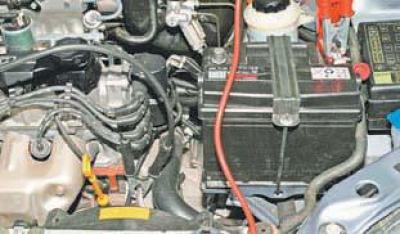
The second clamp of the "minus" cable is connected to the "ground" (body or engine) a car with a discharged battery at a distance of at least 0.5 m from the battery itself.
It is best to connect the negative cable clamp to massive, unpainted and uncontaminated metal parts of the engine.
We start the engine of the "donor" car, after which we start the engine of the car with a discharged battery. The duration of continuous operation of the starter at each start should not exceed 6 sec.
If the engine starts, we maintain an increased crankshaft speed of the car with the discharged battery by pressing the gas pedal so that when the battery of the donor car is disconnected and the discharged battery is connected, the engine does not stop.
To avoid a sharp voltage surge in the on-board network of the "donor" car, we connect the standard "minus" wire to the "minus" terminal of the discharged battery and disconnect the clamp of the "minus" cable from the "ground" of the car with the discharged battery.
We disconnect the clamps of the "positive" cable from the "positive" terminal of the discharged battery and the "donor" battery.
A voltage surge in the on-board network of a car with an electronic engine management system can disable the electronic engine control unit. That is why you should start the engine with a discharged battery using jumper cables only in the sequence described above.
Precautions:
- do not touch uninsulated areas of connecting cable clamps;
- when connecting the positive terminals of the batteries with the red cable, make sure that the uninsulated sections of the clamps do not come into contact with any metal parts of the car that have contact with the ground; this may cause a short circuit and damage the battery;
- at an ambient temperature of -10°C and below, the electrolyte of a discharged battery freezes. When "lighting" a battery with frozen electrolyte, an explosion may occur. To avoid an explosion, you must first warm up the battery in a warm room;
- the negative connecting cable must not be connected to the negative terminal of a discharged battery due to the risk of ignition from an accidental spark and explosion of oxyhydrogen gas released during charging.