
ChevyMan.ru
Mazda Mitsubishi Toyota Land Rover Honda Kia Nissan
English Русский
Български
Беларускі
Український
Српски
Hrvatski
Română
Polski
Slovenský
Magyar
|
Articles | Sitemap | Contacts |


Home   Aveo   Captiva   Cruze   Lacetti   Lanos   Niva   Tahoe   Others  
Captiva 1 (2006-2018)
  • Home
  • Captiva
  • 1 (2006-2018)
  • Manual
  • Car care
  • Starting the engine from an additional battery

Starting the engine from an additional battery (Chevrolet Captiva 1)

            0

Caution: Do not attempt to start the engine by pushing or towing the vehicle. This may result in damage to the catalytic converter, automatic transmission, and personal injury.


If the battery is discharged, you can use the battery of another car to start the engine.

Warning: Batteries are explosive. Electrolyte burns or short circuits can occur, resulting in serious injury or damage to vehicle components.

- Do not use batteries near fire or sparks.

- When starting the engine from another vehicle's battery, do not tilt the battery.

- Do not allow wires to short-circuit.

- When working near the battery, wear protective glasses.

- Do not allow electrolyte to come into contact with eyes, skin, clothing or painted surfaces.

- Make sure that the batteries of both vehicles have the same nominal voltage.

- Do not remove a discharged battery.


Warning: Failure to follow these safety precautions or the following instructions for jump starting another vehicle using extension cables may result in a battery explosion, electrolyte burns, or short circuits.

All this can lead to serious damage to the electrical systems of both vehicles, as well as cause serious bodily injury.


Before starting the engine from another vehicle's battery:

1. Apply the parking brake.

2. If you have an automatic transmission, engage PARK; if you have a manual transmission, move the gear lever to neutral.

3. Turn off all electrical appliances.

Warning: Before starting the engine from another vehicle's battery, turn off the audio system. Otherwise, it may be damaged. Repairs to such faults are not covered by the manufacturer's warranty.


Warning: Do not allow extension cords to come into contact with rotating parts in the engine compartment. This may cause serious damage to these parts.


Connecting extension cables
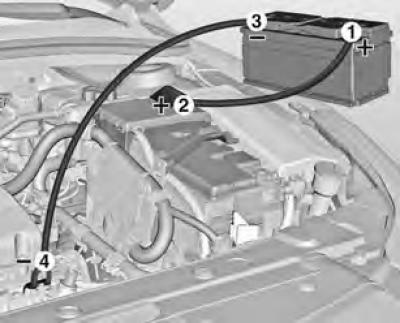


Connecting extension cables


Extension wires are connected in the following order:

1. Mount one clamp of the first jumper cable to the positive terminal of the auxiliary battery (identified by the "+" sign on the battery case or terminal).

2. The other end of this cable is connected to the positive terminal of the discharged battery (the "+" sign).

3. Connect the first clamp of the second jumper cable to the negative terminal of the auxiliary battery (identified by the "-" sign on the battery case or terminal).

Warning: Do not connect the negative (-) terminal of a dead battery last.

This clamp should be secured to some metal engine bracket.

This bracket should be located as far away from the battery as possible.

Connecting the last clamp to the negative terminal of a dead battery may cause an electrical arc or explosion of the battery.

This may result in injury to people and damage to vehicle parts.


4. Connect the other end of the second jumper cable to a ground on another vehicle, such as a steel bracket bolted to the engine block.


5. During the process of charging a discharged battery, the engine of the vehicle from which the engine is started is allowed to operate.

After successful engine start:

1. Carefully disconnect the ground (-) cable. Start with the vehicle with the dead battery. Do not turn off the vehicle's engine.

2. Disconnect the negative cable clamp from the negative terminal of the other vehicle's battery.

3. Disconnect the cable clamps from the positive terminals of both batteries. Place the extension cables in the trunk next to the spare tire.

4. After starting the engine, the car should be driven for approximately 20 minutes. This is necessary to fully charge the battery.

5. If the battery is still discharged, you need to contact a car service center.

Information taken from the official website: chevyman

The article was checked: Vladimir Romannikov
This article is available at russian, bulgarian, belarusian, ukrainian, serbian, croatian, romanian, polish, slovak, hungarian

Share information:

Previous articles
Captiva 1: Car care
Next articles

Changing tires on a car
Tire repair kit
Car wheels and tires
Automotive tool
Fuses and fuses
Towing a car
Car exterior care


See similar articles on the topic of Chevrolet cars:
Starting the engine from external power sources Chevrolet Aveo T300 (2012-2018)
Starting the engine from external power sources Chevrolet Cruze 1 (2008-2016)
Starting the engine from another car's battery («jump-starting») Chevrolet Lacetti 1 (2002-2009)
Starting the engine from another car's battery (jump-starting) Chevrolet Lanos T150 (2002-2009)
Starting the engine Chevrolet Niva 1 (2002-2016)
Engine Starting and Battery Charging System (C/K and Sierra models since 1987) Chevrolet Tahoe 1 (1992-2000)
Starting the engine from an auxiliary battery Chevrolet Lumina 1 (1989-1994)
Link in different formats to this page


Visitor comments

No comments yet


How much will 31 + 27 =


Captiva 1 (2006-2018) 
  • Manual
  • Before leaving
  • Keys, doors and windows
  • Seats, protection systems
  • Instruments and controls
  • Lighting system
  • Information and entertainment
  • Navigation system
  • Climate control
  • Driving a car
  • Car care
  • Maintenance
  • Engine 2.0 l (diesel)
  • Engine device
  • Troubleshooting
  • Engine repair
  • Cooling system
  • Engine electrical equipment
  • Control and power systems
  • Exhaust system
  • Engine FAM II 2.4D
  • Engine device
  • Troubleshooting
  • Engine repair
  • Cooling system
  • Engine electrical equipment
  • Control and power systems
  • Exhaust system
  • Engine HFV6 3.2L
  • Engine device
  • Troubleshooting
  • Engine repair
  • Cooling system
  • Engine electrical equipment
  • Control and power systems
  • Exhaust system
  • Transmission
  • Front drive axle
  • Rear drive axle
  • Automatic gearbox - device
  • Automatic gearbox - service
  • Automatic gearbox - repair
  • Manual gearbox - device
  • Manual gearbox - service and repair
  • Clutch
  • Transfer case
  • Chassis
  • Car suspension
  • Brake system
  • Steering
  • Body
  • Heating and ventilation
  • Air conditioning (manual)
  • Air conditioning (automatic)
  • Seat belts
  • Airbags
  • Car seat
  • Interior (internal elements)
  • Exterior (external elements)
  • Doors and windows
  • Electrical equipment
  • Equipment and devices
  • Lighting and lamps
  • Windshield wipers and washers
  • Electrical circuits


ChevyMan.ru © 2017-2026 · Mobile version · Feedback · Site search · Interesting to read · Sitemap: EN BG BY UA RS HR RO PL SK HU

Aveo 2003-2008 · Aveo 2006-2011 · Aveo 2012-2018 · Captiva 2006-2018 · Cruze 2008-2016 · Lacetti 2002-2009 · Lanos 2002-2009 · Niva 2002-2016 · Tahoe 1992-2000 · Tahoe 2000-2014 · Lumina 1 1989-1994 · Trailblazer 1 2001-2008 · Orlando 1 2010-2018 ·
🛡️ For your security and to improve our service, this site uses cookies. You can disable them in your browser.