


When using tires of different sizes, brands or types (radial and radial-diagonal) may cause loss of vehicle control, which may result in an accident. Using tires of different sizes, brands, or types may also cause damage to your vehicle. Use only the correct tire sizes, brands, and types on all wheels.
Some vehicles are supplied with a tire repair kit instead of a spare tire.
Cm. Tire repair kit.
Perform the following preparatory work and observe the following instructions:
- Park your car well away from the main traffic.
- Place the vehicle on a level, firm and non-slip surface. The front wheels should point straight ahead.
- Apply the parking brake. For a manual transmission, engage first or reverse gear. For an automatic transmission, set the selector to position P.
- Turn off the engine and remove the ignition key.
- Turn on the hazard warning lights.
- Place wedges, blocks or stones in front and behind the wheel located diagonally to the wheel being replaced.
- Remove all passengers from the vehicle.
- Remove the spare tire.
- It is strictly forbidden to change several wheels at the same time.
- The use of a jack is only permitted for replacing a punctured tire and is not permitted for seasonal tire changes.
- If the ground on which the vehicle is stopped is soft, place a strong pad under the jack (maximum thickness 1 cm).
- There must be no people or animals in the posted vehicle.
- Do not climb under a vehicle that is raised on a jack.
- Do not start the engine while the vehicle is raised.
- Clean the wheel nuts and threads before installing the wheel.
Warning: This jack has been designed specifically for this vehicle model.
It is not recommended to use it for other car models.
When working with a jack, do not allow its maximum permissible load to be exceeded.
Using this jack on other vehicles may result in damage to the jack or vehicle, or cause personal injury.
Replacing a damaged wheel
1. Remove the jack, wheel brace or jack handle and spare wheel from the special compartment in the luggage compartment and under the rear bumper.
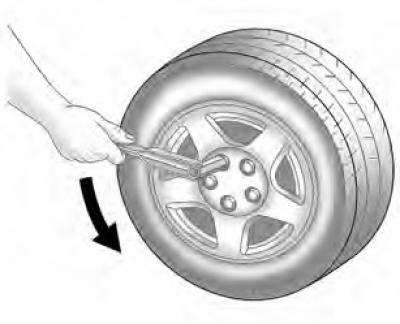
2. Using a lug wrench, loosen each wheel nut one turn.
Caution: Do not remove the nuts until the wheel is raised.
3. Insert the jack handle and wheel wrench into the jack.
4. To raise the wheel, turn the jack handle clockwise.
5. Position the jack as shown in the picture below. There is a socket under the doors at the front and rear of the car.
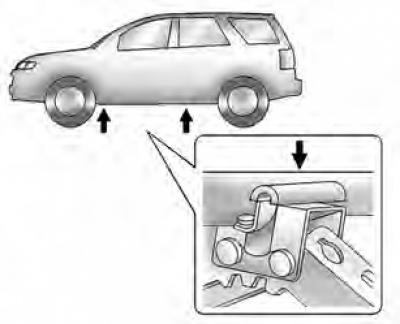
6. Place the jack vertically under the reinforced area on the right or left side of the wheel to be replaced.
Caution: Do not attempt to raise the vehicle until the jack is positioned and securely locked in the correct position.
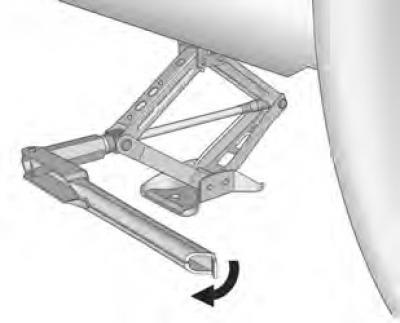
7. Using a clockwise rotation of the jack wrench or handle, carefully lift the vehicle until the lifting head is securely attached to the desired location on the vehicle body and the wheel is raised 2.5 cm above the ground.
Caution: When lifting the vehicle, make sure that the jack is securely positioned, otherwise it may slip out from under the vehicle.
Note: The vehicle must be raised to the height required to change the wheel, but not higher.
Warning: Do not stand under a jacked vehicle or start the engine.
The jack may slip, resulting in serious injury or death.
8. Remove all nuts from the wheel by turning them counterclockwise.
9. Remove the tire together with the wheel.
10. Install the spare wheel onto the hub.
Caution: Never lubricate wheel nuts with oil or grease.
Always use the stock wheel nuts.
Contact your local service center as soon as possible to have the nuts tightened to specification.
If the nuts are not tightened correctly, they may become loose over time.
11. Replace the wheel nuts. Tighten each nut by hand to secure the wheel to the hub.
12. To lower the vehicle to the ground, turn the lug wrench or jack handle counterclockwise.
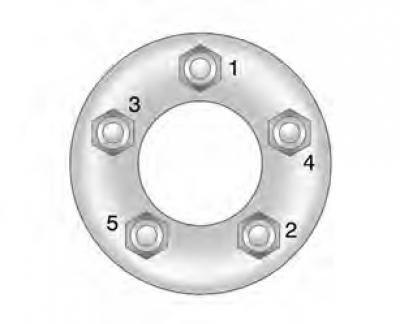
13. Tighten the wheel nuts crosswise to a torque of 125 N. 1→2→3→4→5 (see picture below).
14. Hook the spare tyre retaining cable to the support rod and, to tighten it, insert the bolt into the hole above the rear bumper and tighten it to 6 Nm.
15. Fasten the cable and install the plug in place.
Warning: Use only the correct size nuts and bolts. Tighten the threaded connections strictly to the recommended torque. Inappropriate nuts and bolts or loose nuts and bolts may cause the wheel to become loose or even lose while driving. This may result in an accident.
16. Securely fix the jack and tool in their original position, and place the damaged wheel in the luggage compartment.
Caution: Do not store the damaged tire under the rear bumper where the spare tire was located. The damaged tire may become displaced.
Warning: Do not leave the jack or tools in the vehicle interior. Tools that are not properly secured can pose a danger to passengers in the event of an emergency braking of the vehicle or a road accident.
Note: The temporary spare wheel (spare tire) is intended for short-term use only.
Contact your car service center as soon as possible to replace the temporary spare tire with a regular one.
Caution: A jacked vehicle will become unstable, which may result in damage to the vehicle and personal injury.
- Use only the supplied jack, installed in the correct position.
- The jack must be installed perpendicular to the ground.
- Do not stand under a vehicle supported by a jack.
- You cannot start the engine of a car that is standing on a jack.
- Before installing the car on a jack, all passengers must leave the car and move to a safe distance (including from other transport).
- The jack should only be used to change wheels.
- Do not jack up the vehicle on inclined or slippery surfaces.
- The jack should be installed directly next to the wheel that needs to be replaced.
- It is necessary to block the wheel located diagonally relative to the wheel being replaced.
- Before jacking up the vehicle, make sure that the parking brake is engaged and the gearshift lever is in 1st gear or reverse (for manual transmission) or in the "P" position (for automatic transmission).
- Do not change a wheel near moving vehicles.
Note: If you do not have the conditions to change the wheel or are not confident in your own abilities, contact a car repair shop.