


Contents: Replacing the lamp ↧ Low and high beam headlights ↧ Parking lights ↧ Fog lights ↧ Front turn signal lamps ↧ Tail lights, brake lights and… ↧ Rear lights and brake lights (lED) ↧ Side direction indicator lamps ↧ Center high brake light ↧ Rear fog lights ↧ License plate light ↧ Entrance lighting lamps ↧
Replacing the lamp
Turn off the ignition, turn off the corresponding switch or close the doors.
Handle the new lamp only by the base! Do not touch the glass of the lamp with bare hands.
Use only the same type of lamps for replacement.
Headlight bulb replacement should be done in the engine compartment.
Note: After driving in heavy rain or after washing, the glass of some exterior lights may fog up.
The reason is the difference in temperature between the inside and outside of the lighting fixture.
This phenomenon is similar to condensation on the windows inside a car during rain and does not indicate a problem with the car.
If water gets inside the light, contact the service center to check the car; we recommend contacting an authorized service center.
Low and high beam headlights
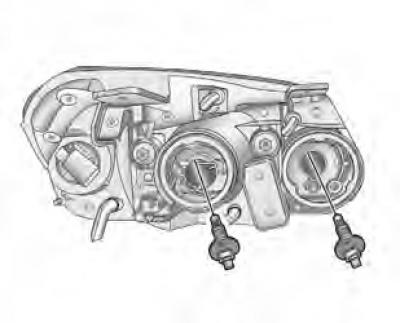
1. Open the hood.
2. Remove the retaining plugs holding the upper radiator cap.
3. Remove the top radiator cap.
4. Remove the three bolts and the entire headlight assembly.
5. Remove the headlight cover.
6. Disconnect the spring that holds the lamp.
7. Remove the lamp.
8. Install a good lamp of the correct type.
9. Install the spring on the new lamp.
10. Install the headlight cover.
11. Connect the wire plug.
Parking lights
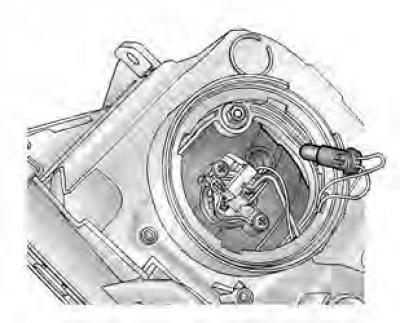
1. Open the hood.
2. Remove the entire headlight assembly.
3. Remove the headlight cover.
4. Remove the bulb holder located next to the high beam headlight bulb.
5. Remove the lamp by pulling it straight out of the socket.
6. Install the new lamp.
7. Install the headlight cover (in reverse order).
Fog lights
Lamp replacement is carried out at a service station.
Front turn signal lamps
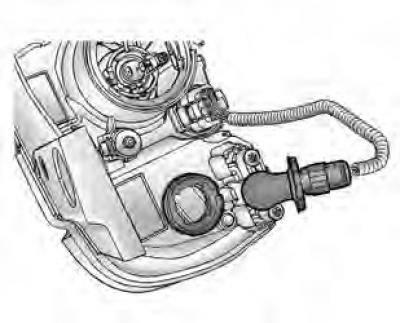
1. Open the hood.
2. Remove the entire headlight assembly.
3. Disconnect the wire plug from the lamp socket.
4. Rotate the turn signal bulb holder counterclockwise.
5. Remove the front turn signal bulb socket from the headlight.
6. Remove the bulb from the socket by pressing it lightly and turning it counterclockwise.
7. Install the new bulb into the socket by pressing it lightly and turning it clockwise.
8. Install the socket into the headlight by turning it clockwise.
9. Install the headlight unit.
Tail lights, brake lights and reversing lights
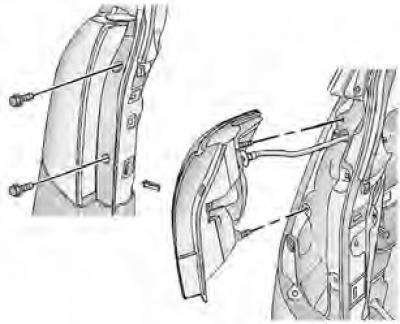
1. Open the back door.
2. Remove both covers.
3. Unscrew the two screws and remove the headlight unit.
4. Unscrew the lamp holder by turning it counterclockwise.
5. Remove the bulb from the socket by pressing it and turning it counterclockwise.
6. Install the new lamp into the socket.
7. Install the socket into the headlight unit. To secure, turn the bulb socket clockwise.
8. Reinstall the headlight assembly and tighten the two screws removed earlier.
9. Close the back door.
Rear lights and brake lights (lED)
Contact a service station to have them checked and replaced.
Side direction indicator lamps
If the turn signal lamp on the outside rearview mirror does not work, contact a service station.
Center high brake light
If the center high brake light does not work, contact a service station.
Rear fog lights
Contact a service station to replace the LED lights.
License plate light
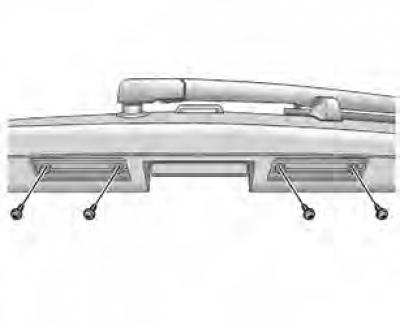
1. Unscrew the two screws and remove the headlight cover.
2. To remove the socket from the flashlight, rotate it clockwise.
3. Remove the lamp from the socket.
4. Replace the lamp.
5. Install the socket into the flashlight by turning it clockwise.
6. Install the lantern cover.
Entrance lighting lamps
1. To remove, pry up the opposite side of the lamp switch with a flat-blade screwdriver. (Be careful not to scratch it!)
2. Remove the lamp.
3. Replace the lamp.
4. Install the headlight assembly.