
ChevyMan.ru
Mazda Mitsubishi Toyota Land Rover Honda Kia Nissan
English Русский
Български
Беларускі
Український
Српски
Hrvatski
Română
Polski
Slovenský
Magyar
|
Articles | Sitemap | Contacts |


Home   Aveo   Captiva   Cruze   Lacetti   Lanos   Niva   Tahoe   Others  
Lacetti 1 (2002-2009)
  • Home
  • Lacetti
  • J200 (2002-2009)
  • General information
  • User manual
  • Replacement of outdoor lighting lamps

Replacement of outdoor lighting lamps (Chevrolet Lacetti J200)

            0

According to paragraphs 2.3.1 and 19.1 of the Traffic Regulations of the Russian Federation, it is prohibited to drive a car in the dark or in conditions of poor visibility without the low beam headlights and side lights in the rear lights on. Therefore, on the road, if you find that at least one of these lamps is not lit, you must stop and replace the lamp.

If one of the parking light bulbs in the rear lights does not light, you can temporarily turn on the fog lights.

In the dark, in clear weather, the fog light will have a blinding effect on drivers of vehicles moving behind your car. Therefore, try to replace the side light bulb in the rear light with a working one as soon as possible.


Operations for replacing lamps in the rear lights of cars with different types of bodies are shown in the work Replacing the bulbs in the rear light, removing the light.

On a car with any body type, two-filament parking light and brake light lamps of the P21/5 W type are used.

To replace the low/high beam lamp in any of the headlights of a hatchback vehicle, it is more convenient to remove the headlight (see Removal the headlight). However, with a certain amount of skill, you can replace the bulb in any of the headlights without removing it from the car. When replacing the bulb in the right headlight, you don't need to remove anything else. When replacing the bulb in the left headlight, you may need to remove the battery, but this will reset the settings of the radio and some other car systems. It will be difficult to remove the bulb from the left headlight without removing the battery (although it is possible).


For clarity, we show this operation on the left headlight, removed from the car (on the right headlight the actions are performed similarly).
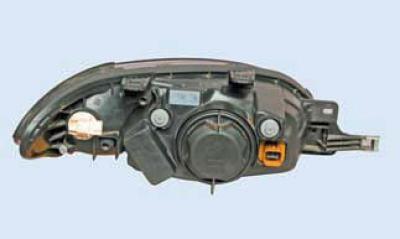
For clarity, we show this operation on the left headlight, removed from the car (on the right…


We turn the cover from the inside of the headlight unit by special protrusions 1/8 of a turn counterclockwise.

In this case, these protrusions will be positioned vertically.
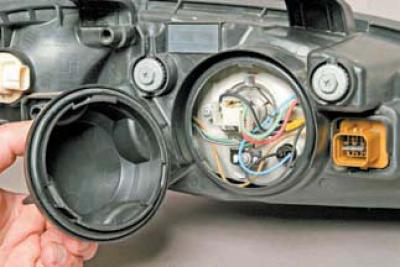
In this case, these protrusions will be positioned vertically.


We remove the cover.
We remove the cover.


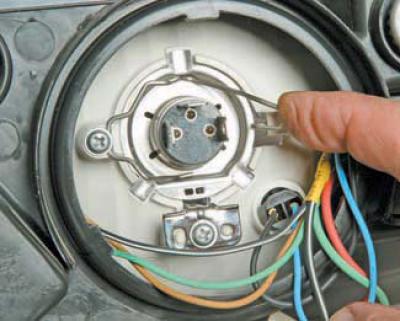
Disconnect the wiring harness from the low/high beam lamp.


Disconnect the wiring harness from the low/high beam lamp.


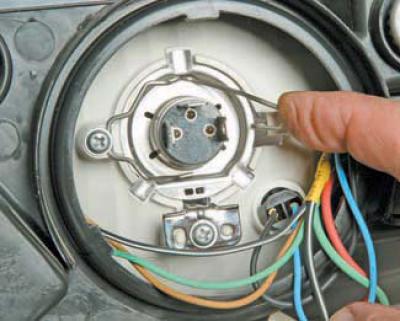
Press down on the spring clip of the lamp and disengage it from the hook on the headlight housing.

We move the spring retainer to the side..
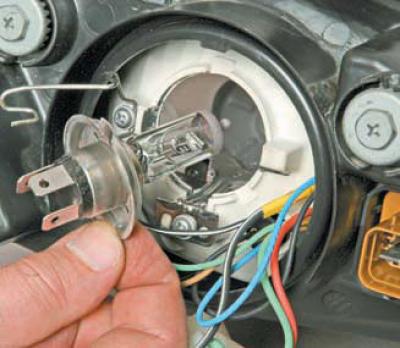
We move the spring retainer to the side..


…and we take out the lamp.

The low/high beam lamp model used on hatchback vehicles is H4.

Install the new headlight bulb in the reverse order. When installing the bulb without removing the headlight from the car, orient the bulb so that the widest of the three antennae on its body (shown in the photo by an arrow) was located at the top.

On cars with sedan and station wagon bodies, the headlight unit has a different shape, in addition, separate high and low beam lamps are used here. It is possible to replace the low beam lamp only after removing the headlight unit (see Removal the headlight).


For clarity, the operation of replacing the low beam lamp is shown on the removed left headlight (on the right headlight the actions are performed similarly).
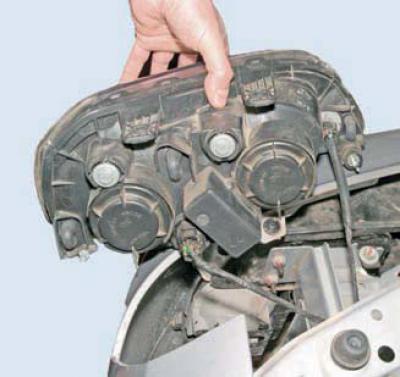
For clarity, the operation of replacing the low beam lamp is shown on the removed left headlight…


The low beam lamp is located under a cover located closer to the wing of the car.
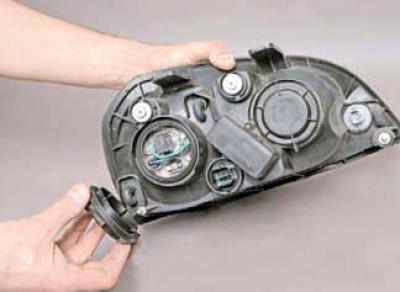
The low beam lamp is located under a cover located closer to the wing of the car.


We turn the lid counterclockwise and remove it.
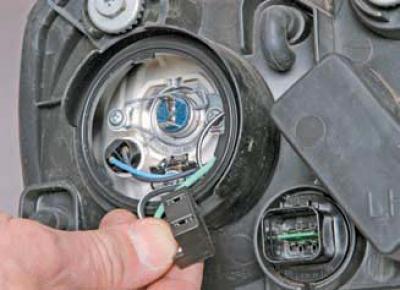
We turn the lid counterclockwise and remove it.


We disconnect the wiring block from the lamp.


We press on the spring clamp of the lamp…
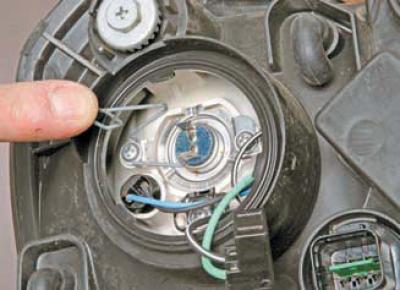
We press on the spring clamp of the lamp…


…and we remove it from engagement with the headlight housing.
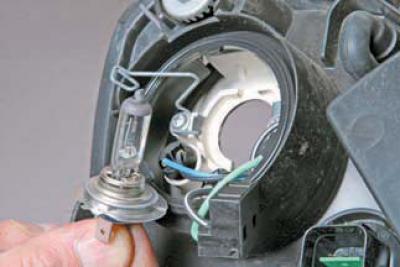
…and we remove it from engagement with the headlight housing.


We remove the lamp from the headlight housing.

The model of the low beam lamp installed in the headlights of cars with sedan and station wagon bodies is H7.

We install the new lamp in the reverse order.

The Chevrolet Lacetti uses halogen headlights.


When working with these lamps, try not to touch the glass bulbs with your fingers.

Traces from them will cause the lamp to darken when heated.

You can remove dirt from the flask with a clean cloth soaked in alcohol.

The article was checked: Vladimir Romannikov
This article is available at russian, bulgarian, belarusian, ukrainian, serbian, croatian, romanian, polish, slovak, hungarian

Share information:

Previous articles
Lacetti 1: User manual
Next articles

Operation of tires
Wheel replacement
Starting the engine from another car's battery («jump-starting»)
Towing a car
Vehicle Passport Data
Lamps used in the car
Fuels, lubricants and operating fluids used
The arrangement of controls and instruments of a sedan car
The arrangement of controls and instruments of cars with a hatchback or station wagon body


See similar articles on the topic of Chevrolet cars:
Scheme 8a. Outdoor lighting Chevrolet Aveo T300 (2012-2018)
Outdoor lighting Chevrolet Captiva 1 (2006-2018)
Scheme 14. Interior lighting lamps Chevrolet Cruze 1 (2008-2016)
Replacement of outdoor lighting lamps Chevrolet Lanos T150 (2002-2009)
Replacing lamps Chevrolet Niva 1 (2002-2016)
Schematic diagram of outdoor lighting devices Chevrolet Tahoe 1 (1992-2000)
Replacing lamps in lighting fixtures Chevrolet Lumina 1 (1989-1994)
Link in different formats to this page


Visitor comments

No comments yet


How much will 47 + 46 =


Lacetti 1 (2002-2009) 
  • General information
  • User manual
  • Maintenance
  • Power unit
  • Engine repair
  • Control system
  • Supply system
  • Cooling system
  • Exhaust system
  • Transmission
  • Clutch
  • Manual gearbox
  • Front wheel drives
  • Chassis
  • Front suspension
  • Rear suspension
  • Steering
  • Brake system
  • Body
  • Repair of body elements
  • Heating and air conditioning
  • Electrical equipment
  • Engine electrics
  • Lighting and lamps
  • Equipment and devices
  • Electrical circuits


ChevyMan.ru © 2017-2026 · Mobile version · Feedback · Site search · Interesting to read · Sitemap: EN BG BY UA RS HR RO PL SK HU

Aveo 2003-2008 · Aveo 2006-2011 · Aveo 2012-2018 · Captiva 2006-2018 · Cruze 2008-2016 · Lacetti 2002-2009 · Lanos 2002-2009 · Niva 2002-2016 · Tahoe 1992-2000 · Tahoe 2000-2014 · Lumina 1 1989-1994 · Trailblazer 1 2001-2008 · Orlando 1 2010-2018 ·
🛡️ For your security and to improve our service, this site uses cookies. You can disable them in your browser.