
Repair of car body elements Chevrolet Lacetti 1

Car body structure
Removable body parts (hatchback): 1 - radiator trim; 2 - Front bumper trim; 3 - energy absorbing beam of the front bumper; 4 — hood; 5 - front wing; 6 -...
Removable body parts (hatchback): 1 - radiator trim; 2 - Front bumper trim; 3 - energy absorbing beam of the front bumper; 4 — hood; 5 - front wing; 6 -...

Removal the radiator grille
The trim is made as a separate element on a car with a hatchback body, and on cars with sedan and station wagon bodies - together with the bumper. We carry out...
The trim is made as a separate element on a car with a hatchback body, and on cars with sedan and station wagon bodies - together with the bumper. We carry out...

Removal the engine compartment mudguards
We remove the right shield if it is necessary to access the auxiliary drive belts and the engine timing belt, or if the mud shield is damaged. We remove the...
We remove the right shield if it is necessary to access the auxiliary drive belts and the engine timing belt, or if the mud shield is damaged. We remove the...

Removal the front wheel arch liners
We remove the mudguards for replacement and anti-corrosion treatment of the body. We show the operations on the left wheel fender liner. We remove the right...
We remove the mudguards for replacement and anti-corrosion treatment of the body. We show the operations on the left wheel fender liner. We remove the right...

Removal the hood lock, replacing the lock drive cable
We remove the hood lock for cleaning and lubrication in case of malfunctions, as well as for replacement. We change the lock drive cable if it jams, stretches...
We remove the hood lock for cleaning and lubrication in case of malfunctions, as well as for replacement. We change the lock drive cable if it jams, stretches...

Removal the hood
We remove the hood if it needs to be replaced or repaired, as well as when removing the engine. Disconnect the windshield washer fluid supply pipe from the...
We remove the hood if it needs to be replaced or repaired, as well as when removing the engine. Disconnect the windshield washer fluid supply pipe from the...

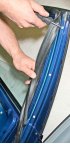
Removal the front bumper
We carry out the work during repair and replacement of the front bumper and the energy-absorbing bumper beam. The work is shown on a car with a hatchback body....
We carry out the work during repair and replacement of the front bumper and the energy-absorbing bumper beam. The work is shown on a car with a hatchback body....

Removal the rear bumper
We carry out the work during repair and replacement of the rear bumper trim and its energy-absorbing beam. The operation is shown on a hatchback car. Using a 7...
We carry out the work during repair and replacement of the rear bumper trim and its energy-absorbing beam. The operation is shown on a hatchback car. Using a 7...

Removal the outside rearview mirror
We carry out the work when repairing or replacing a mirror. We show the operations on the left mirror. The right mirror is removed in the same way. Having...
We carry out the work when repairing or replacing a mirror. We show the operations on the left mirror. The right mirror is removed in the same way. Having...

Removal the front door trim
We carry out the work when replacing the window lifter, glass, interior door lock, cylinder lock mechanism, external and internal door handles. The work is...
We carry out the work when replacing the window lifter, glass, interior door lock, cylinder lock mechanism, external and internal door handles. The work is...

Removal the front door glass
We carry out the work when replacing glass. Remove the front door trim (see Removal the front door trim ). The moisture-proof film can only be peeled off from...
We carry out the work when replacing glass. Remove the front door trim (see Removal the front door trim ). The moisture-proof film can only be peeled off from...

Removal the front door electric window mechanism
We are carrying out work to replace the electric window mechanism. The work is shown on the driver's door. The electric window mechanism of the right front...
We are carrying out work to replace the electric window mechanism. The work is shown on the driver's door. The electric window mechanism of the right front...

Removal the inside front door handle
We remove the inner handle for replacement or when removing the entire door lock mechanism. Remove the front door trim (see Removal the front door trim ). In...
We remove the inner handle for replacement or when removing the entire door lock mechanism. Remove the front door trim (see Removal the front door trim ). In...

Removal the lock cylinder and the outer handle of the front door
We remove the door lock cylinder and the outer handle of the front door for replacement. Before starting work, the door glass should be moved to the upper...
We remove the door lock cylinder and the outer handle of the front door for replacement. Before starting work, the door glass should be moved to the upper...

Removal the door lock
We carry out the work when replacing the lock or its rods. Before starting the work, we raise the glass. Remove the front door trim and moisture-proof film...
We carry out the work when replacing the lock or its rods. Before starting the work, we raise the glass. Remove the front door trim and moisture-proof film...

Removal the rear door trim
We carry out the work when replacing the window lifter, glass, door lock, outer and inner door handles. Overcoming the resistance of the clamps, we remove the...
We carry out the work when replacing the window lifter, glass, door lock, outer and inner door handles. Overcoming the resistance of the clamps, we remove the...
Removal the rear door glass
We carry out the work when replacing door glass. The proposed sequence of work allows it to be completed as quickly as possible, with minimal disassembly, but...
We carry out the work when replacing door glass. The proposed sequence of work allows it to be completed as quickly as possible, with minimal disassembly, but...

Removal the rear door window lift mechanism
We are carrying out work to replace the window lift mechanism. Remove the door trim (see Removal the rear door trim ). We unscrew the screws that secure the...
We are carrying out work to replace the window lift mechanism. Remove the door trim (see Removal the rear door trim ). We unscrew the screws that secure the...

Removal the inner rear door handle
We remove the inner handle for replacement or when removing the entire door lock mechanism. Remove the rear door trim (see Removal the rear door trim ). In...
We remove the inner handle for replacement or when removing the entire door lock mechanism. Remove the rear door trim (see Removal the rear door trim ). In...

Removal the outer rear door handle
We remove the outer handle of the rear door to replace it. Before starting work, the door glass should be moved to the upper position. Remove the door trim...
We remove the outer handle of the rear door to replace it. Before starting work, the door glass should be moved to the upper position. Remove the door trim...

Removal the rear door lock
We carry out the work when replacing the lock, external and internal door handles. Remove the door trim (see Removal the rear door trim ) and glass (see...
We carry out the work when replacing the lock, external and internal door handles. Remove the door trim (see Removal the rear door trim ) and glass (see...

Removal the trunk trim
We remove the trunk trim to access the mounting points of the rear bumper and the upper ends of the rear suspension shock absorber struts. We take out the...
We remove the trunk trim to access the mounting points of the rear bumper and the upper ends of the rear suspension shock absorber struts. We take out the...

Removal the trunk lid trim
We remove the trim to access the additional brake light, the inner sections of the rear lights (hatchback) and the door lock. Pulling it towards you, we remove...
We remove the trim to access the additional brake light, the inner sections of the rear lights (hatchback) and the door lock. Pulling it towards you, we remove...

Removal the cylinder mechanism of the luggage compartment door lock
We perform the work when replacing the cylinder mechanism (cylinder) of the lock. We remove the trim of the luggage compartment door (see Removal the trunk lid...
We perform the work when replacing the cylinder mechanism (cylinder) of the lock. We remove the trim of the luggage compartment door (see Removal the trunk lid...

Removal the tailgate lock
We carry out the work to lubricate the lock and its drive, as well as when replacing the lock. Remove the trim of the luggage compartment door, see. Removal...
We carry out the work to lubricate the lock and its drive, as well as when replacing the lock. Remove the trim of the luggage compartment door, see. Removal...

Removal the electric drive of the luggage compartment door lock
We perform the work when replacing the electric drive of the lock. The electric drive is located in the cavity of the luggage compartment door. Disconnect the...
We perform the work when replacing the electric drive of the lock. The electric drive is located in the cavity of the luggage compartment door. Disconnect the...

Removal the rear section of the floor tunnel trim
We carry out the work by removing the front part of the floor tunnel trim, adjusting the parking brake and removing the parking brake lever. We move the front...
We carry out the work by removing the front part of the floor tunnel trim, adjusting the parking brake and removing the parking brake lever. We move the front...

Removal the front section of the floor tunnel lining
We remove the front part of the floor tunnel to access the gearbox control mechanism, the electrical outlet wiring block and when removing the instrument...
We remove the front part of the floor tunnel to access the gearbox control mechanism, the electrical outlet wiring block and when removing the instrument...

Removal the lower instrument panel trim
We remove the lower trim of the instrument panel to access the wiring harnesses located in the lower part of the panel when removing the hood lock drive cable,...
We remove the lower trim of the instrument panel to access the wiring harnesses located in the lower part of the panel when removing the hood lock drive cable,...

Removal the glove compartment
We remove the glove box to access the electrical wiring harnesses and the heater flap cable drive, as well as when removing the instrument panel. Using a...
We remove the glove box to access the electrical wiring harnesses and the heater flap cable drive, as well as when removing the instrument panel. Using a...

Removal the instrument panel
We perform the work to replace the instrument panel, the panel wiring harness and the elements of the heating, ventilation and air conditioning system. The...
We perform the work to replace the instrument panel, the panel wiring harness and the elements of the heating, ventilation and air conditioning system. The...
This section is available at russian, bulgarian, belarusian, ukrainian, serbian, croatian, romanian, polish, slovak, hungarian
See similar sections on Chevrolet cars:
Body: Repair of body elements Chevrolet Lanos T150 (2002-2009)
Body: Repair of body elements Chevrolet Tahoe 1 (1992-2000)
Body: Repair of body elements Chevrolet Lumina 1 (1989-1994)
Body: Repair of body elements Chevrolet Lanos T150 (2002-2009)
Body: Repair of body elements Chevrolet Tahoe 1 (1992-2000)
Body: Repair of body elements Chevrolet Lumina 1 (1989-1994)
Share information:
- General information
- User manual
- Maintenance
- Power unit
- Engine repair
- Control system
- Supply system
- Cooling system
- Exhaust system
- Transmission
- Clutch
- Manual gearbox
- Front wheel drives
- Chassis
- Front suspension
- Rear suspension
- Steering
- Brake system
- Body
- Repair of body elements
- Heating and air conditioning
- Electrical equipment
- Engine electrics
- Lighting and lamps
- Equipment and devices
- Electrical circuits