
ChevyMan.ru
Mazda Mitsubishi Toyota Land Rover Honda Kia Nissan
English Русский
Български
Беларускі
Український
Српски
Hrvatski
Română
Polski
Slovenský
Magyar
|
Articles | Sitemap | Contacts |


Home   Aveo   Captiva   Cruze   Lacetti   Lanos   Niva   Tahoe   Others  
Lanos T150 (2002-2009)
  • Home
  • Lanos
  • T150 (2002-2009)
  • General information
  • User manual
  • Changing a wheel on the road

Changing a wheel on the road (Chevrolet Lanos T150)

            0

It is advisable to carry out the work on a level area with a hard surface.

Driving a car with a damaged tire at high speed is dangerous, and prolonged driving at low speed leads to complete destruction of the tire and damage to the wheel. Therefore, a punctured wheel must be replaced immediately, having pulled over to the side of the road. In accordance with the requirements of the Road Traffic Regulations, in this case, you must turn on the hazard warning lights and install an emergency stop sign.


To securely fix the car, engage the gear and the parking brake, and place a wheel chock or suitable stop under the wheel located diagonally from the one being removed (stone, wooden block, etc.).

The spare wheel is located in the recess of the luggage compartment floor. To access it, open the trunk lid...
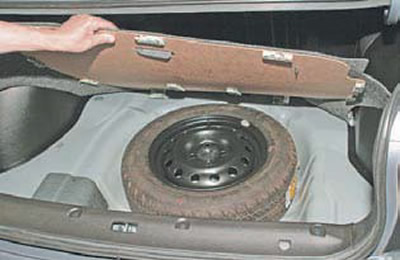
…and lift the mat.

…and lift the mat.

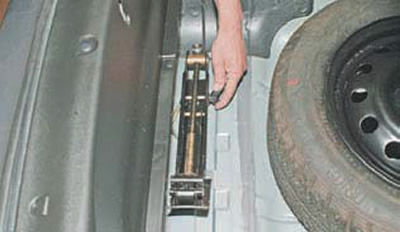
We unscrew the handle that secures the jack to the body bracket...


We unscrew the handle that secures the jack to the body bracket...


...and we take the jack out of the trunk.
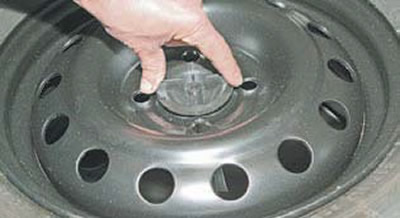
We unscrew the spare wheel holder...


We unscrew the spare wheel holder...

...and we take the wheel out of the trunk.
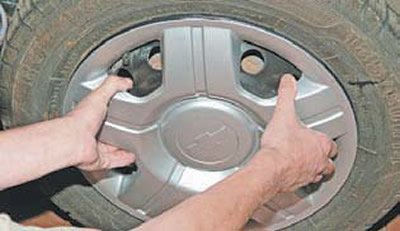
Using both hands, pull the decorative cap off the wheel rim, overcoming the force of the spring…


Using both hands, pull the decorative cap off the wheel rim, overcoming the force of the spring ring.
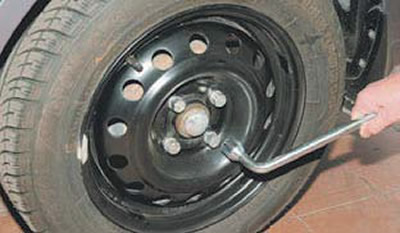
Using the standard wheel wrench, loosen the bolts securing the wheel to be removed.


Using the standard wheel wrench, loosen the bolts securing the wheel to be removed.


Before lifting the car, passengers must leave the car. Install the jack.
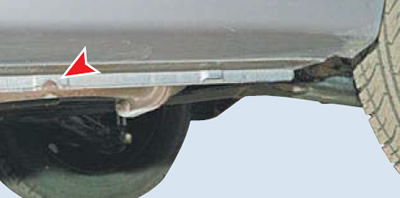
...in the place where a cutout is made in the threshold flanging (the rear part of the car's…


...in the place where a cutout is made in the threshold flanging (the rear part of the car's threshold is shown).

There is a similar place on the side of the front wheel. Before moving the jack under the car, increase the height of the jack by turning the handle and install it on a flat surface, for example, on a thick wide board. Continuing to turn the jack handle, lift the car until the wheel being replaced comes off the road surface.

We unscrew the wheel mounting bolts.
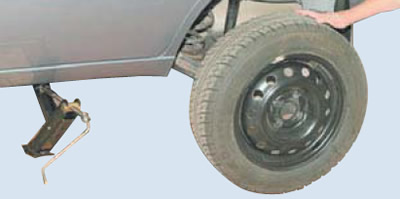
...and remove the wheel.


...and remove the wheel.

We install the spare wheel so that its mounting holes match the holes in the wheel hub, and tighten the mounting bolts until they stop by hand, ensuring that the conical parts of the bolt heads match the holes in the wheel. We tighten the bolts with a wheel wrench, holding the wheel with our hand.


We lower the car and evenly (criss-cross) tighten the bolts to a torque of 90 Nm (a force of about 36 kg·must be applied to the end of a 250 mm long wrench handle).

We check the pressure in the spare tire and, if necessary, bring it up to the norm (see "Checking the condition of wheels and tires").

If the car is equipped with light alloy wheels, their replacement is performed in a similar manner.

If the spare wheel is steel, it can be installed instead of an alloy wheel only if it has a tire that is identical in size and tread pattern to the tire of the wheel being replaced. It should be remembered that the bolts for fastening a steel wheel are usually shorter than the bolts for fastening an alloy wheel. At the first opportunity, the steel spare wheel should be replaced with an alloy wheel - with a repaired or new tire.

(The original article can be found on the resource ChevyMan)

The article was checked: Vladimir Romannikov
This article is available at russian, bulgarian, belarusian, ukrainian, serbian, croatian, romanian, polish, slovak, hungarian

Share information:

Previous articles
Lanos T150: User manual
Next articles

Features of winter operation
Wheels and tires
Rear view mirrors
Steering column switches
Location of switches
Replacement of outdoor lighting lamps
Starting the engine from another car's battery (jump-starting)
Towing a car


See similar articles on the topic of Chevrolet cars:
Adjusting the position of the steering wheel Chevrolet Aveo T300 (2012-2018)
Adjusting the position of the steering wheel Chevrolet Captiva 1 (2006-2018)
Steering wheel-mounted controls Chevrolet Cruze 1 (2008-2016)
Wheel replacement Chevrolet Lacetti 1 (2002-2009)
Adjusting the position of the steering wheel Chevrolet Niva 1 (2002-2016)
Removal the worn wheel and installing the spare Chevrolet Tahoe 1 (1992-2000)
Removal, repair and installation of the rear wheel brake cylinder Chevrolet Lumina 1 (1989-1994)
Link in different formats to this page


Visitor comments

No comments yet


How much will 13 + 27 =


Lanos T150 (2002-2009) 
  • General information
  • User manual
  • Maintenance
  • Troubleshooting
  • Power unit
  • Engine repair
  • Control system
  • Supply system
  • Cooling system
  • Exhaust system
  • Transmission
  • Clutch
  • Car gearbox
  • Front wheel drives
  • Chassis
  • Front suspension
  • Rear suspension
  • Steering
  • Brake system
  • Body
  • Repair of body elements
  • Heating and air conditioning
  • Electrical equipment
  • Engine electrics
  • Lighting and lamps
  • Equipment and devices
  • Electrical circuits


ChevyMan.ru © 2017-2026 · Mobile version · Feedback · Site search · Interesting to read · Sitemap: EN BG BY UA RS HR RO PL SK HU

Aveo 2003-2008 · Aveo 2006-2011 · Aveo 2012-2018 · Captiva 2006-2018 · Cruze 2008-2016 · Lacetti 2002-2009 · Lanos 2002-2009 · Niva 2002-2016 · Tahoe 1992-2000 · Tahoe 2000-2014 · Lumina 1 1989-1994 · Trailblazer 1 2001-2008 · Orlando 1 2010-2018 ·
🛡️ For your security and to improve our service, this site uses cookies. You can disable them in your browser.