
ChevyMan.ru
Mazda Mitsubishi Toyota Land Rover Honda Kia Nissan
English Русский
Български
Беларускі
Український
Српски
Hrvatski
Română
Polski
Slovenský
Magyar
|
Articles | Sitemap | Contacts |


Home   Aveo   Captiva   Cruze   Lacetti   Lanos   Niva   Tahoe   Others  
Orlando 1 (2010-2018) Trailblazer 1 (2001-2008, petrol) Lumina 1 (1989-1994)
  • Home
  • Chevrolet
  • Lumina 1
  • Chassis
  • Brake system
  • Removal, repair and installation of the rear wheel brake cylinder

Removal, repair and installation of the rear wheel brake cylinder (Chevrolet Lumina 1)

            0

Contents: Removal ↧ Repair ↧ Installation ↧
Caution! This operation should not be performed on vehicles equipped with ABS, as special equipment is required to properly bleed such brakes. Take the vehicle to a service shop or other repair shop that has the necessary tools.


Removal


1. Raise the rear of the vehicle and support it securely on stands.

2. Remove the brake pads (see section 5).

3. Carefully remove all dirt around the wheel cylinder.

4. Disconnect the brake hose (see illustration). Do not pull the brake line away from the wheel cylinder.
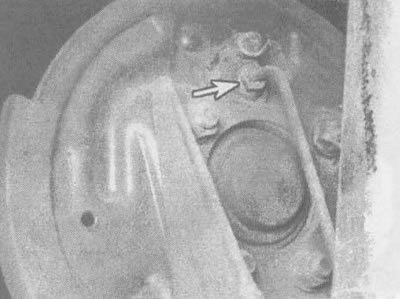
6.4. To disconnect the brake pipe, you must use a special key (open-end wrench) (the brake pipe is…

6.4. To disconnect the brake pipe, you must use a special key (open-end wrench) (the brake pipe is indicated by the arrow)


5. Remove the wheel cylinder from the brake shield and place it on a clean work bench. Plug the brake lines immediately to prevent brake fluid loss and contamination.

Repair


6. Unscrew the bleed valve. Remove the seals, pistons, protective covers and extract the spring from the cylinder body (see illustration).
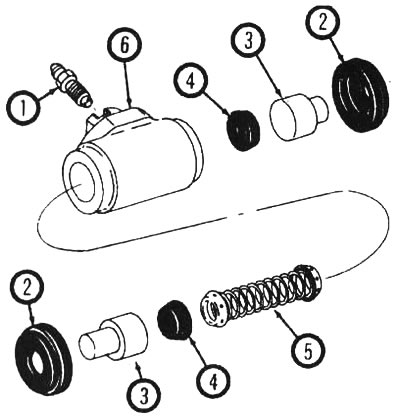
6.6. Details of the working brake cylinder: 1 - bleed valve, 2 - protective cover, 3 - piston, 4 -…

6.6. Details of the working brake cylinder: 1 - bleed valve, 2 - protective cover, 3 - piston, 4 - cuff, 5 - spring, 6 - body of the working brake cylinder


7. Clean the brake cylinder with brake fluid, denatured alcohol or brake cleaner.

Note: Do not use petroleum-based solvents to clean brake parts under any circumstances!


8. To remove excess fluid from the working brake cylinder, use compressed air and blow out all channels.

9. Check the cylinder for scratches and corrosion. Fine-grain sandpaper can be used to remove small traces of corrosion and stains, but if these defects cannot be removed or there are grooves in the cylinder, the cylinder should be replaced with a new one.

10. Lubricate the new seals with brake fluid.

11. Assemble the wheel cylinder, making sure that the protective boots are in place.

Installation


12. Place the wheel cylinder back in place and use a block of wood to wedge it between the flange and the cylinder body to hold it in place (see illustration).
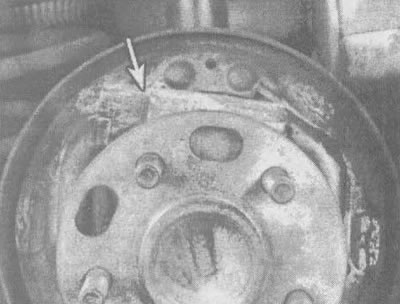
6.12. To hold the wheel cylinder in place, use a wooden block (indicated by the arrow)

6.12. To hold the wheel cylinder in place, use a wooden block (indicated by the arrow)


13. Install the service brake cylinder retainer on top of the latter, using a 1 1/8-inch head to re-install the cylinder.

14. Connect the pipe and install the brake pads.

The article was checked: Vladimir Romannikov
This article is available at russian, bulgarian, belarusian, ukrainian, serbian, croatian, romanian, polish, slovak, hungarian

Share information:

Previous articles
Lumina 1: Brake system
Next articles

Checking and replacing rear brake pads
Checking, removing and installing the brake disc
Removal, repair and installation of disc brake caliper
Replacing disc brake pads
General information about the brake system
Removal, overhaul and installation of the master brake cylinder
Checking and replacing brake hoses and brake lines
Bleeding the brake system
Adjusting the parking brake
Removal and installation parking brake cables


See similar articles on the topic of Chevrolet cars:
Replacing the rear wheel brake slave cylinder Chevrolet Aveo T300 (2012-2018)
Rear wheel brake hose Chevrolet Captiva 1 (2006-2018)
Replacing the rear wheel brake caliper assembly Chevrolet Cruze 1 (2008-2016)
Removal the rear wheel brake disc Chevrolet Lacetti 1 (2002-2009)
Replacing the rear wheel brake cylinder Chevrolet Lanos T150 (2002-2009)
Disassembly and assembly of rear brake wheel cylinders Chevrolet Niva 1 (2002-2016)
Rear Brake Wheel Cylinder — Removal, Disassembly and Installation Chevrolet Tahoe 1 (1992-2000)
Link in different formats to this page


Visitor comments

No comments yet


How much will 10 + 48 =


Orlando 1 (2010-2018) 
  • General information
  • Introduction to manual
  • User manual
  • Maintenance
  • Troubleshooting
  • Power unit
  • Engine repair
  • Fuel and control system
  • Cooling and lubrication system
  • Ignition system
  • Transmission
  • Clutch
  • Gearbox
  • Drive shafts
  • Chassis
  • Car suspension
  • Steering
  • Brake system
  • Body
  • Exterior (external elements)
  • Doors, locks and windows
  • Electrical equipment
  • Equipment and devices
  • Windscreen wipers
  • Power devices
  • Electrical diagrams


Trailblazer 1 (2001-2008) 
  • General information
  • User manual
  • Troubleshooting
  • Maintenance
  • Power unit
  • Engine in a car
  • Engine overhaul
  • Cooling and heating
  • Fuel and exhaust system
  • Engine electrical equipment
  • Engine control
  • Transmission
  • Automatic gearbox
  • Transfer case
  • Drive shafts and cardan
  • Chassis
  • Brake system
  • Car suspension
  • Steering
  • Body
  • Exterior (external elements)
  • Interior (internal elements)
  • Doors, locks and windows
  • Electrical equipment
  • Equipment and devices
  • Electrical circuits


Lumina 1 (1989-1994) 
  • General information
  • Maintenance
  • Power unit
  • Engine 3.1L V6
  • Engine 3.8L V6
  • Engine overhaul
  • Cooling system
  • Power and exhaust system
  • Fuel injection
  • Engine electrical equipment
  • Reduced exhaust gas toxicity
  • Transmission
  • Automatic gearbox
  • Drive shafts
  • Chassis
  • Brake system
  • Car suspension
  • Steering
  • Body
  • Heating and air conditioning
  • Repair of body elements
  • Doors, covers and windows
  • Interior (internal elements)
  • Electrical equipment
  • Equipment and devices
  • Electrical circuits


ChevyMan.ru © 2017-2026 · Mobile version · Feedback · Site search · Interesting to read · Sitemap: EN BG BY UA RS HR RO PL SK HU

Aveo 2003-2008 · Aveo 2006-2011 · Aveo 2012-2018 · Captiva 2006-2018 · Cruze 2008-2016 · Lacetti 2002-2009 · Lanos 2002-2009 · Niva 2002-2016 · Tahoe 1992-2000 · Tahoe 2000-2014 · Lumina 1 1989-1994 · Trailblazer 1 2001-2008 · Orlando 1 2010-2018 ·
🛡️ For your security and to improve our service, this site uses cookies. You can disable them in your browser.