ChevyMan.ru
Mazda Mitsubishi Toyota Land Rover Honda Kia Nissan
English Русский
Български
Беларускі
Український
Српски
Hrvatski
Română
Polski
Slovenský
Magyar
|
Articles | Sitemap | Contacts |


Home   Aveo   Captiva   Cruze   Lacetti   Lanos   Niva   Tahoe   Others  
Orlando 1 (2010-2018) Trailblazer 1 (2001-2008, petrol) Lumina 1 (1989-1994)
  • Home
  • Chevrolet
  • Lumina 1
  • Chassis
  • Brake system
  • Checking, removing and installing the brake disc

Checking, removing and installing the brake disc (Chevrolet Lumina 1)

            0

Contents: Examination ↧ Removal ↧ Installation ↧

Examination


1. Loosen the wheel nuts, raise the vehicle and securely support it on struts. Remove the wheel and tighten the three wheel nuts (flat side to the disk), to hold the disk in place.

2. Remove the brake caliper as described in section 3. There is no need to disconnect the brake hose. After unscrewing the caliper bolts, hang the caliper on a wire (see illustration).
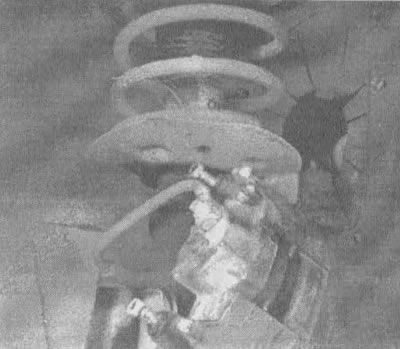
4.2. Hang the support on the wire whenever it is necessary to change its position (do not leave it…

4.2. Hang the support on the wire whenever it is necessary to change its position (do not leave it hanging on the brake hose!)


3. Inspect the surface of the disc: check for scratches, grooves and other damage. The presence of small scratches and fine grooves may be considered normal and will not always significantly affect the performance of the brakes, however, deep grooves (more than 0.015 inches (0.38 mm) deep) require the removal of the disc and its regrinding in a workshop. Don't forget to check both sides of the disc (see illustration). If you notice pulsations when pressing the brakes, this may indicate disc beating.
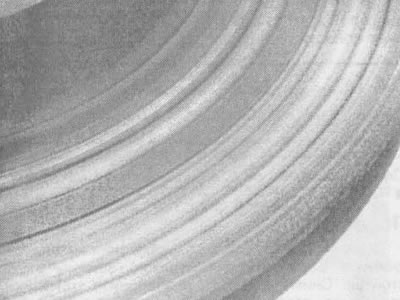
4.3 The brake pads on this car are completely worn out; the disc has deep grooves - the wear is so…

4.3 The brake pads on this car are completely worn out; the disc has deep grooves - the wear is so great that the disc will need to be replaced


4. To check for disc runout, place the indicator at a point approximately 1/2 inch from the outer edge of the disc (see illustration). Set the indicator to zero and turn the dial. The indicator readings must not exceed the maximum allowable runout limit specified in the specifications. If this limit is exceeded, the disc must be reground in a workshop.
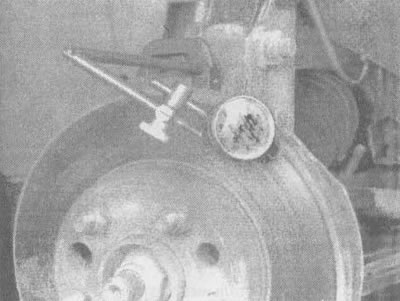
4.4 a. Use the indicator to check for wear by placing the indicator needle approximately 1/2 inch…

4.4 a. Use the indicator to check for wear by placing the indicator needle approximately 1/2 inch away from the outer edge


Note: It is recommended to re-grind regardless of the indicator readings, as this will provide a smooth surface and ensure the absence of brake pedal pulsation and other disc-related problems. If you decide not to re-sand the wheels, at least remove the polish ("glaze") from the surface using medium-grit sandpaper, using circular motions (see illustration).
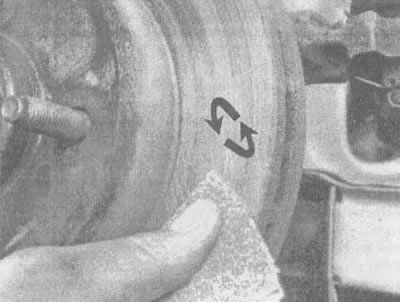

4.46. If you decide not to regrind the wheels, at least remove the polish («glaze») from the…

4.46. If you decide not to regrind the wheels, at least remove the polish ("glaze") from the surfaces using sandpaper


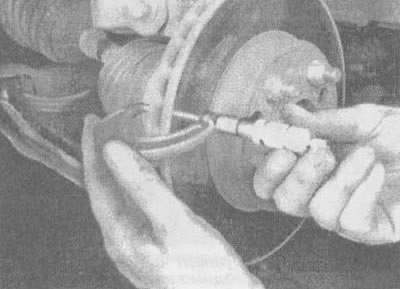
5. It is absolutely unacceptable to grind the disc when its thickness is below the permissible limit. The minimum thickness at which the disc must be replaced is cast on the inside of the disc (see illustration). It should not be confused with the minimum thickness at which regrinding of the disc is permissible. The thickness of the disc can be checked using a micrometer (see illustration).
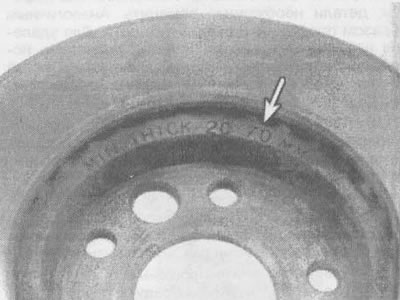
4.5a. Thickness at which the disc must be replaced (indicated by the arrow), cast on the inside of…

4.5a. Thickness at which the disc must be replaced (indicated by the arrow), cast on the inside of the disc
4.5b. Measure the thickness of the disc with a micrometer

4.5b. Measure the thickness of the disc with a micrometer

Removal


6. Remove the wheel nuts that were tightened to hold the disc in place and remove the disc from the hub.

Installation


7. Place the disc over the studs.


8. Install the caliper and brake pads onto the disc and place them on the steering knuckle (see section 3, which contains a description of the caliper installation procedure). Tighten the caliper bolts to the torque specified in the specifications in this chapter.

9. Install the wheel, then lower the car to the ground. Press the brake pedal several times to ensure that the brake pads come into contact with the disc. If the brake fluid hose was not disconnected from the caliper, then there is no need to bleed the system. Before using the vehicle in normal conditions, carefully check the operation of the brakes.

(The material was created based on information from the website ChevyMan.ru)

The article was checked: Vladimir Romannikov
This article is available at russian, bulgarian, belarusian, ukrainian, serbian, croatian, romanian, polish, slovak, hungarian

Share information:

Previous articles
Lumina 1: Brake system
Next articles

Removal, repair and installation of disc brake caliper
Replacing disc brake pads
General information about the brake system
Technical data of the brake system
Checking and replacing rear brake pads
Removal, repair and installation of the rear wheel brake cylinder
Removal, overhaul and installation of the master brake cylinder
Checking and replacing brake hoses and brake lines
Bleeding the brake system


See similar articles on the topic of Chevrolet cars:
Checking the brake system Chevrolet Aveo T300 (2012-2018)
Checking the 2nd gear inertia brake (B1) and 2nd gear brake (B2) Chevrolet Captiva 1 (2006-2018)
Checking the parking brake Chevrolet Cruze 1 (2008-2016)
Checking the fluid level in the brake and clutch hydraulic reservoir Chevrolet Lacetti 1 (2002-2009)
Replacing the front wheel brake disc Chevrolet Lanos T150 (2002-2009)
Checking the thickness of the front brake disc Chevrolet Niva 1 (2002-2016)
Lapping in the brake pad and disc Chevrolet Tahoe 2 and 3 (2000-2014)
Link in different formats to this page


Visitor comments

No comments yet


How much will 37 + 31 =


Orlando 1 (2010-2018) 
  • General information
  • Introduction to manual
  • User manual
  • Maintenance
  • Troubleshooting
  • Power unit
  • Engine repair
  • Fuel and control system
  • Cooling and lubrication system
  • Ignition system
  • Transmission
  • Clutch
  • Gearbox
  • Drive shafts
  • Chassis
  • Car suspension
  • Steering
  • Brake system
  • Body
  • Exterior (external elements)
  • Doors, locks and windows
  • Electrical equipment
  • Equipment and devices
  • Windscreen wipers
  • Power devices
  • Electrical diagrams


Trailblazer 1 (2001-2008) 
  • General information
  • User manual
  • Troubleshooting
  • Maintenance
  • Power unit
  • Engine in a car
  • Engine overhaul
  • Cooling and heating
  • Fuel and exhaust system
  • Engine electrical equipment
  • Engine control
  • Transmission
  • Automatic gearbox
  • Transfer case
  • Drive shafts and cardan
  • Chassis
  • Brake system
  • Car suspension
  • Steering
  • Body
  • Exterior (external elements)
  • Interior (internal elements)
  • Doors, locks and windows
  • Electrical equipment
  • Equipment and devices
  • Electrical circuits


Lumina 1 (1989-1994) 
  • General information
  • Maintenance
  • Power unit
  • Engine 3.1L V6
  • Engine 3.8L V6
  • Engine overhaul
  • Cooling system
  • Power and exhaust system
  • Fuel injection
  • Engine electrical equipment
  • Reduced exhaust gas toxicity
  • Transmission
  • Automatic gearbox
  • Drive shafts
  • Chassis
  • Brake system
  • Car suspension
  • Steering
  • Body
  • Heating and air conditioning
  • Repair of body elements
  • Doors, covers and windows
  • Interior (internal elements)
  • Electrical equipment
  • Equipment and devices
  • Electrical circuits


ChevyMan.ru © 2017-2026 · Mobile version · Feedback · Site search · Interesting to read · Sitemap: EN BG BY UA RS HR RO PL SK HU

Aveo 2003-2008 · Aveo 2006-2011 · Aveo 2012-2018 · Captiva 2006-2018 · Cruze 2008-2016 · Lacetti 2002-2009 · Lanos 2002-2009 · Niva 2002-2016 · Tahoe 1992-2000 · Tahoe 2000-2014 · Lumina 1 1989-1994 · Trailblazer 1 2001-2008 · Orlando 1 2010-2018 ·
🛡️ For your security and to improve our service, this site uses cookies. You can disable them in your browser.