
Contents: Examination ↧ Replacement ↧
Examination
1. Approximately every 6 months, the vehicle should be raised, securely supported on stands, and the brake hoses connected to the steel brake pipes on the front and rear brake mechanisms should be checked for cracks, dents in the outer covers, leaks, or other damage. These checks are very important because these parts of the braking system are vulnerable and need to be fully checked. A flashlight and a small mirror can be very helpful when performing a thorough inspection. If the hose shows any signs of the above damage, replace it with a new one.
Replacement
Caution! This operation should not be performed on vehicles equipped with ABS, as special equipment is required to properly bleed such brakes. Take the vehicle to a service shop or other repair shop that has the necessary tools.
Front brake hose
2. Using another wrench to prevent twisting, disconnect the brake hose, making sure not to bend the bracket or brake pipe (see illustrations).

8.2a. Using a small screwdriver, remove the retaining clip from the recess in the end of the brake line |
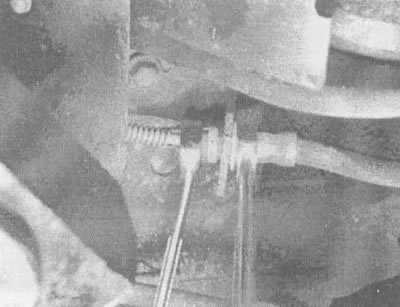
8.2b. When unscrewing the brake hoses, use the second (auxiliary) key to avoid twisting of hoses |
3. Use pliers to remove the U-clamp from the female inlet fitting from the bracket, then separate the hose from the bracket.
4. Remove the bolt from the caliper side of the hose, then remove the hose and copper washers on either side of the bolt.
5. When installing the hose, always use new copper washers on both sides of the bolt and lubricate the bolt threads with clean brake fluid before screwing them in.
6. Once the hose is connected to the caliper mounting collar, attach the hose to the caliper.
7. Without bending the hose, insert the inlet pipe into the hose bracket. It fits into the bracket only in one position.
8. Insert the U-clamp that secures the intake hose into the frame bracket.
9. Using a wrench to prevent the hose from twisting, connect the brake line to the hose.
10. After completing the installation of the brake hose, make sure that there are no kinks in it. Make sure that the hose does not come into contact with any suspension parts. Check this by turning the wheels fully left and right. If the hose comes into contact with other suspension parts, remove the hose and correct the installation position.
Rear brake hose
11. Using the auxiliary key (to avoid twisting), disconnect the hose at both ends, being careful not to bend the bracket or steel pipes (see illustration 8.26).
12. Remove the two U-shaped clamps (clamps) with pliers and separate the intake pipes from the brackets.
13. Loosen the hose retaining clamp and remove the hose.
14. Without twisting the hose, insert its receiving ends into the frame brackets. The hose fits into the bracket only in one position.
15. Insert the U-shaped clamps to secure the ends of the hose to the bracket.
16. Using the auxiliary wrench, connect the steel pipes to the hose. Be careful not to bend the bracket or steel pipe.
17. Make sure that the bracket does not loosen when installing the hose. Tighten the bracket if necessary.
18. Fill the brake master cylinder reservoir and bleed the system (see section 9).
Steel pipes of the brake system
19. If the brake system lines are being replaced, it is important to purchase the appropriate parts. Do not use copper tubing to connect any brake system components. Purchase the correct brake lines from your General Motors dealer or auto parts store.
20. Auto parts stores have brake lines that are fully prepared for installation with connectors installed. Such pipelines are already properly adjusted to shape.
21. If you cannot find fully prepared and properly bent piping, obtain recommended steel piping and fittings that fit the piping being replaced. Determine the required length by measuring the old pipeline (a piece of cord is usually used for this purpose) and cut the new piping lengthwise, adding approximately 0.5 inches to the nut ends.
22. Insert the nipple into the cut end of the pipeline and seal the ends of the pipeline with a special ISO crimping tool.
23. If necessary, carefully bend the pipe to give it the desired shape. It is recommended to use a pipe bender for this purpose.
Caution! Do not damage or pinch the pipeline.
24. When installing a new pipe, make sure that it is well held in the brackets and is well away from moving or hot parts of the car.
25. After installation, check the fluid level in the master cylinder and top up if necessary. Bleed the brake system as described in the next section and road test the brakes before operating the vehicle in normal conditions.
(The original text can be found on the website: «CHEVYMAN.RU»)