
ChevyMan.ru
Mazda Mitsubishi Toyota Land Rover Honda Kia Nissan
English Русский
Български
Беларускі
Український
Српски
Hrvatski
Română
Polski
Slovenský
Magyar
|
Articles | Sitemap | Contacts |


Home   Aveo   Captiva   Cruze   Lacetti   Lanos   Niva   Tahoe   Others  
Niva 1 (2002-2016)
  • Home
  • Niva
  • 1 (2002-2016)
  • Chassis
  • Brake system
  • Replacing the front brake pads

Replacing the front brake pads (Chevrolet Niva 1)

            0

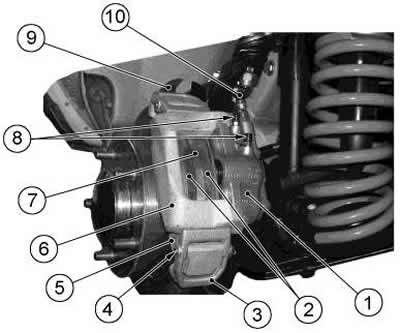
A preliminary assessment of the wear of the linings is carried out with the front wheels removed through the window in the caliper 6 (see figure 6-11). If the thickness of the linings is small, it is necessary to dismantle the pads and measure their remaining thickness.

Figure 6-11. Front wheel brake mechanism:

Figure 6-11. Front wheel brake mechanism:
1 - cylinder block;
2 - brake pads;
3 - caliper clamping lever;
4 - axis of the clamping lever;
5 - shoe guide;
6 - brake caliper;
7 - brake disc;
8 - air bleed nipples;
9 - protective cover;
10 - brake hose.


Replace the pads with new ones in the following cases:
  • if the thickness of the pads has decreased to 1.5 mm;
  • the surface of the linings is oily;
  • the friction lining has separated from the shoe frame;
  • the overlays have large chips and deep grooves.

When replacing the pads with new ones, it is necessary to replace the entire set - on the left and right wheels. It is necessary to install only pads approved by GM-AVTOVAZ. In this case, make sure that all four pads in the set are from the same manufacturer and were manufactured at the same time.

If you do not plan to replace the pads with new ones, you must mark each pad when dismantling and install the pads in the same places when assembling. Mixing up the pads can lead to reduced braking efficiency and uneven braking.


To replace the pads, perform the following operations:
  • unpin and remove the axle of the upper brake caliper pressure lever, remove the pressure lever with springs;
  • move the caliper with the cylinder block up until it is released from the lower clamping lever, remove the caliper and hang it on a technological hook, avoiding tension on the brake hoses;
  • remove worn brake pads from the caliper guide grooves (figure 6-16);
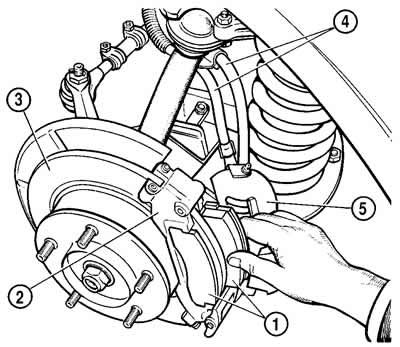
Figure 6-16. Replacing brake pads:

Figure 6-16. Replacing brake pads:
1 - brake pads;
2 - shoe guide;
3 - brake disc;
4 - brake hoses;
5 - cylinder block (complete with support).

  • carefully inspect the pads, paying attention to the presence of chips, cracks, delamination from the frame;
carefully inspect the pads, paying attention to the presence of chips, cracks, delamination from…


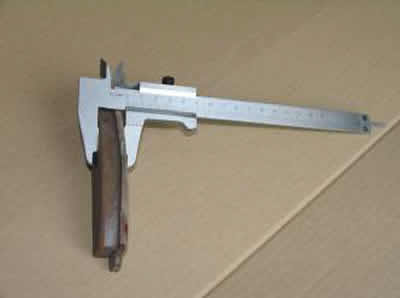
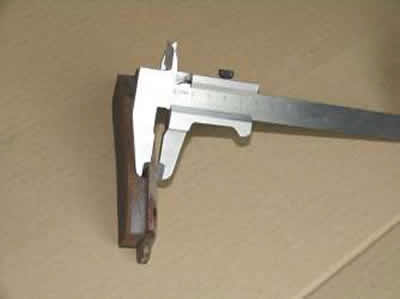
Figure 6-17. Measuring the thickness of brake pads

Figure 6-17. Measuring the thickness of brake pads

  • measure the remaining thickness of the brake lining using a caliper with a measurement accuracy of at least 0.1 mm (figure 6-17);
  • if the thickness of the pads does not exceed 1.5 mm, replace the pads with new ones.
  • check the condition of the piston protective caps, the caps must be in their sockets and not damaged, replace the caps if necessary;
  • unscrew the brake fluid reservoir cap and carefully, so as not to damage the dust caps, push the pistons into the cylinder block. When pushing, monitor the brake fluid level, if necessary, remove some of the brake fluid from the reservoir;
  • install new brake pads into the guide grooves;
  • place the lower guide bevel on the caliper under the lower pressure arm, press the caliper against the pads, install the upper pressure arm with springs, insert the upper pressure arm axle from the wheel side and secure it with a cotter pin.

The article was checked: Vladimir Romannikov
This article is available at russian, bulgarian, belarusian, ukrainian, serbian, croatian, romanian, polish, slovak, hungarian

Share information:

Previous articles
Niva 1: Brake system
Next articles

Checking the runout of the front brake disc
Checking the thickness of the front brake disc
Disassembling and assembling the front brake
Removal and installation the front brake
Front brake device
Rear brake device
Removal and disassembling the rear brake
Assembly and installation of the rear brake
Disassembly and assembly of rear brake wheel cylinders
Checking the rear brake components


See similar articles on the topic of Chevrolet cars:
Replacing the front brake pads Chevrolet Aveo T250 (2006-2011)
Front brake pads — removal and installation Chevrolet Captiva 1 (2006-2018)
Replacing the brake pads of the front wheel brake mechanism Chevrolet Cruze 1 (2008-2016)
Replacing the front brake pads Chevrolet Lacetti 1 (2002-2009)
Replacing the brake pads of the front wheels Chevrolet Lanos T150 (2002-2009)
Brake fluid and pads Chevrolet Tahoe 1 (1992-2000)
Replacing the front brake pads Chevrolet Orlando 1 (2010-2018)
Link in different formats to this page


Visitor comments

No comments yet


How much will 36 + 23 =


Niva 1 (2002-2016) 
  • General information
  • Vehicle device
  • User manual
  • Maintenance
  • Power unit
  • Engine repair
  • Cooling system
  • Lubrication system
  • Power and exhaust system
  • Transmission
  • Clutch
  • Car gearbox
  • Transfer case
  • Cardan gear
  • Rear axle
  • Front axle
  • Chassis
  • Suspension and shock absorbers
  • Steering
  • Brake system
  • Body
  • Exterior (external elements)
  • Interior (internal elements)
  • Ventilation and heating
  • Electrical equipment
  • Power devices
  • Lighting and appliances


ChevyMan.ru © 2017-2026 · Mobile version · Feedback · Site search · Interesting to read · Sitemap: EN BG BY UA RS HR RO PL SK HU

Aveo 2003-2008 · Aveo 2006-2011 · Aveo 2012-2018 · Captiva 2006-2018 · Cruze 2008-2016 · Lacetti 2002-2009 · Lanos 2002-2009 · Niva 2002-2016 · Tahoe 1992-2000 · Tahoe 2000-2014 · Lumina 1 1989-1994 · Trailblazer 1 2001-2008 · Orlando 1 2010-2018 ·
🛡️ For your security and to improve our service, this site uses cookies. You can disable them in your browser.