
ChevyMan.ru
Mazda Mitsubishi Toyota Land Rover Honda Kia Nissan
English Русский
Български
Беларускі
Український
Српски
Hrvatski
Română
Polski
Slovenský
Magyar
|
Articles | Sitemap | Contacts |


Home   Aveo   Captiva   Cruze   Lacetti   Lanos   Niva   Tahoe   Others  
Lacetti 1 (2002-2009)
  • Home
  • Lacetti
  • J200 (2002-2009)
  • Chassis
  • Brake system
  • Replacing the front brake pads

Replacing the front brake pads (Chevrolet Lacetti J200)

            0

We replace the brake pads in the event of the maximum permissible wear of their linings - the minimum thickness of the pad, including its base, must be at least 7 mm.

The pads also need to be replaced when replacing the brake disc, when the linings are oiled or have deep grooves, cracks and chips on them, and also if the linings separate from the base of the pads.

The inner pads are equipped with acoustic wear indicators that begin to make a grinding noise during braking when the pad wear approaches its limit. If a grinding noise is heard during braking, it is time to change the pads.

The front wheel brake pads must only be replaced as a set - all four brake pads.


Replacing the pads of only one brake mechanism can lead to unpredictable pulling of the vehicle to the side when braking.

If the fluid level in the brake hydraulic drive reservoir is at the MAX mark, then before installing new pads, use a syringe or rubber bulb to pump out some of the fluid from the reservoir so that when the piston is pressed into the working cylinder of the brake mechanism, the fluid does not flow out from under the reservoir cap.

We remove the front wheel.

By inserting a mounting blade or a screwdriver with a wide blade between the brake shoe guide and the caliper and resting it on the guide…
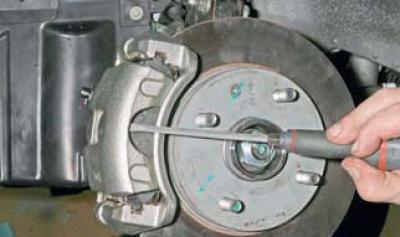
By inserting a mounting blade or a screwdriver with a wide blade between the brake shoe guide and…


…we move the caliper, pressing the piston into the cylinder.
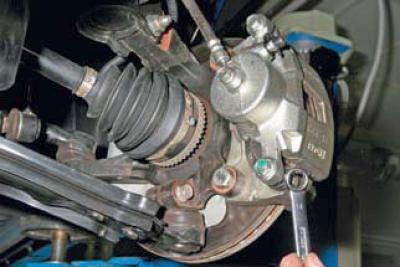


…we move the caliper, pressing the piston into the cylinder.


Using a 14 mm open-end wrench, unscrew the lower bolt securing the caliper to the guide pin.
Using a 14 mm open-end wrench, unscrew the lower bolt securing the caliper to the guide pin.


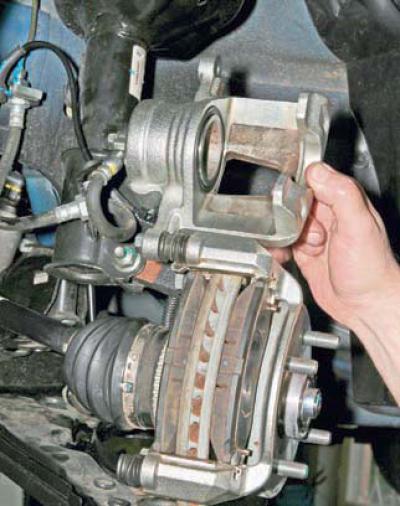
We lift the caliper by turning it around the axis of the upper guide pin.
We lift the caliper by turning it around the axis of the upper guide pin.


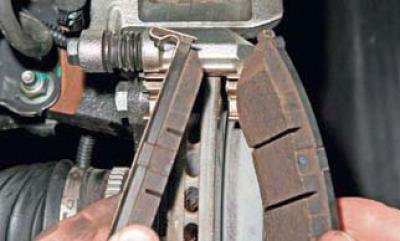
We remove the brake pads from their guide.
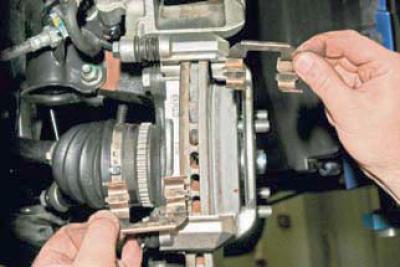
We remove the brake pads from their guide.


We remove two spring clamps of the brake pads.


Using a metal brush, we clean dirt and corrosion from the seating areas of the pads in their guide.

Before installing new pads, check the condition of the protective covers of the guide pins.

We replace a torn or lost elastic cover.

For this…
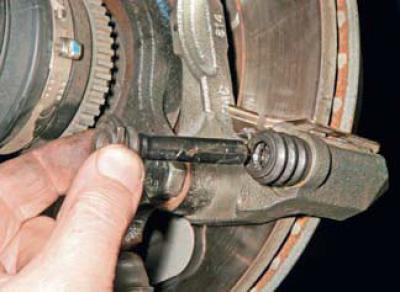
For this…


…we remove the finger from the hole in the brake shoe guide…
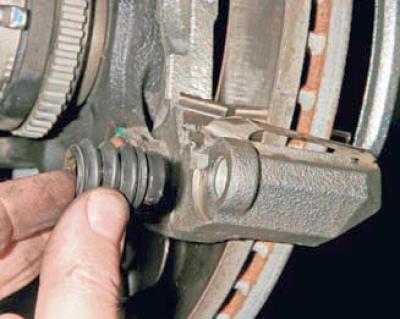
…we remove the finger from the hole in the brake shoe guide…


…and a cover.

Before installing the pin, put a little plastic grease into the hole in the shoe guide and apply a thin layer of grease to the surface of the pin.

Before installing new brake pads, it is necessary to move the piston as far into the cylinder as possible.
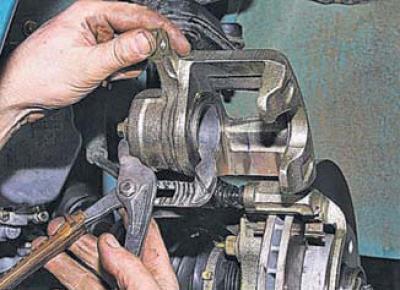
Before installing new brake pads, it is necessary to move the piston as far into the cylinder as…


To do this, use sliding pliers to push the piston into the cylinder.


We install new brake pads into the pad guide and lower the caliper.

We replace the pads on the other side of the car in the same way.

After replacing the pads, press the brake pedal several times to set the gaps between the pads and the discs. Check the fluid level in the reservoir and top it up to normal if necessary.

During operation, the surface of the brake disc becomes uneven, as a result of which the contact area of the new, not yet worn-in pads with the disc decreases. Therefore, during the first 100 km of mileage after replacing the pads, until the new pads are worn-in, be careful, as the braking distance of the car may increase.

For details, visit the website: CHEVYMAN

The article was checked: Vladimir Romannikov
This article is available at russian, bulgarian, belarusian, ukrainian, serbian, croatian, romanian, polish, slovak, hungarian

Share information:

Previous articles
Lacetti 1: Brake system
Next articles

The structure of the braking system
Replacement of protective covers and sealing rings of pistons of brake cylinders of front and rear wheels
Replacing the brake pads of the rear wheels
Removal the front wheel brake disc
Removal the rear wheel brake disc
Replacing the parking brake pads


See similar articles on the topic of Chevrolet cars:
Replacing the front brake pads Chevrolet Aveo T250 (2006-2011)
Front brake pads — removal and installation Chevrolet Captiva 1 (2006-2018)
Replacing the brake pads of the front wheel brake mechanism Chevrolet Cruze 1 (2008-2016)
Replacing the brake pads of the front wheels Chevrolet Lanos T150 (2002-2009)
Replacing the front brake pads Chevrolet Niva 1 (2002-2016)
Brake fluid and pads Chevrolet Tahoe 1 (1992-2000)
Replacing the front brake pads Chevrolet Orlando 1 (2010-2018)
Link in different formats to this page


Visitor comments

No comments yet


How much will 17 + 24 =


Lacetti 1 (2002-2009) 
  • General information
  • User manual
  • Maintenance
  • Power unit
  • Engine repair
  • Control system
  • Supply system
  • Cooling system
  • Exhaust system
  • Transmission
  • Clutch
  • Manual gearbox
  • Front wheel drives
  • Chassis
  • Front suspension
  • Rear suspension
  • Steering
  • Brake system
  • Body
  • Repair of body elements
  • Heating and air conditioning
  • Electrical equipment
  • Engine electrics
  • Lighting and lamps
  • Equipment and devices
  • Electrical circuits


ChevyMan.ru © 2017-2026 · Mobile version · Feedback · Site search · Interesting to read · Sitemap: EN BG BY UA RS HR RO PL SK HU

Aveo 2003-2008 · Aveo 2006-2011 · Aveo 2012-2018 · Captiva 2006-2018 · Cruze 2008-2016 · Lacetti 2002-2009 · Lanos 2002-2009 · Niva 2002-2016 · Tahoe 1992-2000 · Tahoe 2000-2014 · Lumina 1 1989-1994 · Trailblazer 1 2001-2008 · Orlando 1 2010-2018 ·
🛡️ For your security and to improve our service, this site uses cookies. You can disable them in your browser.