
ChevyMan.ru
Mazda Mitsubishi Toyota Land Rover Honda Kia Nissan
English Русский
Български
Беларускі
Український
Српски
Hrvatski
Română
Polski
Slovenský
Magyar
|
Articles | Sitemap | Contacts |


Home   Aveo   Captiva   Cruze   Lacetti   Lanos   Niva   Tahoe   Others  
Niva 1 (2002-2016)
  • Home
  • Niva
  • 1 (2002-2016)
  • Chassis
  • Brake system
  • Checking the rear brake components

Checking the rear brake components (Chevrolet Niva 1)

            0

Wheel cylinders. Check the cleanliness of the working surfaces of the cylinder, pistons and thrust rings. The surfaces must be completely smooth, without roughness, so that there is no fluid leakage and premature wear of the seals and pistons.

Check the condition of the stop screw 3 (see figure 6-21), springs 6, thrust cup 7 and crackers 5. If necessary, replace damaged parts with new ones.
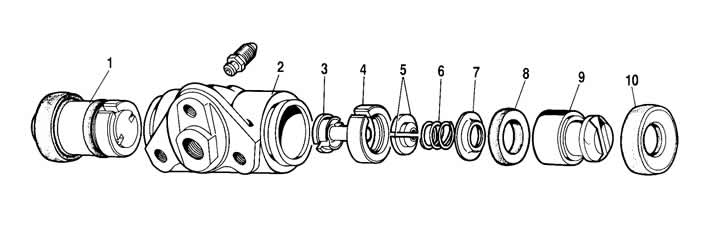
Figure 6-21. Wheel cylinder parts:

Figure 6-21. Wheel cylinder parts:
1 - piston assembly;
2 - cylinder body;
3 - stop screw;
4 - thrust ring;
5 - crackers;
6 - spring;
7 - support cup;
8 - seal;
9 - piston;
10 - protective cap.


Replace the seals 8 with new ones. Check the condition of the protective caps 10 and replace them if necessary.

Check the elasticity of the upper and lower tension springs; replace them with new ones if necessary.

Pads. Check the cleanliness of the linings, if dirt or traces of grease are found, thoroughly clean the linings with a metal brush and wash with white spirit, in addition, check for grease leaks inside the drum; please fix the problems.

Carefully inspect the pads, check for any deformations or damage on the pads - chips, cracks, delamination from the frame.


Measure the remaining brake lining thickness using a caliper (figure 6-22).
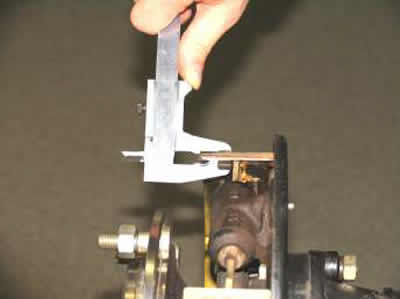
Measure the remaining brake lining thickness using a caliper (figure 6-22).
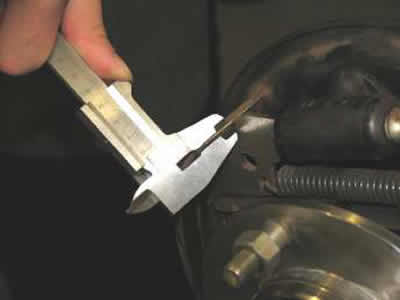

Figure 6-22. Measuring brake pad thickness

Figure 6-22. Measuring brake pad thickness


The rear brake linings wear unevenly, so measurements must be taken in several places that have the smallest thickness.

Replace the pads with new ones if the lining thickness is less than 2 mm.

When operating a car with a mileage of more than 30,000 km, it is necessary to check the degree of wear of the brake pads at each maintenance. A preliminary assessment of wear can be made through the inspection hole in the brake shield, removing the rubber plug. For a more accurate assessment, it is necessary to dismantle the brake drum.

Brake drums. Inspect the brake drums. If there are deep scratches or deviations from roundness on the working surface, bore the drums. Then grind them on a machine with fine-grained abrasive bars. This will increase the durability of the linings and improve the uniformity and efficiency of braking.


The degree of wear or out-of-roundness of the brake drum can be accurately measured with a bore gauge fitted with appropriate extension rods. The wear or out-of-roundness of the brake drum should be measured on the inside diameter of the machined surface in sectors at 90° intervals around the circumference of the drum.

If the brake drum exceeds the specified roundness limit, grind it again. The maximum difference in diameter measurements should not exceed 0.1 mm.

The maximum allowable increase in the nominal drum diameter (250 mm) after turning and grinding is 1 mm. The limits of this tolerance must be strictly observed, otherwise the strength of the drum is impaired, as well as the braking efficiency due to a decrease in drum rigidity.

The maximum diameter due to wear of the inner diameter of the drum should not exceed 251.6 mm.

The source of the article is available on the website chevyman.ru

The article was checked: Vladimir Romannikov
This article is available at russian, bulgarian, belarusian, ukrainian, serbian, croatian, romanian, polish, slovak, hungarian

Share information:

Previous articles
Niva 1: Brake system
Next articles

Disassembly and assembly of rear brake wheel cylinders
Assembly and installation of the rear brake
Removal and disassembling the rear brake
Rear brake device
Replacing the front brake pads
Checking the rear brake wheel cylinders on the stand
Rear brake pressure regulator
Parking brake


See similar articles on the topic of Chevrolet cars:
Checking the brake shoes of the rear drum brakes Chevrolet Aveo T200 (2003-2008)
Rear casing and brake B5 Chevrolet Captiva 1 (2006-2018)
Checking the parking brake Chevrolet Cruze 1 (2008-2016)
Checking the fluid level in the brake and clutch hydraulic reservoir Chevrolet Lacetti 1 (2002-2009)
Replacing the brake pads of the rear wheels Chevrolet Lanos T150 (2002-2009)
Checking the oil level in the rear axle gearbox Chevrolet Tahoe 1 (1992-2000)
Checking and replacing rear brake pads Chevrolet Lumina 1 (1989-1994)
Link in different formats to this page


Visitor comments

No comments yet


How much will 38 + 34 =


Niva 1 (2002-2016) 
  • General information
  • Vehicle device
  • User manual
  • Maintenance
  • Power unit
  • Engine repair
  • Cooling system
  • Lubrication system
  • Power and exhaust system
  • Transmission
  • Clutch
  • Car gearbox
  • Transfer case
  • Cardan gear
  • Rear axle
  • Front axle
  • Chassis
  • Suspension and shock absorbers
  • Steering
  • Brake system
  • Body
  • Exterior (external elements)
  • Interior (internal elements)
  • Ventilation and heating
  • Electrical equipment
  • Power devices
  • Lighting and appliances


ChevyMan.ru © 2017-2026 · Mobile version · Feedback · Site search · Interesting to read · Sitemap: EN BG BY UA RS HR RO PL SK HU

Aveo 2003-2008 · Aveo 2006-2011 · Aveo 2012-2018 · Captiva 2006-2018 · Cruze 2008-2016 · Lacetti 2002-2009 · Lanos 2002-2009 · Niva 2002-2016 · Tahoe 1992-2000 · Tahoe 2000-2014 · Lumina 1 1989-1994 · Trailblazer 1 2001-2008 · Orlando 1 2010-2018 ·
🛡️ For your security and to improve our service, this site uses cookies. You can disable them in your browser.