
Exterior elements of the car body Chevrolet Niva 1

Features of the body structure
The Chevrolet Niva car body is five-door, load-bearing, all-metal, welded. Front and rear doors with front hinges, with drop-down windows. The rear door is a...
The Chevrolet Niva car body is five-door, load-bearing, all-metal, welded. Front and rear doors with front hinges, with drop-down windows. The rear door is a...

The structure of the body frame and its sections
The structure of the frame and its sections are shown in Figures 8-1, 8-2, 8-3 and 8-4. Figure 8-1. Body frame parts: 1 - floor tunnel; 2 - front right floor...
The structure of the frame and its sections are shown in Figures 8-1, 8-2, 8-3 and 8-4. Figure 8-1. Body frame parts: 1 - floor tunnel; 2 - front right floor...

Repair of damaged bodywork
During operation, some vehicles are damaged as a result of road accidents, which disrupts the integrity and geometry of the front surfaces, frame and body...
During operation, some vehicles are damaged as a result of road accidents, which disrupts the integrity and geometry of the front surfaces, frame and body...

Repair of deformed surfaces of body parts
Repair of damaged body parts is carried out by drawing, straightening, straightening with metal shrinkage, cutting out areas that cannot be repaired, making...
Repair of damaged body parts is carried out by drawing, straightening, straightening with metal shrinkage, cutting out areas that cannot be repaired, making...
Galvanized metal body
For parts operating in a corrosive environment, (the bottom of the car), the manufacturer uses one- or two-sided galvanized metal. The share of galvanized...
For parts operating in a corrosive environment, (the bottom of the car), the manufacturer uses one- or two-sided galvanized metal. The share of galvanized...
Removal and installation the front wing
For minor damage to the wing (small dents, scratches, etc.), without removing it, straighten and paint it. After straightening, check the condition of the...
For minor damage to the wing (small dents, scratches, etc.), without removing it, straighten and paint it. After straightening, check the condition of the...
Polishing of paintwork
To preserve the paintwork of the car body and keep it in good condition for a long time, it is necessary to select polishing agents that correspond to the...
To preserve the paintwork of the car body and keep it in good condition for a long time, it is necessary to select polishing agents that correspond to the...
Repainting the body with synthetic enamel
Note. To achieve high quality painting, it is necessary to use primers, enamels, putties, solvents, hardeners from the same manufacturer. This will avoid...
Note. To achieve high quality painting, it is necessary to use primers, enamels, putties, solvents, hardeners from the same manufacturer. This will avoid...
Painting of individual body parts
When replacing individual body parts (wings, doors, hood, etc.), and also after straightening work on deformed parts, carry out partial or complete painting of...
When replacing individual body parts (wings, doors, hood, etc.), and also after straightening work on deformed parts, carry out partial or complete painting of...

Anti-corrosion protection of the body
The hollow body sections, the underbody, the lower parts of the doors and pillars, as well as the joints of body parts, including spot welding, are most...
The hollow body sections, the underbody, the lower parts of the doors and pillars, as well as the joints of body parts, including spot welding, are most...

Preparation and anti-corrosion treatment of hidden cavities
Due to the use of complex technological equipment and the need for high-quality work, it is recommended that the treatment of hidden cavities be performed only...
Due to the use of complex technological equipment and the need for high-quality work, it is recommended that the treatment of hidden cavities be performed only...
Restoration of anti-corrosion and anti-noise coating of the underbody and wheel arches
During vehicle operation, the coating on the underbody is exposed to gravel, sand, salt, and moisture. As a result, the mastic and primer are damaged and worn...
During vehicle operation, the coating on the underbody is exposed to gravel, sand, salt, and moisture. As a result, the mastic and primer are damaged and worn...
Elimination of corrosion of welded joints, flanges, and body part connection points
Clean the area to be repaired from dirt and rinse with water. Wipe the surface dry. Protruding burrs, sharp edges, weld splashes (if available), and also...
Clean the area to be repaired from dirt and rinse with water. Wipe the surface dry. Protruding burrs, sharp edges, weld splashes (if available), and also...

Body sealing
Sealing is ensured by using rubber seals (figure 8-6, 8-7, 8-8), adhesives, sealing mastics, rubber plugs that close technological openings, and careful...
Sealing is ensured by using rubber seals (figure 8-6, 8-7, 8-8), adhesives, sealing mastics, rubber plugs that close technological openings, and careful...

Removal, installation and adjustment of the hood position
Hood 6 (figure 8-9) is hung on hinges along the rear edge of the front of the body. A lock is installed in the front part, and on the hood - a retainer 5 and a...
Hood 6 (figure 8-9) is hung on hinges along the rear edge of the front of the body. A lock is installed in the front part, and on the hood - a retainer 5 and a...

Removal and installation bumpers
Removing the front bumper. Raise the hood of the car, disconnect the negative terminal from the battery, remove the license plate. Remove the radiator grille....
Removing the front bumper. Raise the hood of the car, disconnect the negative terminal from the battery, remove the license plate. Remove the radiator grille....

Removal the front bumper for the 55 configuration
Install the car on a lift. Raise the hood, disconnect the ground wire terminal from the battery. Unscrew the three screws 1 (figure 8-11) upper bumper mount....
Install the car on a lift. Raise the hood, disconnect the ground wire terminal from the battery. Unscrew the three screws 1 (figure 8-11) upper bumper mount....
Installation of beam and front bumper for assembly 55
Install the beam and front bumper in the reverse order of removal, while ensuring uniform gaps in the joint between the bumper and the headlights and front...
Install the beam and front bumper in the reverse order of removal, while ensuring uniform gaps in the joint between the bumper and the headlights and front...

Disassembly and assembly of the front bumper for the 55 configuration
Disassembly Remove five screws 1 (figure 8-21) lower bumper trim fasteners, remove trim 2. Figure 8-21. Removing the lower bumper trim: 1 - self-tapping screw;...
Disassembly Remove five screws 1 (figure 8-21) lower bumper trim fasteners, remove trim 2. Figure 8-21. Removing the lower bumper trim: 1 - self-tapping screw;...

Removal the rear bumper assembly for the 55 package
Place the car on a lift. Raise the hood, disconnect the ground wire terminal from the battery. Open the tailgate, remove the caps 1 (figure 8-27) from the bolt...
Place the car on a lift. Raise the hood, disconnect the ground wire terminal from the battery. Open the tailgate, remove the caps 1 (figure 8-27) from the bolt...

Removal the rear bumper beam for the 55 configuration
Unscrew one bolt at a time 1 (figure 8-35) side mounting of the rear beam 2. Figure 8-35. Rear bumper beam side mount: 1 - bolt; 2 - bumper beam. Unscrew two...
Unscrew one bolt at a time 1 (figure 8-35) side mounting of the rear beam 2. Figure 8-35. Rear bumper beam side mount: 1 - bolt; 2 - bumper beam. Unscrew two...
Installation of beam and rear bumper for assembly 55
Install the beam and rear bumper in the reverse order of removal, while ensuring uniform gaps in the bumper joint with the rear fenders and lights. The beam...
Install the beam and rear bumper in the reverse order of removal, while ensuring uniform gaps in the bumper joint with the rear fenders and lights. The beam...

Disassembly and assembly of the rear bumper for the 55 configuration
Disassembly Unscrew three screws 1 (figure 8-37) and remove the right and left bumper extensions 2, unscrew the three screws 3, fastenings of the deflectors 4...
Disassembly Unscrew three screws 1 (figure 8-37) and remove the right and left bumper extensions 2, unscrew the three screws 3, fastenings of the deflectors 4...

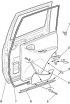
Disassembly and assembly of the front door
Open the front door and lower the window to the lower position. Disconnect the negative terminal from the battery. Figure 8-39. Removing the doors: 1 - door...
Open the front door and lower the window to the lower position. Disconnect the negative terminal from the battery. Figure 8-39. Removing the doors: 1 - door...

Adjusting the front door lock
For normal operation of the lock, adjust the position of the lock retainer housing 6, having first loosened the fastening bolts. Before adjusting the lock, it...
For normal operation of the lock, adjust the position of the lock retainer housing 6, having first loosened the fastening bolts. Before adjusting the lock, it...
Disassembling and assembling the rear door
Disconnect the negative terminal from the battery. Open the rear door and lower the window to the lower position. Squeeze the tabs of the lock and remove...
Disconnect the negative terminal from the battery. Open the rear door and lower the window to the lower position. Squeeze the tabs of the lock and remove...

Disassembly and assembly of the tailgate
The tailgate is hung on the body with two hinges 7 (figure 8-49) on the left side of the back and is locked with a lock. Figure 8-49. Removing the tailgate...
The tailgate is hung on the body with two hinges 7 (figure 8-49) on the left side of the back and is locked with a lock. Figure 8-49. Removing the tailgate...

Body geometry: gaps, openings, joints
Figure 8-135. Dimensions of openings and gaps of mating body parts. Attention: the dimensions of the side door openings, hood and tailgate are reference and...
Figure 8-135. Dimensions of openings and gaps of mating body parts. Attention: the dimensions of the side door openings, hood and tailgate are reference and...

Basic attachment points of transmission units
Figure 8-136. Engine and suspension mounting points: 1; 3 - front suspension mounting points; 2 - base holes with a diameter of 20 mm; 4 - attachment points...
Figure 8-136. Engine and suspension mounting points: 1; 3 - front suspension mounting points; 2 - base holes with a diameter of 20 mm; 4 - attachment points...

Front of the body
Figure 8-137. Hood opening dimensions (top view). Figure 8-138. Engine mount attachment points (bottom view).
Figure 8-137. Hood opening dimensions (top view). Figure 8-138. Engine mount attachment points (bottom view).


Welding tailgate hinges
Remove any components or parts that may interfere with straightening, welding or painting work. Assemble the upper hinges 1 on the left pillar of the rear door...
Remove any components or parts that may interfere with straightening, welding or painting work. Assemble the upper hinges 1 on the left pillar of the rear door...

Welding side door hinges
Remove from the car any components or parts that prevent bodywork, welding or painting. Remove the door from the body. Remove the remains of the damaged link 1...
Remove from the car any components or parts that prevent bodywork, welding or painting. Remove the door from the body. Remove the remains of the damaged link 1...

Welding the studs for fastening the threshold trim
Degrease the threshold of the right or left side of the body with white spirit or another degreasing agent available at the plant. Prepare and apply the SAP...
Degrease the threshold of the right or left side of the body with white spirit or another degreasing agent available at the plant. Prepare and apply the SAP...
This section is available at russian, bulgarian, belarusian, ukrainian, serbian, croatian, romanian, polish, slovak, hungarian
See similar sections on Chevrolet cars:
Body: Exterior Chevrolet Aveo T250 (2006-2011)
Body: Exterior (external elements) Chevrolet Captiva 1 (2006-2018)
Body: Exterior (external elements) Chevrolet Cruze 1 (2008-2016)
Body (since 2007): Exterior (external elements) Chevrolet Tahoe 2 and 3 (2000-2014)
Body: Exterior (external elements) Chevrolet Orlando 1 (2010-2018)
Share information:
- General information
- Vehicle device
- User manual
- Maintenance
- Power unit
- Engine repair
- Cooling system
- Lubrication system
- Power and exhaust system
- Transmission
- Clutch
- Car gearbox
- Transfer case
- Cardan gear
- Rear axle
- Front axle
- Chassis
- Suspension and shock absorbers
- Steering
- Brake system
- Body
- Exterior (external elements)
- Interior (internal elements)
- Ventilation and heating
- Electrical equipment
- Power devices
- Lighting and appliances