
ChevyMan.ru
Mazda Mitsubishi Toyota Land Rover Honda Kia Nissan
English Русский
Български
Беларускі
Український
Српски
Hrvatski
Română
Polski
Slovenský
Magyar
|
Articles | Sitemap | Contacts |


Home   Aveo   Captiva   Cruze   Lacetti   Lanos   Niva   Tahoe   Others  
Niva 1 (2002-2016)
  • Home
  • Niva
  • 1 (2002-2016)
  • Body
  • Exterior (external elements)
  • Disassembling and assembling the rear door

Disassembling and assembling the rear door (Chevrolet Niva 1)

            0

Disconnect the negative terminal from the battery. Open the rear door and lower the window to the lower position.

Squeeze the tabs of the lock and remove button 2 (see figure 8-47) disabling the door lock.
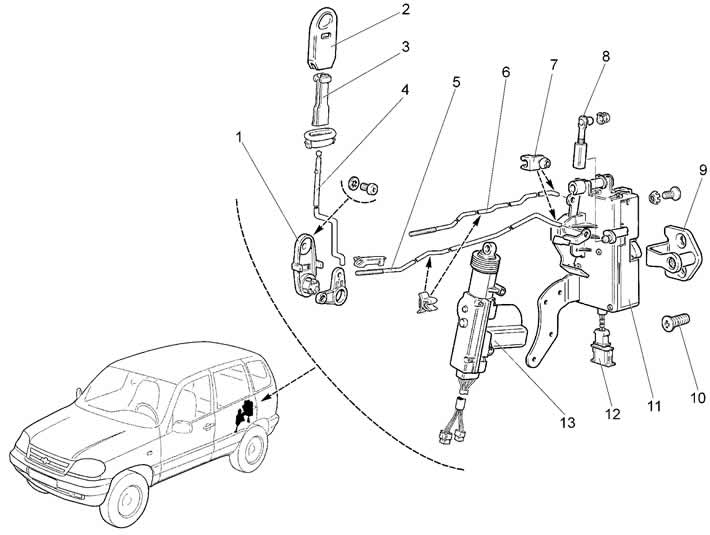
Figure 8-47. Rear door locking mechanism:

Figure 8-47. Rear door locking mechanism:
1 - housing of the lock release drive;
2 - lock release button;
3 - Insert button;
4 - button pull;
5 - lock drive rod;
6 - internal lock drive rod;
7 - lock rod mounting bracket;
8 - outer handle rod;
9 - lock retainer;
10 - retainer mounting screw;
11 - rear door lock;
12 - gearmotor electrical connector;
13 - gear motor.


Remove two screws 5 (see figure 8-45) and remove pocket 4.
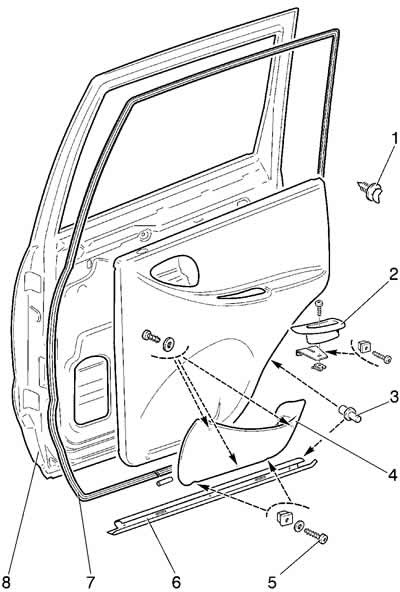
Figure 8-45. Removing the rear door trim:

Figure 8-45. Removing the rear door trim:
1 - button;
2 - armrest handle insert;
3 - upholstery holder;
4 - rear door trim pocket;
5 - screw;
6 - door threshold seal;
7 - rear door opening seal;
8 - back door.


Loosen the trim mounting screw 1 (figure 8-46), move it back and remove the trim of the inner door opening handle 2.
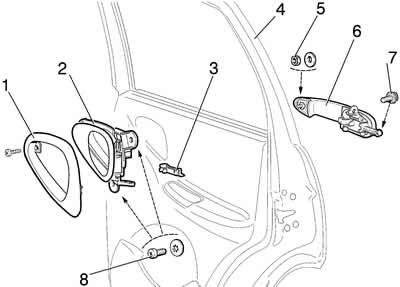


Figure 8-46. Removing the rear door handles:

Figure 8-46. Removing the rear door handles:
1 - inner handle lining;
2 - inner door handle;
3 - bracket;
4 - back door;
5 - nut;
6 - rear door outer handle;
7 - bolt;
8 - screw.


Remove the trim 9 (figure 8-48) and window lift handle 10.
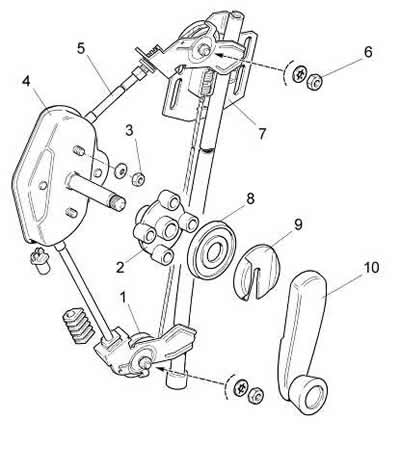
Figure 8-48. Removing the rear side door window regulator:

Figure 8-48. Removing the rear side door window regulator:
1 - roller;
2 - spacer sleeve;
3 - nut;
4 - rear door window lifter;
5 - cable sheath;
6 - nut;
7 - mounting plate for the drop glass;
8 - window lift handle socket;
9 - window lift handle trim;
10 - window lift handle.


Press buttons 1 (see figure 8-45) and remove the rear door trim 8.

Unscrew two screws 8 (figure 8-46) fastenings of the inner handle 2 of the door lock drive, disconnect the rod 5 (figure 8-47) and remove the handle.


Disconnect the rod 8 of the outer handle from the lock 11.

Unscrew nut 5 (see figure 8-46) and bolt 7 and remove handle 6 with the rod assembly.

Loosen the drive mounting screw 1 (see figure 8-47) disabling the door lock.

Unscrew three screws and remove lock 11 together with the lock release drive and rods 4, 6 and 7.

Unscrew the three bolts securing the limiter and remove it.

Removing the rear door window regulator (figure 8-48) proceed in the same way as removing the front door window regulator.

Assemble the door in reverse order.

(The original text can be found on the website «ChevyMan.ru»)

The article was checked: Vladimir Romannikov
This article is available at russian, bulgarian, belarusian, ukrainian, serbian, croatian, romanian, polish, slovak, hungarian

Share information:

Previous articles
Niva 1: Exterior (external elements)
Next articles

Adjusting the front door lock
Disassembly and assembly of the front door
Disassembly and assembly of the rear bumper for the 55 configuration
Installation of beam and rear bumper for assembly 55
Removal the rear bumper beam for the 55 configuration
Disassembly and assembly of the tailgate
Body geometry: gaps, openings, joints
Basic attachment points of transmission units
Front of the body
Tailgate opening


See similar articles on the topic of Chevrolet cars:
Replacing the inner handle of the rear door lock actuator Chevrolet Aveo T300 (2012-2018)
Disassembling and assembling the starter Chevrolet Captiva 1 (2006-2018)
Replacing the inner handle of the rear door lock actuator Chevrolet Cruze 1 (2008-2016)
Removal the rear door trim Chevrolet Lacetti 1 (2002-2009)
Removal the rear door trim Chevrolet Lanos T150 (2002-2009)
Rear door (Cadillac Escalade, Chevrolet Tahoe) Chevrolet Tahoe 2 and 3 (2000-2014)
Removal and installation the rear door Chevrolet Lumina 1 (1989-1994)
Link in different formats to this page


Visitor comments

No comments yet


How much will 48 + 40 =


Niva 1 (2002-2016) 
  • General information
  • Vehicle device
  • User manual
  • Maintenance
  • Power unit
  • Engine repair
  • Cooling system
  • Lubrication system
  • Power and exhaust system
  • Transmission
  • Clutch
  • Car gearbox
  • Transfer case
  • Cardan gear
  • Rear axle
  • Front axle
  • Chassis
  • Suspension and shock absorbers
  • Steering
  • Brake system
  • Body
  • Exterior (external elements)
  • Interior (internal elements)
  • Ventilation and heating
  • Electrical equipment
  • Power devices
  • Lighting and appliances


ChevyMan.ru © 2017-2026 · Mobile version · Feedback · Site search · Interesting to read · Sitemap: EN BG BY UA RS HR RO PL SK HU

Aveo 2003-2008 · Aveo 2006-2011 · Aveo 2012-2018 · Captiva 2006-2018 · Cruze 2008-2016 · Lacetti 2002-2009 · Lanos 2002-2009 · Niva 2002-2016 · Tahoe 1992-2000 · Tahoe 2000-2014 · Lumina 1 1989-1994 · Trailblazer 1 2001-2008 · Orlando 1 2010-2018 ·
🛡️ For your security and to improve our service, this site uses cookies. You can disable them in your browser.