ChevyMan.ru
Mazda Mitsubishi Toyota Land Rover Honda Kia Nissan
English Русский
Български
Беларускі
Український
Српски
Hrvatski
Română
Polski
Slovenský
Magyar
|
Articles | Sitemap | Contacts |


Home   Aveo   Captiva   Cruze   Lacetti   Lanos   Niva   Tahoe   Others  
Orlando 1 (2010-2018) Trailblazer 1 (2001-2008, petrol) Lumina 1 (1989-1994)
  • Home
  • Chevrolet
  • Lumina 1
  • Chassis
  • Brake system
  • Bleeding the brake system

Bleeding the brake system (Chevrolet Lumina 1)

            0

Warning 1: This procedure should not be performed on vehicles equipped with ABS as special tools are required to properly bleed the brakes. Take the vehicle to a workshop that has the appropriate tools.


Warning 2: Always wear eye protection when bleeding the brake system. If the liquid gets into your eyes, rinse immediately with plenty of water and seek medical advice.


Note: Bleeding the hydraulic system is necessary to remove any air that has entered the system when it was opened while removing or installing hoses, lines, caliper or master cylinder.


1. If air has entered the system due to low brake fluid level or if the brake lines have been disconnected at the master cylinder, you will have to bleed the system at all four brake assemblies.

2. If the brake line was disconnected only at one wheel, then it is necessary to bleed only the caliper or wheel cylinder that is affected.

3. If a brake line becomes disconnected at the nipple located between the master cylinder and any of the brake assemblies, it is necessary to bleed the part of the system that serves the disconnected line.

4. With the engine off, press the brake pedal several times to relieve any residual vacuum in the brake booster.

5. Unscrew the cap of the master brake cylinder reservoir and fill the reservoir with brake fluid. Place the cap back in place.

Note: When bleeding, check the fluid level frequently and add fluid as needed, being careful not to let the level drop so low that air bubbles enter the master cylinder.


6. Have fresh brake fluid on hand. You will also need an assistant, an empty, clean plastic container, a piece of 3/16-inch plastic, rubber, or vinyl tubing to fit over the bleed valve, and a wrench to open and close the valve.


7. Starting at the rear right wheel, loosen the bleeder valve slightly, then tighten it to the point where it blocks the path of brake fluid, tight enough but still so that it can be quickly and easily removed.

8. Place the end of the tube on the bleed valve and immerse the other end of the tube in the brake fluid in the container (see illustration).

9.8. When bleeding the brakes, the hose is connected to the bleeding valve on the caliper (or the…

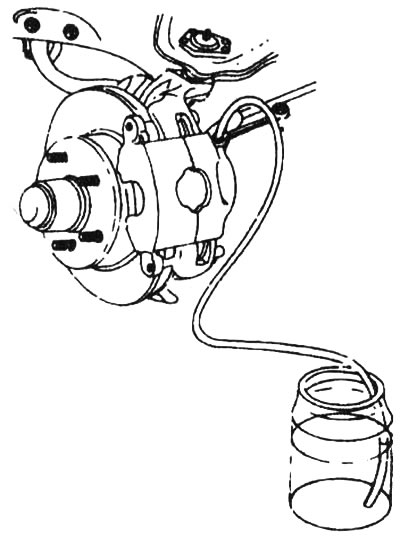
9.8. When bleeding the brakes, the hose is connected to the bleeding valve on the caliper (or the working brake cylinder), and then immersed in brake fluid. Air will be visible as bubbles in the container or tube. Before moving on to the next wheel, all air must be removed


9. Have an assistant slowly press the brake pedal several times to build up pressure in the system, then have him hold the pedal down while pressing it firmly.

10. While the pedal is still depressed, open the bleed valve just enough to allow fluid to flow through the valve. Watch for air bubbles escaping through the end of the tube immersed in the liquid. When the flow of fluid decreases after a couple of seconds, close the valve and have your assistant release the pedal.

11. Repeat steps 9 and 10 until no more air comes out of the tube, then tighten the bleed valve and proceed to the left rear wheel, the right front wheel, and then the left front wheel (exactly in that order) and follow the same procedure. Monitor the fluid level in the master cylinder reservoir.


12. Do not reuse old brake fluid. It contains water, which negatively affects the operation of the system.

13. After completing the bleeding procedure, fill the master cylinder with brake fluid.

14. Check the operation of the brakes. When you press the pedal, you should feel the pedal being firm. Repeat the entire process if necessary.

Warning! Do not operate the vehicle if you doubt the effectiveness of the braking system.


[The article is reprinted from the website: «CHEVYMAN.ru»]

The article was checked: Vladimir Romannikov
This article is available at russian, bulgarian, belarusian, ukrainian, serbian, croatian, romanian, polish, slovak, hungarian

Share information:

Previous articles
Lumina 1: Brake system
Next articles

Checking and replacing brake hoses and brake lines
Removal, overhaul and installation of the master brake cylinder
Removal, repair and installation of the rear wheel brake cylinder
Checking and replacing rear brake pads
Checking, removing and installing the brake disc
Adjusting the parking brake
Removal and installation parking brake cables
Checking, removing and installing the brake booster
Removal, installation and adjusting the brake light switch


See similar articles on the topic of Chevrolet cars:
Bleeding the brake system Chevrolet Aveo T300 (2012-2018)
Bleeding the hydraulic brake system (Manual) Chevrolet Captiva 1 (2006-2018)
Bleeding the hydraulic brake system Chevrolet Cruze 1 (2008-2016)
Bleeding the hydraulic brake system Chevrolet Lacetti 1 (2002-2009)
Bleeding the hydraulic brake system Chevrolet Lanos T150 (2002-2009)
Brake system Chevrolet Niva 1 (2002-2016)
Bleeding the brake hydraulic system Chevrolet Tahoe 1 (1992-2000)
Link in different formats to this page


Visitor comments

No comments yet


How much will 19 + 14 =


Orlando 1 (2010-2018) 
  • General information
  • Introduction to manual
  • User manual
  • Maintenance
  • Troubleshooting
  • Power unit
  • Engine repair
  • Fuel and control system
  • Cooling and lubrication system
  • Ignition system
  • Transmission
  • Clutch
  • Gearbox
  • Drive shafts
  • Chassis
  • Car suspension
  • Steering
  • Brake system
  • Body
  • Exterior (external elements)
  • Doors, locks and windows
  • Electrical equipment
  • Equipment and devices
  • Windscreen wipers
  • Power devices
  • Electrical diagrams


Trailblazer 1 (2001-2008) 
  • General information
  • User manual
  • Troubleshooting
  • Maintenance
  • Power unit
  • Engine in a car
  • Engine overhaul
  • Cooling and heating
  • Fuel and exhaust system
  • Engine electrical equipment
  • Engine control
  • Transmission
  • Automatic gearbox
  • Transfer case
  • Drive shafts and cardan
  • Chassis
  • Brake system
  • Car suspension
  • Steering
  • Body
  • Exterior (external elements)
  • Interior (internal elements)
  • Doors, locks and windows
  • Electrical equipment
  • Equipment and devices
  • Electrical circuits


Lumina 1 (1989-1994) 
  • General information
  • Maintenance
  • Power unit
  • Engine 3.1L V6
  • Engine 3.8L V6
  • Engine overhaul
  • Cooling system
  • Power and exhaust system
  • Fuel injection
  • Engine electrical equipment
  • Reduced exhaust gas toxicity
  • Transmission
  • Automatic gearbox
  • Drive shafts
  • Chassis
  • Brake system
  • Car suspension
  • Steering
  • Body
  • Heating and air conditioning
  • Repair of body elements
  • Doors, covers and windows
  • Interior (internal elements)
  • Electrical equipment
  • Equipment and devices
  • Electrical circuits


ChevyMan.ru © 2017-2026 · Mobile version · Feedback · Site search · Interesting to read · Sitemap: EN BG BY UA RS HR RO PL SK HU

Aveo 2003-2008 · Aveo 2006-2011 · Aveo 2012-2018 · Captiva 2006-2018 · Cruze 2008-2016 · Lacetti 2002-2009 · Lanos 2002-2009 · Niva 2002-2016 · Tahoe 1992-2000 · Tahoe 2000-2014 · Lumina 1 1989-1994 · Trailblazer 1 2001-2008 · Orlando 1 2010-2018 ·
🛡️ For your security and to improve our service, this site uses cookies. You can disable them in your browser.