
ChevyMan.ru
Mazda Mitsubishi Toyota Land Rover Honda Kia Nissan
English Русский
Български
Беларускі
Український
Српски
Hrvatski
Română
Polski
Slovenský
Magyar
|
Articles | Sitemap | Contacts |


Home   Aveo   Captiva   Cruze   Lacetti   Lanos   Niva   Tahoe   Others  
Lanos T150 (2002-2009)
  • Home
  • Lanos
  • T150 (2002-2009)
  • General information
  • Maintenance
  • Checking the condition of wheels and tires

Checking the condition of wheels and tires (Chevrolet Lanos T150)

            0

For driving safety and to extend the service life of tires, it is necessary to visually inspect them before driving, identifying any damage that may have appeared (cuts, punctures), remove foreign objects stuck in the tread blocks or between them. Cracks and abrasions from curbs during unsuccessful parking may occur on the outer sidewalls of the tires.

It is necessary to maintain in tires (including a spare tire) required pressure, regularly (at least once a month) check it with a pressure gauge and bring it up to standard. It is necessary to check the tire pressure when the ambient temperature drops or rises significantly and before a long-distance trip.

The air pressure in the front and rear tires should be 2.2 bar.

When driving for a long time, especially at high speed, the tires heat up and the pressure in them increases. Therefore, the air pressure should be checked on cold tires before driving.

If it is not possible to measure the pressure on cold tires, it is necessary to take into account the increase in air pressure in the tires from heating by 0.2-0.3 bar. To check the air pressure in the tires, unscrew the cap of the wheel valve...
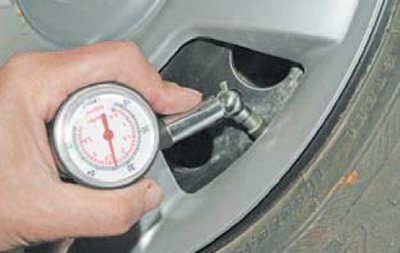
...and connect a tire pressure gauge or a pump with a pressure gauge to the valve.


...and connect a tire pressure gauge or a pump with a pressure gauge to the valve.


If the pressure is lower than required, we inflate the tire using a tire pump or compressor, monitoring the pressure using a pressure gauge.

If the pressure is higher than required...
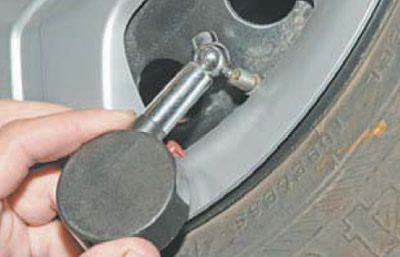
...by pressing with a special protrusion of the pressure gauge (or a suitable tool) on the valve,…


...by pressing with a special protrusion of the pressure gauge (or a suitable tool) on the valve, release air from the tire in small portions and check the pressure.

The tires must not have any bulges, tread separations, or damage that exposes the cord.

A worn-out tire should be replaced with a new one immediately, without waiting for it to fail.


It is prohibited to install tires of different models on one axle, as well as tires of a size or load that do not correspond to the vehicle.

The remaining tread depth must be at least 1.6 mm.
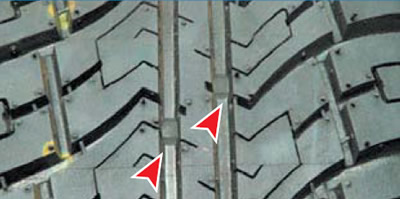
To monitor tread wear, its grooves are equipped with indicators in the form of 1.6 mm high…


To monitor tread wear, its grooves are equipped with indicators in the form of 1.6 mm high protrusions.
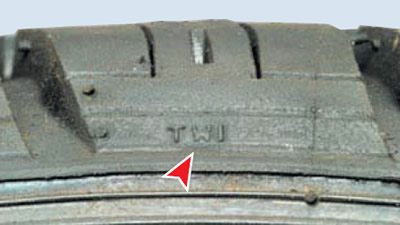


The wear indicators on the sidewalls of the tires are marked with the letters TWI.


The wear indicators on the sidewalls of the tires are marked with the letters TWI.

You can also check the tread wear using a caliper.

For this...
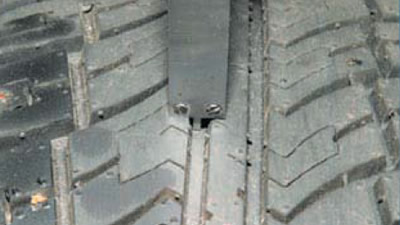
...we lower it into the groove in the middle part of the tread (as a rule, the tread wears out…


...we lower it into the groove in the middle part of the tread (as a rule, the tread wears out faster in this area) depth gauge probe and make sure that the height of the pattern is more than 1.6 mm.

To reduce the likelihood of error, it is advisable to measure at three different points around the circumference of the tire. If the wear exceeds the maximum allowable, the tires must be replaced.

We regularly check the tightness of the wheel mounting bolts and tighten the bolts if necessary.

If vibrations occur while driving on a flat section of the road in a limited speed range, it is necessary to have the wheels balanced at a tire shop. Vibration at all speeds can be caused by spotty wear of the tire, the appearance of bulges or other damage on it, as well as deformation of the wheel disk.

The article was checked: Vladimir Romannikov
This article is available at russian, bulgarian, belarusian, ukrainian, serbian, croatian, romanian, polish, slovak, hungarian

Share information:

Previous articles
Lanos T150: Maintenance
Next articles

Maintenance schedule
Vehicle check
Location of the main units and assemblies of the car
Safety precautions during maintenance and repair
Checking the fluid level in the windshield washer reservoir
Replacing Windshield Wiper Blades
Checking the oil level in the engine oil pan
Changing engine oil and oil filter
Replacing the coolant


See similar articles on the topic of Chevrolet cars:
Checking the technical condition of the front wheel drives Chevrolet Aveo T300 (2012-2018)
Car wheels and tires Chevrolet Captiva 1 (2006-2018)
Checking the wheels Chevrolet Cruze 1 (2008-2016)
Checking the condition of wheels and tires Chevrolet Lacetti 1 (2002-2009)
Checking the technical condition and checking the clutch Chevrolet Niva 1 (2002-2016)
Checking tires Chevrolet Tahoe 1 (1992-2000)
Checking the condition of the tires and their inflation pressure Chevrolet Trailblazer 1 (2001-2008, petrol)
Link in different formats to this page


Visitor comments

No comments yet


How much will 27 + 44 =


Lanos T150 (2002-2009) 
  • General information
  • User manual
  • Maintenance
  • Troubleshooting
  • Power unit
  • Engine repair
  • Control system
  • Supply system
  • Cooling system
  • Exhaust system
  • Transmission
  • Clutch
  • Car gearbox
  • Front wheel drives
  • Chassis
  • Front suspension
  • Rear suspension
  • Steering
  • Brake system
  • Body
  • Repair of body elements
  • Heating and air conditioning
  • Electrical equipment
  • Engine electrics
  • Lighting and lamps
  • Equipment and devices
  • Electrical circuits


ChevyMan.ru © 2017-2026 · Mobile version · Feedback · Site search · Interesting to read · Sitemap: EN BG BY UA RS HR RO PL SK HU

Aveo 2003-2008 · Aveo 2006-2011 · Aveo 2012-2018 · Captiva 2006-2018 · Cruze 2008-2016 · Lacetti 2002-2009 · Lanos 2002-2009 · Niva 2002-2016 · Tahoe 1992-2000 · Tahoe 2000-2014 · Lumina 1 1989-1994 · Trailblazer 1 2001-2008 · Orlando 1 2010-2018 ·
🛡️ For your security and to improve our service, this site uses cookies. You can disable them in your browser.