
ChevyMan.ru
Mazda Mitsubishi Toyota Land Rover Honda Kia Nissan
English Русский
Български
Беларускі
Український
Српски
Hrvatski
Română
Polski
Slovenský
Magyar
|
Articles | Sitemap | Contacts |


Home   Aveo   Captiva   Cruze   Lacetti   Lanos   Niva   Tahoe   Others  
Lacetti 1 (2002-2009)
  • Home
  • Lacetti
  • J200 (2002-2009)
  • General information
  • Maintenance
  • Adjusting the direction of the headlight beams

Adjusting the direction of the headlight beams (Chevrolet Lacetti J200)

            0

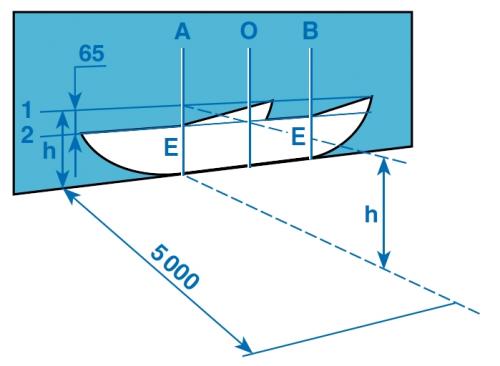
We adjust the direction of the headlight beams on a fully fueled and equipped car, with normal air pressure in the tires. We install the car on a flat horizontal surface at a distance of 5 m from the screen (you can use a garage wall, a sheet of plywood or hardboard measuring 1x2 m). On the screen we draw a horizontal line 1 at a height equal to the distance from the center of the headlights to the floor. Below it, 65 mm, we draw a parallel line 2.

We draw a vertical axis line 0 on the screen (the distance from it to the center of the left and right headlights should be equal) and lines corresponding to the centers of the headlights (AE and BE).

Set the headlight range control switch to position "0" (one driver or a driver with a passenger in the front seat) and turn on the low beam headlights. Cover one of the headlights with an opaque material.

When adjusting, the upper boundary of the light beam should coincide with the lower horizontal line (see picture), and the place of the beam break (the point of intersection of the horizontal and inclined sections of the luminous flux) — with a vertical line corresponding to the center of this headlight.

We adjust the direction of the light beam of the other headlight in the same way.
We adjust the direction of the light beam of the other headlight in the same way.


Headlight beam adjustment diagram


Headlight beam adjustment diagram


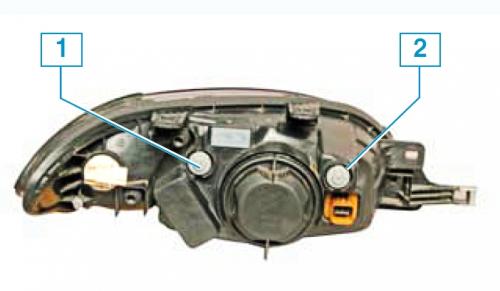
Location of the light beam direction regulators on the headlight housing of a hatchback vehicle: 1 — vertical beam regulator; 2 - light beam regulator in the horizontal plane
Location of the light beam direction regulators on the headlight housing of a hatchback vehicle: 1…


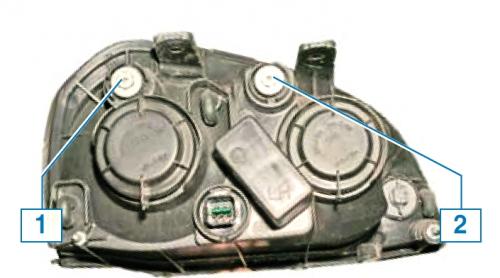
The arrangement of the light beam direction regulators on the headlight housing of cars with sedan and station wagon bodies: 1 — light beam regulator in the horizontal plane 2 — light beam regulator in the vertical plane
The arrangement of the light beam direction regulators on the headlight housing of cars with sedan…


We adjust the direction of the headlight beam by turning the regulators with a Phillips screwdriver.


We adjust the direction of the light beam of the other headlight in the same way.

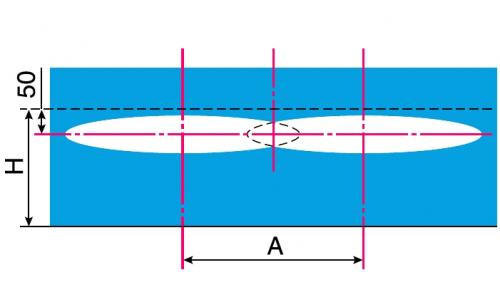
Adjustment of the fog light beams is performed under the same conditions as when adjusting the headlights (see above). Measure the distance between the centers of the fog lights and the distance from the surface of the platform to the center of the fog lights. Draw lines on the screen and draw another horizontal line below the height line of the center of the fog lights by 50 mm.

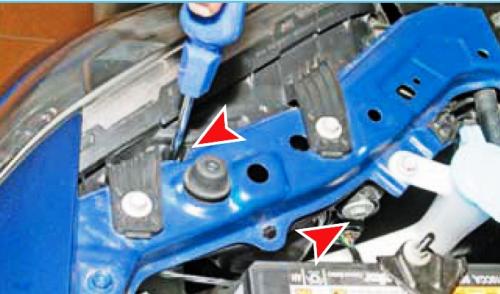
We perform the adjustment from under the car bumper. By turning the headlight adjustment screw with a Phillips screwdriver, we bring the upper horizontal boundary of the headlight beam to the height line of the center of the fog lights.
We perform the adjustment from under the car bumper. By turning the headlight adjustment screw with…


Screen marking diagram for adjusting fog lights: A - distance between fog light centers; H — height of the center of the fog lights on the car
Screen marking diagram for adjusting fog lights: A - distance between fog light centers; H — height…


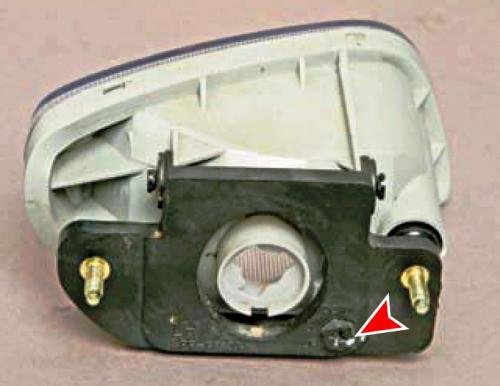
We change the direction of the light beam of the fog lamp by turning the adjusting screw with a Phillips screwdriver (for clarity, shown on a removed headlight).

The article was checked: Vladimir Romannikov
This article is available at russian, bulgarian, belarusian, ukrainian, serbian, croatian, romanian, polish, slovak, hungarian

Share information:

Previous articles
Lacetti 1: Maintenance
Next articles

Checking the condition of the brake system
Checking the condition of the steering
Checking the condition of the chassis and transmission
Replacing the heating, ventilation and air conditioning system filter
Replacing the air filter element
Troubleshooting
Tools used in car repair
Tightening torques for critical threaded connections


See similar articles on the topic of Chevrolet cars:
Adjusting the position of the front seats Chevrolet Aveo T300 (2012-2018)
Adjusting the position of the steering wheel Chevrolet Captiva 1 (2006-2018)
Adjusting the position of the front seats Chevrolet Cruze 1 (2008-2016)
Adjusting the direction of the headlight beams Chevrolet Lanos T150 (2002-2009)
Adjusting the position of the steering wheel Chevrolet Niva 1 (2002-2016)
Adjusting mirrors Chevrolet Tahoe 1 (1992-2000)
Checking and adjusting the ignition timing (3.1L engine) Chevrolet Lumina 1 (1989-1994)
Link in different formats to this page


Visitor comments

No comments yet


How much will 29 + 42 =


Lacetti 1 (2002-2009) 
  • General information
  • User manual
  • Maintenance
  • Power unit
  • Engine repair
  • Control system
  • Supply system
  • Cooling system
  • Exhaust system
  • Transmission
  • Clutch
  • Manual gearbox
  • Front wheel drives
  • Chassis
  • Front suspension
  • Rear suspension
  • Steering
  • Brake system
  • Body
  • Repair of body elements
  • Heating and air conditioning
  • Electrical equipment
  • Engine electrics
  • Lighting and lamps
  • Equipment and devices
  • Electrical circuits


ChevyMan.ru © 2017-2026 · Mobile version · Feedback · Site search · Interesting to read · Sitemap: EN BG BY UA RS HR RO PL SK HU

Aveo 2003-2008 · Aveo 2006-2011 · Aveo 2012-2018 · Captiva 2006-2018 · Cruze 2008-2016 · Lacetti 2002-2009 · Lanos 2002-2009 · Niva 2002-2016 · Tahoe 1992-2000 · Tahoe 2000-2014 · Lumina 1 1989-1994 · Trailblazer 1 2001-2008 · Orlando 1 2010-2018 ·
🛡️ For your security and to improve our service, this site uses cookies. You can disable them in your browser.