


Contents: Removal ↧ Installation ↧
Removal
Open the hood and disconnect the negative terminal from the battery.
Remove the radiator grille.
Remove the air filter:
- loosen the clamp securing the intake manifold hose to the mass air flow sensor and disconnect the hose from the sensor;
- disconnect the wiring harness connector from the mass air flow sensor;
- unscrew the four bolts securing the front and rear air filter brackets to the vehicle body and remove the air filter with the mass air flow sensor assembly.
Disconnect the connector from the audio device and remove the audio device assembly with the bracket.
Disconnect hose 3 from the power steering heat exchanger (figure 8-73) low pressure and 1 low pressure drain hose.
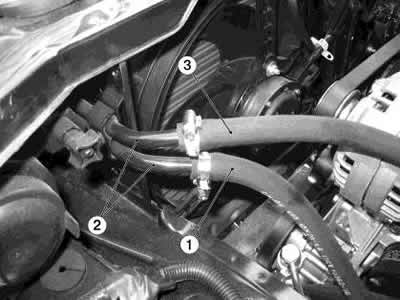
Figure 8-73. Fastening the hoses to the power steering heat exchanger:
1 - low pressure drain hose;
2 - power steering heat exchanger tube;
3 - low pressure hose.
Caution: When disconnecting hoses, use a container to drain hydraulic fluid from the hoses to prevent leakage of hydraulic fluid.
Remove heat exchanger 3 (figure 8-74) power steering.
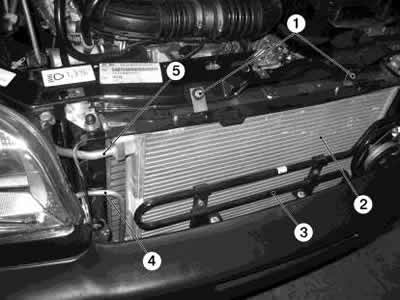
Figure 8-74. Removing the capacitor:
1 - condenser mounting bolts;
2 - capacitor;
3 - Power steering heat exchanger;
4 - condenser pipeline;
5 - injection pipeline.
Evacuate the refrigerant from the air conditioning system according to the service equipment documentation.
Disconnect the discharge pipe 5, the condenser pipe 4 from the condenser and remove the condenser 2.
Caution: Install plugs in the openings of the pipes and condenser to prevent leakage of compressor oil and the ingress of dust particles and moisture from the air into the air conditioning system.
Installation
Install and secure the condenser, remove the plugs from the condenser holes and pipes.
Install new sealing rings on the pipelines, lubricated with antifreeze oil, and secure the pipelines to the condenser: tightening torque of pipeline fastening bolts is 7...9 Nm (0.7...0.9 kgf·m).
Install and secure the power steering heat exchanger.
Connect the low pressure hose and the low pressure drain hose to the heat exchanger.
Add hydraulic fluid to the power steering oil reservoir, following the recommendations in the subsection "Power steering".
Install and secure the audio device, connect the wiring harness plug to the audio device.
Install and secure the air filter.
Install and secure the radiator grille of the cooling system.
Connect the negative terminal to the battery.
Fill the air conditioning system with refrigerant according to the service equipment documentation.
Warning: It is strictly forbidden to refuel through a high-pressure pipeline (red service hose) with the engine running and the air conditioner on. To prevent damage to the filling equipment or injury, fill with the engine running and the air conditioner on only through the low-pressure line (blue service hose). All work with refrigerant must be performed wearing safety glasses.
Bleed the power steering system following the recommendations in the subsection "Power steering".
[The original text can be found on the website: «ChevyMan.ru»]