
ChevyMan.ru
Mazda Mitsubishi Toyota Land Rover Honda Kia Nissan
English Русский
Български
Беларускі
Український
Српски
Hrvatski
Română
Polski
Slovenský
Magyar
|
Articles | Sitemap | Contacts |


Home   Aveo   Captiva   Cruze   Lacetti   Lanos   Niva   Tahoe   Others  
Niva 1 (2002-2016)
  • Home
  • Niva
  • 1 (2002-2016)
  • Body
  • Ventilation and heating
  • Removal and installation the evaporator

Removal and installation the evaporator (Chevrolet Niva 1)

            0

Contents: Removal ↧ Installation ↧

Removal


Open the hood and disconnect the negative terminal from the battery.

Remove the protective plate and engine splash guard.

Drain the coolant from the engine cooling system (see section "Power unit - removal and installation").

Disconnect the ignition system harness connector from sensor 1 (figure 8-75) pressure.
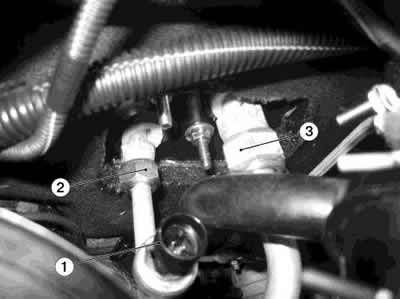
Figure 8-75. Disconnecting the pipes from the evaporator:

Figure 8-75. Disconnecting the pipes from the evaporator:
1 - pressure sensor;
2 - high pressure pipeline;
3 - low pressure pipeline.


Disconnect the hoses from the heater radiator pipes.

Evacuate the refrigerant from the air conditioning system according to the service equipment documentation.

Disconnect low pressure line 3 from the evaporator and line 2 from the receiver.

Caution: Install plugs in the piping openings and evaporator tubes to prevent compressor oil leakage and dust and moisture particles from the air from entering the air conditioning system.


Remove the heater according to the requirements of the subsection "Removing and installing the heater". Remove the evaporator from the heater.

Installation


Install the evaporator into the heater.


Install the heater according to the requirements of the subsection "Removing and installing the heater". Remove the plugs from the openings of the pipes and evaporator tubes.

Install new sealing rings lubricated with compressor oil on the pipelines and secure the pipelines to the evaporator: tightening torque of the pipeline fastening nut from the receiver - 15.4...17.0 Nm (1.54...1.70 kgf·m); tightening torque of the pipeline fastening nut from the compressor — 24.4...27.0 Nm (2.44...2.70 kgf·m).

Connect the hoses to the heater radiator pipes.

Connect the ignition system harness connector to the pressure sensor.

Install the protective plate and engine splash guard.

Fill the engine cooling system with coolant (see section "Power unit - removal and installation").

Connect the negative terminal to the battery.

Fill the air conditioning system with refrigerant according to the service equipment documentation.

Warning: It is strictly forbidden to refuel through a high-pressure pipeline (red service hose) with the engine running and the air conditioner on. To prevent damage to the filling equipment or injury, fill with the engine running and the air conditioner on only through the low-pressure line (blue service hose). All work with refrigerant must be performed wearing safety glasses.

The article was checked: Vladimir Romannikov
This article is available at russian, bulgarian, belarusian, ukrainian, serbian, croatian, romanian, polish, slovak, hungarian

Share information:

Previous articles
Niva 1: Ventilation and heating
Next articles

Removal and installation the capacitor
Removal and installation the compressor
Possible malfunctions, their causes and methods of elimination
Air conditioning system diagnostics
Air Conditioning Control
Removal and installation the receiver-dryer


See similar articles on the topic of Chevrolet cars:
Evaporator core — removal and installation Chevrolet Captiva 1 (2006-2018)
Removal the evaporator Chevrolet Lacetti 1 (2002-2009)
Evaporator tube — removal and installation Chevrolet Tahoe 2 and 3 (2000-2014)
Removal and installation the evaporator Chevrolet Lumina 1 (1989-1994)
Link in different formats to this page


Visitor comments

No comments yet


How much will 21 + 39 =


Niva 1 (2002-2016) 
  • General information
  • Vehicle device
  • User manual
  • Maintenance
  • Power unit
  • Engine repair
  • Cooling system
  • Lubrication system
  • Power and exhaust system
  • Transmission
  • Clutch
  • Car gearbox
  • Transfer case
  • Cardan gear
  • Rear axle
  • Front axle
  • Chassis
  • Suspension and shock absorbers
  • Steering
  • Brake system
  • Body
  • Exterior (external elements)
  • Interior (internal elements)
  • Ventilation and heating
  • Electrical equipment
  • Power devices
  • Lighting and appliances


ChevyMan.ru © 2017-2026 · Mobile version · Feedback · Site search · Interesting to read · Sitemap: EN BG BY UA RS HR RO PL SK HU

Aveo 2003-2008 · Aveo 2006-2011 · Aveo 2012-2018 · Captiva 2006-2018 · Cruze 2008-2016 · Lacetti 2002-2009 · Lanos 2002-2009 · Niva 2002-2016 · Tahoe 1992-2000 · Tahoe 2000-2014 · Lumina 1 1989-1994 · Trailblazer 1 2001-2008 · Orlando 1 2010-2018 ·
🛡️ For your security and to improve our service, this site uses cookies. You can disable them in your browser.