ChevyMan.ru
Mazda Mitsubishi Toyota Land Rover Honda Kia Nissan
English Русский
Български
Беларускі
Український
Српски
Hrvatski
Română
Polski
Slovenský
Magyar
|
Articles | Sitemap | Contacts |


Home   Aveo   Captiva   Cruze   Lacetti   Lanos   Niva   Tahoe   Others  
Orlando 1 (2010-2018) Trailblazer 1 (2001-2008, petrol) Lumina 1 (1989-1994)
  • Home
  • Chevrolet
  • Lumina 1
  • Body
  • Heating and air conditioning
  • Removal and installation the evaporator

Removal and installation the evaporator (Chevrolet Lumina 1)

            0

Contents: Front evaporator ↧ Rear evaporator ↧
Caution! The air conditioning system is under high pressure. Do not loosen any hoses or fittings or remove any parts until the system has been discharged by a workshop or service station. When disconnecting air conditioning hoses, use eye protection.


Front evaporator


1. Have your air conditioning system discharged for you (see precautions above).

2. Disconnect the negative battery cable and on vehicles equipped with a front-mounted fan, remove the auxiliary fan (see section 4).

3. Remove the heater radiator cap and the radiator itself (see section 11).

4. Disconnect the inlet and outlet pipes on the evaporator.

5. Remove the top panel (see chapter 11, section 22).

6. Disconnect the motor wiring connector and remove the four screws that secure the damper and sub-housing.

7. From the engine compartment, remove the four bolts that secure the evaporator cover to the evaporator. Remove the evaporator.

Rear evaporator


8. Have your air conditioning system discharged for you (see precautions above).

9. Disconnect the negative battery cable and drain the cooling system (see chapter 1, section 29).

10. Remove the side panel (see chapter 11, section 12).

11. Disconnect the rear evaporator and blower housing from the door (see section 10), then remove the rear heater core (see section 11).

12. To remove the rear evaporator, follow the steps shown in the series of photographs. Follow the sequence of actions, pay attention to the signatures.
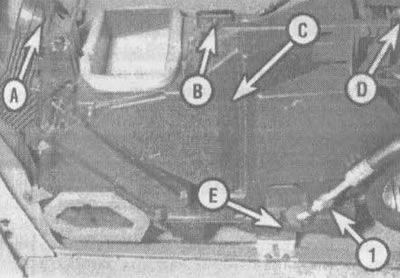


17.12a. The bolts that hold the rear evaporator cover are located at the rear (front view shown): A…

17.12a. The bolts that hold the rear evaporator cover are located at the rear (front view shown): A - Radiator Cap Bolts, B - Upper Rear Bolts, C - Center Bolt, D - Rear Evaporator Outlet, E - Drain Pan Bolts, 1 - Evaporator Inlet
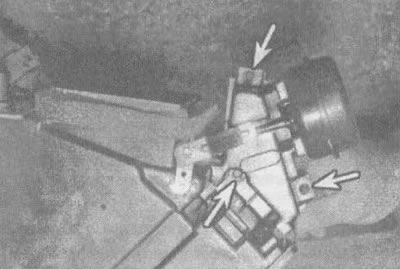
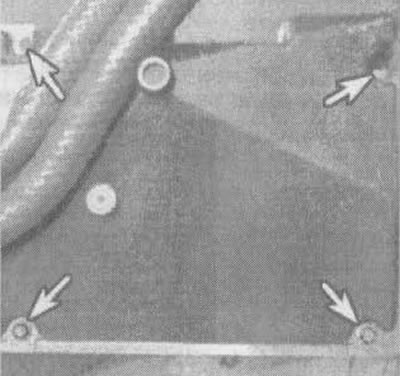
17.12b. View A - Unscrew the bolts near the evaporator (indicated by arrows)

17.12b. View A - Unscrew the bolts near the evaporator (indicated by arrows)

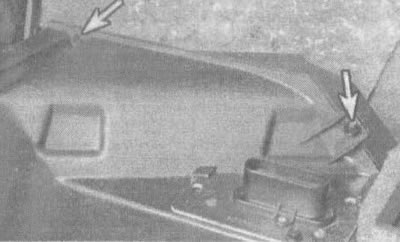
17.12v. View B - Unscrew the upper rear bolts...

17.12v. View B - Unscrew the upper rear bolts...
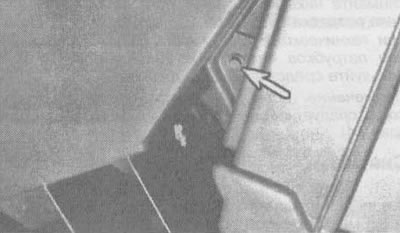
12/17 View C -...and a bolt in the center (indicated by the arrow)

12/17 View C -...and a bolt in the center (indicated by the arrow)


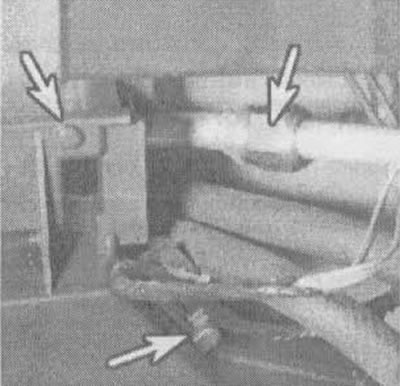
17.12d. View D - Unscrew the indicated bolts (left arrows are bolts that are not visible in this…

17.12d. View D - Unscrew the indicated bolts (left arrows are bolts that are not visible in this photo), evaporator outlet (right arrow) and the inlet of the refrigerant line (see illustration 17.12a). To avoid twisting the lines, use a duplicate key
17.12e. View E - Unscrew the four bolts securing the drain pan (indicated by arrows)

17.12e. View E - Unscrew the four bolts securing the drain pan (indicated by arrows)

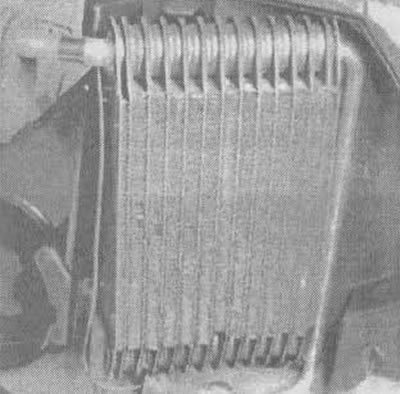
17.12g. Lift the lid, then carefully remove the rear evaporator

17.12g. Lift the lid, then carefully remove the rear evaporator


13. Installation is carried out in reverse order. Don't forget to fill the cooling system with liquid (see chapter 1, section 29). Have your entire air conditioning system pumped, recharged, and leak tested at the same shop where you had it discharged.

The article was checked: Vladimir Romannikov
This article is available at russian, bulgarian, belarusian, ukrainian, serbian, croatian, romanian, polish, slovak, hungarian

Share information:

Previous articles
Lumina 1: Heating and air conditioning
Next articles

Removal and installation the air conditioning radiator
Removal and installation the air conditioning compressor
Removal and installation the air conditioning system filter-drier
Checking and servicing the air conditioning system
Removal and installation the heater and air conditioner control panel


See similar articles on the topic of Chevrolet cars:
Evaporator core — removal and installation Chevrolet Captiva 1 (2006-2018)
Removal the evaporator Chevrolet Lacetti 1 (2002-2009)
Removal and installation the evaporator Chevrolet Niva 1 (2002-2016)
Evaporator tube — removal and installation Chevrolet Tahoe 2 and 3 (2000-2014)
Link in different formats to this page


Visitor comments

No comments yet


How much will 43 + 49 =


Orlando 1 (2010-2018) 
  • General information
  • Introduction to manual
  • User manual
  • Maintenance
  • Troubleshooting
  • Power unit
  • Engine repair
  • Fuel and control system
  • Cooling and lubrication system
  • Ignition system
  • Transmission
  • Clutch
  • Gearbox
  • Drive shafts
  • Chassis
  • Car suspension
  • Steering
  • Brake system
  • Body
  • Exterior (external elements)
  • Doors, locks and windows
  • Electrical equipment
  • Equipment and devices
  • Windscreen wipers
  • Power devices
  • Electrical diagrams


Trailblazer 1 (2001-2008) 
  • General information
  • User manual
  • Troubleshooting
  • Maintenance
  • Power unit
  • Engine in a car
  • Engine overhaul
  • Cooling and heating
  • Fuel and exhaust system
  • Engine electrical equipment
  • Engine control
  • Transmission
  • Automatic gearbox
  • Transfer case
  • Drive shafts and cardan
  • Chassis
  • Brake system
  • Car suspension
  • Steering
  • Body
  • Exterior (external elements)
  • Interior (internal elements)
  • Doors, locks and windows
  • Electrical equipment
  • Equipment and devices
  • Electrical circuits


Lumina 1 (1989-1994) 
  • General information
  • Maintenance
  • Power unit
  • Engine 3.1L V6
  • Engine 3.8L V6
  • Engine overhaul
  • Cooling system
  • Power and exhaust system
  • Fuel injection
  • Engine electrical equipment
  • Reduced exhaust gas toxicity
  • Transmission
  • Automatic gearbox
  • Drive shafts
  • Chassis
  • Brake system
  • Car suspension
  • Steering
  • Body
  • Heating and air conditioning
  • Repair of body elements
  • Doors, covers and windows
  • Interior (internal elements)
  • Electrical equipment
  • Equipment and devices
  • Electrical circuits


ChevyMan.ru © 2017-2026 · Mobile version · Feedback · Site search · Interesting to read · Sitemap: EN BG BY UA RS HR RO PL SK HU

Aveo 2003-2008 · Aveo 2006-2011 · Aveo 2012-2018 · Captiva 2006-2018 · Cruze 2008-2016 · Lacetti 2002-2009 · Lanos 2002-2009 · Niva 2002-2016 · Tahoe 1992-2000 · Tahoe 2000-2014 · Lumina 1 1989-1994 · Trailblazer 1 2001-2008 · Orlando 1 2010-2018 ·
🛡️ For your security and to improve our service, this site uses cookies. You can disable them in your browser.