
2. When servicing the cooling system, all hoses and the radiator cap should be checked and replaced if necessary (see section 9).
3. Since coolant is a corrosive and poisonous solution, be careful not to spill it on painted parts of the car or on your skin. If this does happen, immediately rinse the area with plenty of clean water.
4. When the engine has cooled, remove the radiator cap.
5. Place a container for coolant under the radiator and begin draining.
6. Drain the coolant from the radiator by opening the drain hole at the bottom on the left side (see illustration). If the drain plug is rusted and cannot be removed, or if the radiator does not have a plug, disconnect the lower radiator hose and drain the coolant. Be careful not to let it get on your skin or in your eyes.
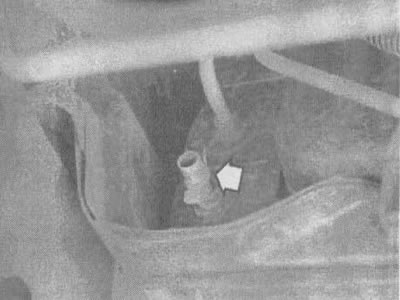
29.6. Drain plug (indicated by the arrow) located on the lower left corner of the radiator
7. After the coolant stops flowing out of the radiator, move the container under the drain plug(s) of the engine block, then unscrew the plugs. The 3.1L engine has plugs on both sides of the block, while the 3.8L engine only has one plug. On vehicles equipped with an engine oil cooler, disconnect the inlet hose located on the left side of the cooler.
8. Disconnect the hose from the expansion tank and remove it. Rinse the tank with clean water.
9. Insert a hose into the radiator filler neck and flush the system until clear water comes out of all drain holes.
10. In cases of severe contamination of the radiator, remove it (see chapter 3) and perform backwash. In this case, you need to insert a hose into the lower radiator pipe to allow the water to flow against the normal direction of flow, pouring out through the top. You can consult with radiator repair shops about the need for further cleaning or repair of the radiator.
11. If the coolant is drained regularly and the system is filled with a mixture of antifreeze and water in the correct ratio, then there is no need to use chemical cleaners.
12. To refill the system, tighten the block plugs, connect all radiator and oil cooler hoses, and install the expansion tank and overflow hose.
13. Slowly fill the radiator with the recommended coolant (see section 4) to the base of the filler neck. Wait two minutes and check the coolant level again, adding more if necessary, then close the radiator cap. Add coolant to the expansion tank until it reaches the lower mark.
14. On models with rear heater, avoid using the rear fan the first three times the engine reaches operating temperature. This will ensure that the full flow of liquid passes through the heater radiator and at the same time the air will be displaced from the radiator and pipes.
15. Monitor the coolant level and cooling system hoses carefully during the first few miles of driving after servicing the cooling system. If necessary, tighten the hose clamps and/or add coolant to the system. The coolant level should be slightly above the "HOT" mark on the engine reservoir at normal operating temperature.