
Note: Engines with a displacement of 3.8 L are equipped with an ignition system without a distributor. The spark plug wires are connected directly to the ignition coils.
1. Spark plug wires should be checked at recommended intervals and whenever new spark plugs are installed in the engine.
2. The wires should be checked one at a time to avoid mixing them up when connecting, which is the key to proper engine operation.
3. Disconnect the wire from the spark plug. To do this, grasp the rubber tip, twist slightly and pull out the wire. Pull not on the wire itself, but on the rubber tip.
4 Check the inside of the wire tip for corrosion, which appears as a white powder. Reinstall the wire with the tip onto the end of the spark plug. It must be firmly fixed to the spark plug. If this is not the case, remove the wire and, using pliers, carefully position the metal conductor inside the tip so that it is securely fastened to the end of the spark plug.
5. Using a clean cloth, wipe the entire length of the wire to remove any dirt or grease that has accumulated. Once the wire is clean, inspect it for any burns, cracks, or other damage. Do not make sharp bends in the wire or pull it out - this can break the inner conductor.
6. Disconnect the wire from the ignition coil. This time, also pull only on the rubber tip. Check the wire for corrosion and tighten it down tightly in the same way as you would on a spark plug. Insert the wire back into the ignition coil.
7. Check the remaining spark plug wires one at a time, making sure they are securely connected to the ignition coil and spark plug when the check is complete.
8. If new spark plug wires are required, purchase a kit specifically designed for your engine model. Wire kits are sold in the required length and with rubber tips installed. To avoid mixing up the firing order, remove and replace wires one at a time.
9. Loosen the distributor cap mounting screws (please note that the screws have a flange so they cannot be pulled out completely). Pull the cover up with the wires to separate it from the distributor, then set it aside.
10. Now you can see the rotor (runner) on the distributor shaft. Check it carefully for cracks and burns. Make sure the rotor spring has the proper tension and look for signs of corrosion and wear on the top of the rotor. If there is any doubt about the condition of the rotor, replace it with a new one.
11. If the rotor needs to be replaced, unscrew the screws, remove the rotor from the axle and install a new one.
12. Check the distributor cap for cracks or other damage. Carefully inspect the outlet on the inside of the cap for excessive corrosion or damage (see illustration). If in doubt about the condition of the cover, replace it with a new one.
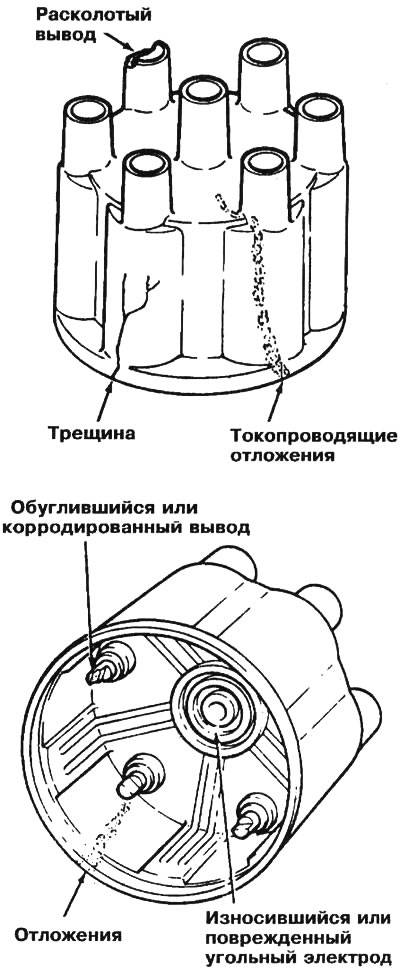
33.12. The most common defects visible when inspecting the distributor cap are shown here (if there is any doubt about its condition, replace it with a new one)
13. If the distributor cap needs to be replaced, separate it from the distributor and transfer the spark plug wires one at a time to the new cap. Be careful not to mix up the wires!
14. Replace the distributor cap and tighten the screws.
(The article was reprinted from the website «ChevyMan»)