
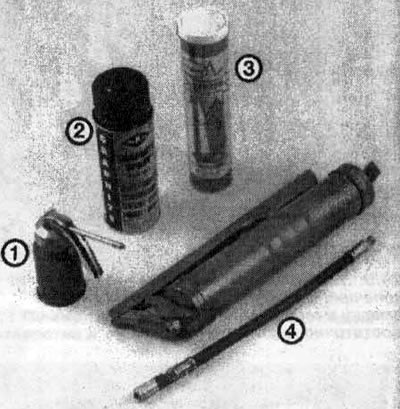
26.1. Materials required for lubrication of the chassis and body:
1 - Motor oil - oil in this package can be used for door and hood hinges
2 - Graphite aerosol - used to lubricate lock cylinders
3 - Grease - grease of various types and consistencies is applied using a grease gun. For the necessary requirements for lubricants, see the technical specifications
4 - Grease Gun - Shown here is a typical grease gun with a removable hose and nozzle. It is necessary for lubrication of the chassis. Clean the syringe thoroughly after use!
2. To facilitate access under the vehicle, raise it with a jack and place jack stands under the frame. Make sure the posts are securely fastened. If at this time it is also necessary to remove the wheels for rotation or to check the brakes, loosen the wheel nuts slightly while the vehicle is still on the ground.
3. Before you begin lubricating, squeeze a little grease out of the tip to remove any dirt from the end of the syringe. Wipe the nozzle with a clean cloth.
4. Having collected a lot of clean rags and taken a grease gun, begin to lubricate the parts, lying under the car.
5. Wipe the ball joint grease nipple dry and place the tip of the grease gun on it (see illustration). Press the lever on the grease gun to dispense the grease. Continue squeezing the grease until it begins to come out of the joint between the two parts. If it starts to come out around the tip of the syringe, this means that the oiler is dirty or the tip of the syringe is not fully seated on the nozzle. Replace the oiler if necessary.
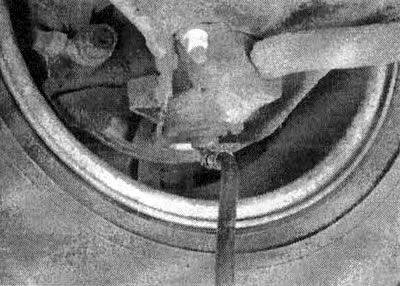
26.5. After wiping the oiler dry, attach the tip of the grease gun and pump grease into the ball joint (usually two pumps of the syringe are enough)
6. Wipe off excess grease from parts and grease nipple. Repeat the above procedure for the steering tips. The grease should be pumped into them until the rubber seals feel hard when touched. Do not pump too much grease into the hose as this may damage the boots (see illustration).

26.6. Pump grease into the tie rod end until the rubber seal feels hard when touched
7. While under the vehicle, clean and lubricate the parking brake cable along with the cable guides and levers. This can be done by applying a small amount of grease to the cable and its mating parts with your fingers.
8. Raise the hood and apply a small amount of chassis grease to the hood latch mechanism. While you are lubricating the cable at the latch, have your assistant pull the cable release lever from inside the vehicle.
9. Lubricate all curtains (door hinges, hood, etc.) motor oil to keep them in good working order.
10. Lock cylinders can be lubricated with graphite grease or silicone spray, available at auto parts stores.
11. Lubricate the door seals with silicone spray. This will reduce abrasion and slow down wear.