
2. The cooling system should be checked when the engine is cold. Perform this operation before operating the vehicle or no earlier than 3 hours after turning off the engine.
3. Remove the radiator cap by turning it to the left until it stops. If you hear a hissing sound (indicating that there is still excess pressure in the system), wait until it stops. Then press down on the cap with the palm of your hand and continue turning it to the left until the cap can be removed. Rinse the cork thoroughly (the inner and outer side) with clean water. Clean the radiator neck. All traces of corrosion must be removed. The coolant inside the radiator should be relatively clear. If it is colored rusty, the fluid should be drained and replaced with fresh fluid (see section 29).
4. Check the upper and lower radiator hoses along their entire length, as well as all heater hoses (smaller diameter), which go from the engine to the heat-insulating partition. Check each hose along its entire length and replace any that show cracks, kinks or signs of wear. Cracks may become more visible if the hose is compressed (see illustration).
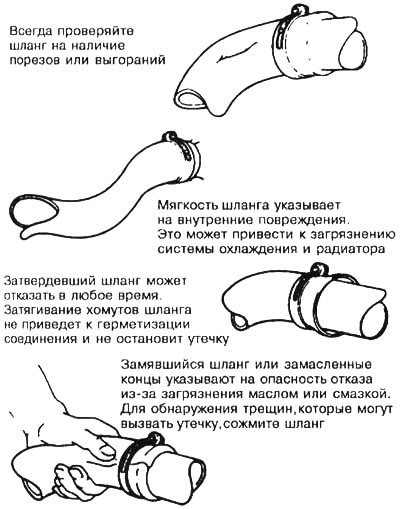
9.4 Hoses, like drive belts, often fail at the most inopportune times, so check them carefully as described here
5. Make sure all hose connections are tight. A cooling system leak will usually show up as white or "rusty" colored deposits in areas surrounding the leak. If wire type clamps are used at the ends of the hoses, it is recommended to replace them with more secure clamps with screws.
6. Use compressed air or a soft-bristled brush to remove insects, leaves, and other debris from the front of the air conditioning radiator or condenser. Be careful not to damage the thin cooling fins or cut yourself.
7. Perform a pressure test of the cooling system every other maintenance. Do the same at the first sign of a malfunction in the cooling system.
[The original source of the article is the website: «CHEVYMAN.ru»]