
2. Although some sources recommend changing the oil filter every other oil change, the low cost of the oil filter and the relative ease of its installation suggest that a new filter should be installed every time the oil is changed.
3. Gather all the necessary tools and materials before you begin work (see illustration).
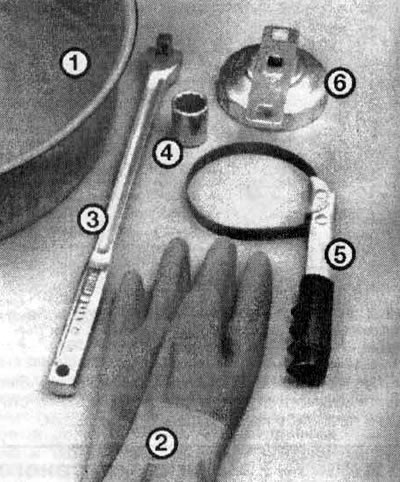
12.3. These tools are required when changing the engine oil and filter:
1 - Drain pan - it should be shallow but wide to prevent oil from splashing out
2 - Rubber gloves - when removing the drain plug and filter, your hands will get oil on them (gloves will also prevent burns)
3 - Extension - Sometimes the oil pan drain plug is tightened very tightly and an extension will be needed to increase the leverage to unscrew it
4 - Socket head - used with extension
5 - A special key for removing the oil filter is a key with a metal strip
6 - Oil Filter Wrench - This type of wrench fits into the bottom of the filter and can be turned using a ratchet or socket (there are different size keys for different types of filters)
4. Also, you should have a rag to wipe up any spilled oil. Access to the underside of the vehicle is greatly improved if the vehicle can be raised on a lift.
Warning! Do not work under a vehicle that is supported only by a jack.
5. If you are changing the oil under your vehicle for the first time, familiarize yourself with the location of the oil drain plug and oil filter. Engine and exhaust system components will be hot during operation, so pay attention to their location to avoid touching them while working under the vehicle.
6. Warm up the engine to normal operating temperature. If new oil or any tools are needed, use the warm-up time to gather everything you need for the job. The required type of oil can be found in the subsection "Recommended oils and fluids" at the beginning of this chapter.
7. When the engine oil warms up (after the engine oil warms up, it flows out better, and more dirt and bottom sediments are removed along with the oil), raise and support the vehicle. Make sure it is securely fastened.
8. Place all necessary tools, rags and newspapers under the car. Place a drain pan under the drain plug. Remember that at first the oil will flow out under pressure.
9. Be careful not to touch hot parts of the exhaust system. Unscrew the drain plug at the bottom of the oil pan (see illustration). If the oil is too hot, you may want to wear gloves when removing the cap.
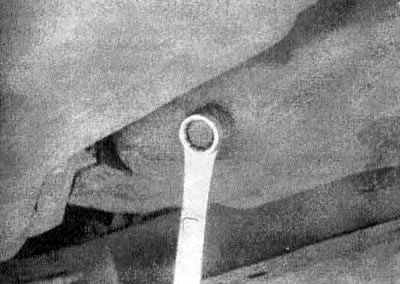
12.9. The engine oil drain plug is located at the rear of the oil pan. It is usually very tight, so use a socket wrench to avoid stripping the hexagon edges
10. Allow the old oil to drain into the pan. As the oil flow slows down and becomes a droplet, it may be necessary to move the pan further under the engine.
11. After the oil has drained, wipe the drain plug with a clean cloth. Small metal particles may stick to the plug and contaminate the new oil.
12. Clean the area around the drain plug hole and reinstall it. Tighten the plug securely with a wrench. If you have a torque wrench, use it to tighten.
13. Move the oil pan into place under the oil filter.
14. To loosen the oil filter, use a special oil filter wrench (see illustration). A chain or metal strip from a wrench can damage the oil filter housing, but this does not matter, since in any case the filter will be unsuitable for further use.
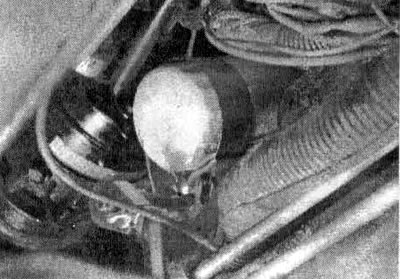
12.14. The oil filter is usually also tightened very tightly, and a special key is required to unscrew it (do not use this wrench to tighten the new filter!)
15. Unscrew the old filter completely. Be careful - it's full of oil. Drain the oil from the filter into the drain pan.
16. Compare the old filter with the new one to make sure they are the same type.
17. Use a clean rag to remove all oil, dirt and sediment from the area where the oil filter was mounted on the engine. Look at the old filter and make sure the rubber gasket is not stuck to the engine. If this happens, remove the gasket.
18. Apply a small amount of oil to the rubber gasket of the new oil filter (see illustration), and also pour a small amount of fresh oil into it. Oil pressure will not build up in the engine until the pump has filled the filter with oil, so a partial fill will reduce the amount of time the engine will run without oil.
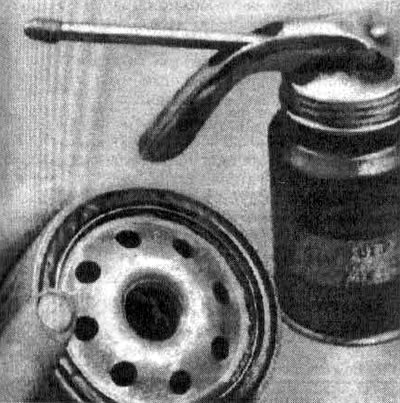
12.18. Lubricate the oil filter gasket with clean engine oil before installing the filter on the engine
19. Install the new filter on the engine using the filter tightening recommendations stamped on the filter housing or provided on the filter box. Most filter manufacturers do not recommend using an oil filter wrench when tightening, as this can overtighten the connection and damage the gasket.
20. Remove all equipment, rags, etc. from under the vehicle. Be careful not to spill oil from the drain pan. Lower the car.
21. Move to the engine compartment and locate the oil filler cap.
22. Pour clean oil through the filler hole. You can use a funnel.
23. Pour three quarts of clean oil into the engine. Wait a few minutes and allow the oil to drain into the pan, then check the level on the dipstick (see if necessarysection 4). If the oil level is above the "ADD" mark, start the engine to allow new oil to fill all oil passages.
24. Start the engine and let it run for about 1 minute, then turn it off. Inspect under the vehicle for leaks through the oil pan drain hole and around the oil filter. If there is a leak in any of these places, tighten the connections with greater force.
25. When the new oil has circulated through the lubrication circuit and the filter is full, check the oil level again using the dipstick and top up if necessary.
26. During your first few trips after an oil change, make it a habit to check for leaks and the oil level frequently.
27. Old oil drained from the engine cannot be reused. Oil recycling stations, auto repair shops and petrol stations will usually accept oil that can be cleaned and reused.