
Warning! The brake system may contain asbestos, which is dangerous to your health. Do not blow out its particles with compressed air or inhale it. Do not use gasoline or solvents to remove asbestos dust. Use only brake cleaner or denatured alcohol.
Note: Illustrations relating to the braking system are contained in chapter 9.
1. In addition to the above intervals, the brakes should be checked whenever wheels are removed or faults are suspected. Raise the vehicle and support it securely on stands. Remove the wheels.
Disc brakes (front)
2. Disc brakes can be checked without removing any parts other than the wheels. If the brake pads are not replaced in time, extensive damage to the disc may occur.
3. Disc brake pads have built-in wear indicators that emit a squealing warning sound when the pads are worn to the limit (see illustration).
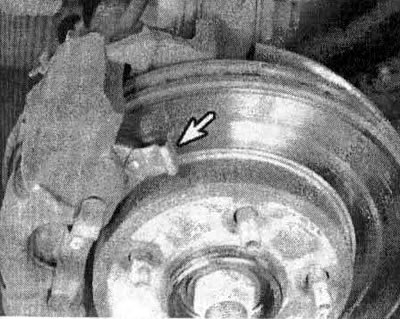
17.3. When the pad wears out, the brake wear indicator (indicated by the arrow) will come into contact with the discs and will make a sharp squealing sound when braking
Caution: Failure to replace the pads soon after the wear indicators begin to make a squealing noise may result in disc damage requiring costly repairs.
4. The disc brake calipers in which the pads are installed are now visible. Each caliper has an outer and inner pad. All pads should be checked.
5. Each caliper has a "window" for checking the brake pads (see illustration). Once the pad material wears down to a thickness of about 1/8 inch or less, the pads should be replaced.
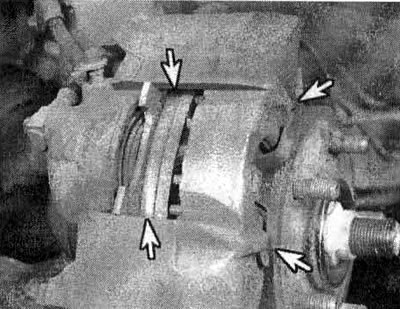
17.5 Look through the holes in the front of the caliper to check the condition of the brake pads (indicated by arrows); you can also check the pad linings rubbing against the disc by looking through each end of the caliper
6. If you are unsure of the exact thickness of the remaining pad material, remove the pads for further inspection or replacement (see chapter 9).
7. Before installing the wheels, check for leaks and/or damage to the brake hoses and connections. If necessary, replace the hose or couplings by contacting chapter 9.
8. Check the condition of the brake disc. Look for nicks, deep scratches and areas of overheating (they are either discolored or have a blue tint). If wear or damage is detected, the disc can be removed and reground in a workshop or replaced with a new one. Regarding detailed inspection and repair procedures see chapter 9.
Drum brakes (rear)
9. Raise the vehicle and support it securely on stands. Block the front wheels to prevent the car from rolling away; however, do not apply the parking brake as this will lock the drums.
10. Remove the wheels.
11. Mark the hub so that it can be installed in the same position in its original place. Use chalk, a scriber's pencil, etc. to make marks on the drum, hub, and backing plate.
12. Remove the brake drum.
13. Once the brake drum is removed, carefully clean the brake assembly with brake cleaner.
Warning! Do not blow off dust with compressed air or inhale it (it may contain asbestos, which is hazardous to health).
14. Measure the thickness of the lining material on the front and rear brake pads. If the material is worn down to 1/8 of an inch, counting down to rivets or metal lining, the linings should be replaced (see illustrations). The overlays should also be replaced if they are cracked or covered with glaze (there are shiny areas) or filled with brake fluid.
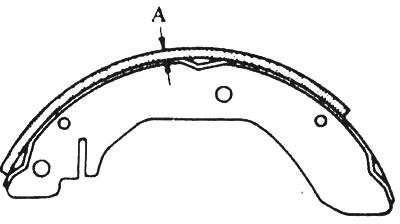
17.14 If the brake linings are bonded to the brake shoe, measure the thickness of the linings from the outer surface to the metal of the shoe as shown here; if the brake pads are riveted to the shoe, measure the thickness from the outer surface of the pad to the head of the rivet
15. Make sure that all brake assembly springs are connected and in good condition.
16. Check the brake system components for brake fluid leaks. Using your finger or a small screwdriver, carefully remove the rubber caps on the wheel cylinder located on top of the brake shoes. Any leakage here is an indication that the wheel cylinders need immediate overhaul (see chapter 9). Also, check all hoses and fittings for leaks.
17. Wipe the inside of the drum with a clean cloth dampened with denatured alcohol or brake cleaner. Be careful not to inhale hazardous asbestos dust.
18. Check the inside of the drums for chips, nicks, deep grooves and hardened areas, which appear as small discolored areas. If they cannot be removed with fine-grained sandpaper, the drum should be sent to a workshop for re-grinding.
19. Repeat this procedure for the other wheel. If the inspection reveals that all parts are in good condition, reinstall the brake drums, install the wheels and lower the vehicle to the ground.
Parking brake
20. The parking brake is activated by the pedal; it locks the rear brake system. The easiest and perhaps most straightforward method of periodically checking the operation of the parking brake is to stop the vehicle on a steep hill with the parking brake applied and the transmission in neutral. If the parking brake does not "hold" the car, it needs servicing (see chapter 9).
[The article is reprinted from the website: CHEVYMAN]