
Caution: Certain precautions must be taken when checking and servicing the battery. Battery cells always contain flammable hydrogen gas, so keep the battery away from open flames and do not smoke near it. The electrolyte inside the battery is diluted sulfuric acid, which, if it comes into contact with it, can injure the skin or eyes, and damage clothing and paintwork. When disconnecting battery cables, always remove the negative cable first and reconnect it last.
1. Battery maintenance is an important procedure that will help you prevent embarrassing situations due to battery failure. This procedure will require several tools (see illustration).
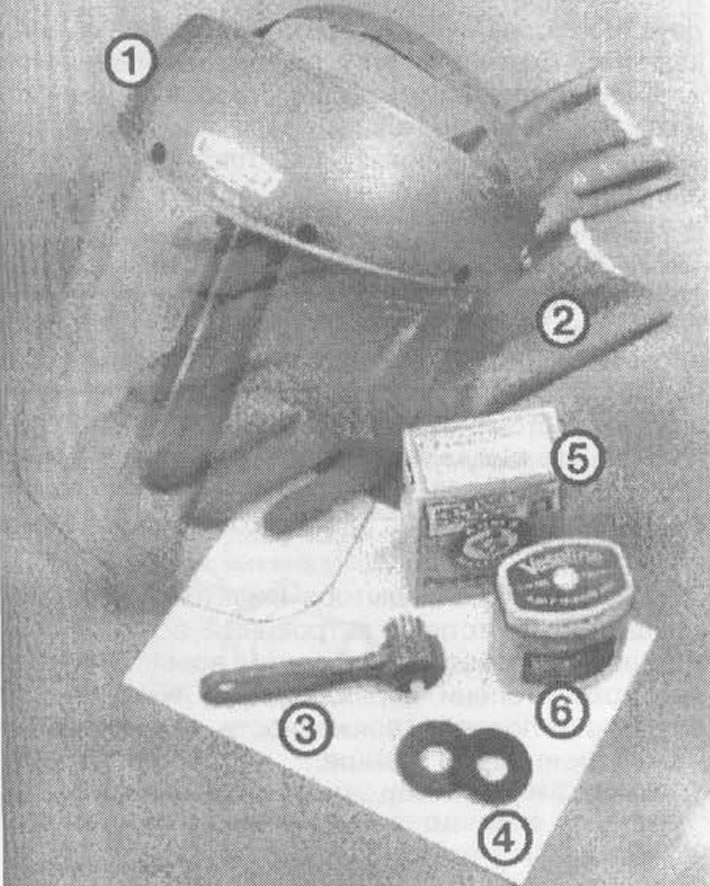
8.1. Tools and materials required for battery maintenance:
1 - Face shield or safety glasses - necessary when brushing away acid corrosion and acid particles that may get into the eyes
2 - Rubber gloves - needed to ensure safety when servicing the battery (remember that there is acid inside the battery!)
3 - Battery Terminal and Wire Cleaner - This wire brush removes traces of corrosion from the battery and its wires
4 - Washers - placing one of these washers on each terminal (directly under the terminal) will help prevent corrosion (make sure you select the correct type - for batteries with side terminals!)
5 - Baking soda - a solution of baking soda and water can be used to neutralize the acid
6 - Vaseline - a layer of this substance on the battery terminal bolts will prevent corrosion
2. All vehicles described in this manual are equipped with a sealed battery as standard. Although this type of battery has many advantages over older ones (elemental type) and does not require adding water, however, it should still be serviced in accordance with the procedure described below.
Examination
3. The battery is located on the left side of the engine compartment. The battery should be checked periodically for damage such as cracked case or cover.
4. Check the strength of the battery terminals and connections and the quality of the electrical contact; check each wire along its entire length for cracks and wear.
5. If acid corrosion is visible (in the form of white loose deposits), remove the wires from the battery terminals, clean the terminals with a special brush and install the terminals in their original place. Corrosion can be minimized by using special washers available at auto parts stores or by applying a coat of petroleum jelly to the terminals and wires after assembly.
6. Make sure the battery bracket is in good condition and that the battery mounting bolt is tight (see illustration). If the battery has been removed from the bracket, make sure that there are no parts remaining at the bottom of the bracket when the battery is reinstalled. When installing, do not overtighten the battery mounting bolt.
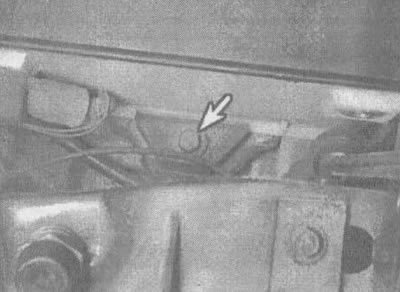
8.6. Check the tightness of the battery mounting bolt (indicated by the arrow)
7. Information on removing and installing the battery can be found in Chapter 5.
Cleaning
8. Corrosion on the mounting parts, battery case and surrounding areas can be removed with a solution of baking soda and water. Rinse all areas to be cleaned thoroughly with clean water.
9. All metal parts of the car that are subject to corrosion should be coated with a zinc-based primer and then painted.
Charger
Warning! When charging the battery, hydrogen is released, which is explosive. Do not smoke or allow open flames near a battery that is being charged or has recently been charged. Wear protective glasses when near a charging battery. Also, before connecting or disconnecting the battery from the charger, make sure the charger is unplugged.
10. Low current charging is the best way to preserve a battery that has been discharged to the point where it can no longer be used to start the engine. It is also recommended to keep the battery charged in a vehicle that is driven only a few miles between engine starts. Maintaining the battery charge is especially important in winter when the battery is under greater load when starting the engine and auxiliary electrical equipment is used more intensively.
11. It is best to use a 1A or 2A battery charger (sometimes called a "trickle" charger). These are the safest and put the least amount of stress on the battery. Besides, they are the cheapest. For faster charging, you can use a charger with a higher charging current, but do not use chargers that deliver more than 0.1 of the battery's amp-hour rating. Fast chargers that restore battery power in 1-2 hours are the most stressful on the battery and can cause damage. This type of charger should only be used in emergency situations.
12. The average time required to charge the battery is indicated in the instructions for the charger. Typically, a trickle charger charges a battery in 12-16 hours.
13. Remove all element covers (if any) and cover the holes with a clean cloth to prevent electrolyte from spilling. Disconnect the negative battery terminal and attach the charger clamps to the battery posts (positive - to positive, negative - to negative), then plug the charger into the power supply. If your charger has a voltage range selector, set the range to 12V.
14. If you use a charger rated for more than 2A, check the battery regularly while charging to ensure that it does not overheat. If you use a trickle charger and have checked it regularly during the first two hours of charging, you can safely leave it overnight.
15. If the battery has removable cell plugs, measure the specific gravity of the electrolyte with a hydrometer every hour for at least several hours of the charging cycle. Consider the battery to be charged if there is no change in the electrolyte density readings for two or more hours and the electrolyte in the cells bubbles slightly. The density readings in each battery cell should be very close to the density readings in the other cells. If this is not the case, then there are faulty elements in the battery.
16. Some batteries with a sealed cap have built-in hydrometers on the top that indicate the state of charge by the color displayed in the hydrometer window. Typically, a bright color on the hydrometer indicates a full charge, while a dark color indicates that the battery needs recharging. Check the manufacturer's instructions for your battery to make sure you know what each color means.
17. If the battery has a sealed cap and does not have a built-in hydrometer, you can use a digital voltmeter to check the state of charge. A fully charged battery should produce a voltage of 12.5 V or higher.
[For details, visit the website: CHEVYMAN.RU]