ChevyMan.ru
Mazda Mitsubishi Toyota Land Rover Honda Kia Nissan
English Русский
Български
Беларускі
Український
Српски
Hrvatski
Română
Polski
Slovenský
Magyar
|
Articles | Sitemap | Contacts |


Home   Aveo   Captiva   Cruze   Lacetti   Lanos   Niva   Tahoe   Others  
Captiva 1 (2006-2018)
  • Home
  • Captiva
  • 1 (2006-2018)
  • Body
  • Interior (internal elements)
  • Interior rear view mirror

Interior rear view mirror (Chevrolet Captiva 1)

            0

The interior rear view mirror is attached to a support that is attached to the windshield. This support is installed by the glass supplier using a plastic polyvinyl butyl adhesive.

On replacement windshields, the mirror support is attached to the glass. To install a removed mirror support or to install a new part, you will need the following:
  • Loctite® Minute Bonding Adhesive.
  • Original or replacement mirror support.
  • Wax marking pencil or crayon.
  • Rubbing alcohol.
  • Clean paper towel.
  • Fine sandpaper (grain #320 or #360).
  • 2mm Allen key.

Installation procedure


Installation procedure


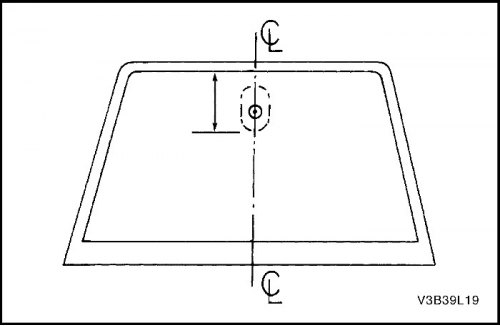
1. Measure the distance from the headliner to the bottom of the windshield where the mirror support will be installed.
1. Measure the distance from the headliner to the bottom of the windshield where the mirror support…


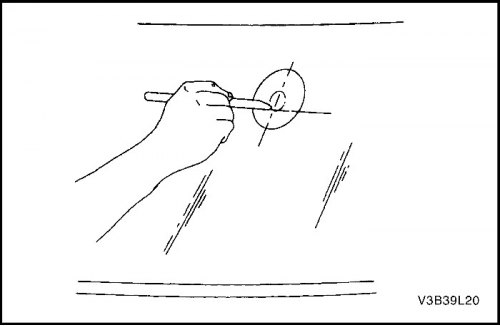
2. Mark this position on the outside of the glass with a wax marking pencil or chalk. Draw a large circle around the mirror support location on the outside of the glass.


3. Clean the inside of the glass with household cleaner, glass cleaner or polish and paper towels. Wipe the glass until completely dry. When the installation area is dry, clean it with an alcohol-soaked paper towel to remove any remaining cleaning powder or glass cleaner.

4. If a new mirror mount is being installed, clean the surface to be attached with fine #320 or #360 sandpaper. If the original mirror mount is being used, all traces of factory applied adhesive must be removed prior to installation.

5. Wipe the sanded mirror support with a clean paper towel soaked in rubbing alcohol. Allow the support to dry.

6. Follow the adhesive manufacturer's instructions for applying the adhesive and preparing the mirror support before installing the mirror support on the glass.

7. Place the mirror support in the previously marked position. Press the support evenly against the glass and hold it in the pressed position for 30-60 seconds.

8. After 5 minutes, remove excess glue with a towel soaked in alcohol or glass cleaning solution.

9. Install the interior rearview mirror to the mirror support using the mounting screw.

Tighten

Tighten the rear view mirror mounting bolt to 1.2 Nm (11 lbs.in).

The article was checked: Vladimir Romannikov
This article is available at russian, bulgarian, belarusian, ukrainian, serbian, croatian, romanian, polish, slovak, hungarian

Share information:

Previous articles
Captiva 1: Interior (internal elements)
Next articles

Driver's knee bolster
Rear wheel arch trim panel
Storage tray in the rear compartment
Floor carpeting
Floor console — removal and installation


See similar articles on the topic of Chevrolet cars:
Rear view mirrors Chevrolet Aveo T300 (2012-2018)
Rear view mirrors Chevrolet Cruze 1 (2008-2016)
Rear window and exterior rear view mirror heating circuit diagram Chevrolet Lacetti 1 (2002-2009)
Rear view mirrors Chevrolet Lanos T150 (2002-2009)
Removal and installation the interior rearview mirror Chevrolet Niva 1 (2002-2016)
Interior trim of the external rear view mirror Chevrolet Tahoe 2 and 3 (2000-2014)
Rear view camera Chevrolet Orlando 1 (2010-2018)
Link in different formats to this page


Visitor comments

No comments yet


How much will 35 + 12 =


Captiva 1 (2006-2018) 
  • Manual
  • Before leaving
  • Keys, doors and windows
  • Seats, protection systems
  • Instruments and controls
  • Lighting system
  • Information and entertainment
  • Navigation system
  • Climate control
  • Driving a car
  • Car care
  • Maintenance
  • Engine 2.0 l (diesel)
  • Engine device
  • Troubleshooting
  • Engine repair
  • Cooling system
  • Engine electrical equipment
  • Control and power systems
  • Exhaust system
  • Engine FAM II 2.4D
  • Engine device
  • Troubleshooting
  • Engine repair
  • Cooling system
  • Engine electrical equipment
  • Control and power systems
  • Exhaust system
  • Engine HFV6 3.2L
  • Engine device
  • Troubleshooting
  • Engine repair
  • Cooling system
  • Engine electrical equipment
  • Control and power systems
  • Exhaust system
  • Transmission
  • Front drive axle
  • Rear drive axle
  • Automatic gearbox - device
  • Automatic gearbox - service
  • Automatic gearbox - repair
  • Manual gearbox - device
  • Manual gearbox - service and repair
  • Clutch
  • Transfer case
  • Chassis
  • Car suspension
  • Brake system
  • Steering
  • Body
  • Heating and ventilation
  • Air conditioning (manual)
  • Air conditioning (automatic)
  • Seat belts
  • Airbags
  • Car seat
  • Interior (internal elements)
  • Exterior (external elements)
  • Doors and windows
  • Electrical equipment
  • Equipment and devices
  • Lighting and lamps
  • Windshield wipers and washers
  • Electrical circuits


ChevyMan.ru © 2017-2026 · Mobile version · Feedback · Site search · Interesting to read · Sitemap: EN BG BY UA RS HR RO PL SK HU

Aveo 2003-2008 · Aveo 2006-2011 · Aveo 2012-2018 · Captiva 2006-2018 · Cruze 2008-2016 · Lacetti 2002-2009 · Lanos 2002-2009 · Niva 2002-2016 · Tahoe 1992-2000 · Tahoe 2000-2014 · Lumina 1 1989-1994 · Trailblazer 1 2001-2008 · Orlando 1 2010-2018 ·
🛡️ For your security and to improve our service, this site uses cookies. You can disable them in your browser.