
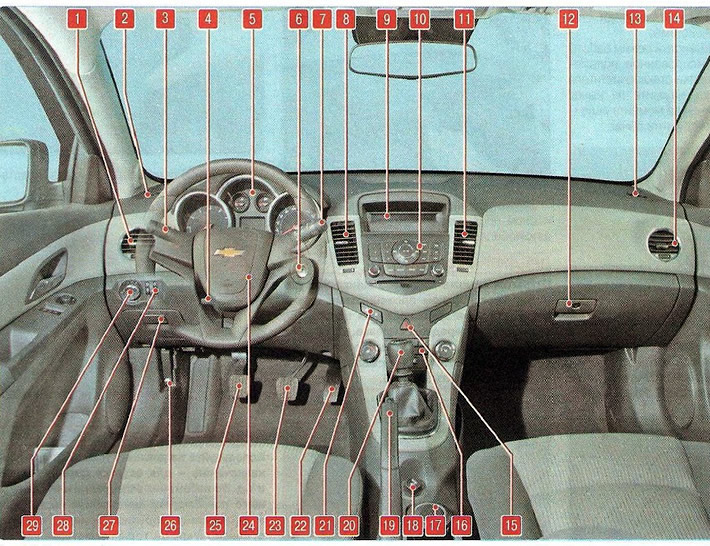
The following controls and instrumentation are located on the instrument panel: (see fig. 1.7).
1, 14 - side nozzles of the ventilation and heating system of the passenger compartment.
2, 13 - door glass blowing nozzles.
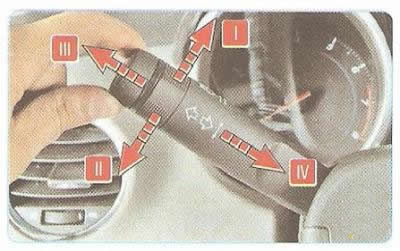
3 - lever for switching direction indicators and high beam headlights.
The lever can occupy four positions:
- I - right turn signals are on (fixed position);
- II - left turn signals are on (fixed position);
- III - high beam headlights on (fixed position);
- IV - the high beam headlights are on regardless of the position of the lever.
4 - steering column position lock lever.
5 - instrument cluster.
6 - ignition switch (lock), combined with the anti-theft device, is located on the right side of the steering column. The key in the lock can occupy one of three positions:
- locking - ignition is off, with the key removed the anti-theft device is on. To ensure that the steering shaft is locked after removing the key, turn the steering wheel to the right or left until it clicks;
- ignition on - key cannot be removed, steering unlocked, ignition, instruments and all electrical circuits on;
- starter - ignition and starter are on, the key cannot be removed, the steering is unlocked. This position of the key is not fixed, when released, the key returns to the "ignition on" position under the force of the spring;
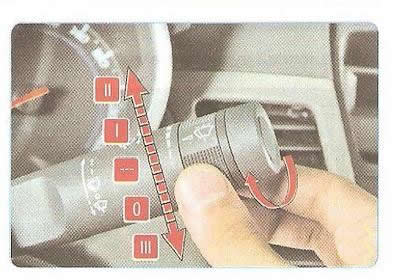
7 - the windshield wiper and washer switch lever turns on the electrical circuits when the ignition is on and can occupy the following positions:
- 0 - windshield wiper off (fixed position);
- 1 - the first (low) windshield wiper speed is on (fixed position);
- II - the second (high) windshield wiper speed is on (fixed position);
- III - by moving the lever towards you, the windshield washer is turned on (non-fixed position). When you press the lever, the windshield wiper will automatically turn on after the washer, and its blades will complete three working cycles.
By turning the ring on the handle along the axis, you set the pause duration between windshield wiper cycles in the "---" mode. The pause duration is changed steplessly. If the car is equipped with an automatic windshield wiper system with a rain sensor, then this ring sets the sensitivity of the system;
"---" - intermittent windshield wiper mode is enabled (fixed position). To make the wiper blades complete one cycle, press the lever towards the "---" position until you feel resistance and release the lever.
8, 11 - central nozzles of the ventilation and heating system of the passenger compartment. The algorithm for controlling the air flow and its intensity through the central nozzles is the same as for the side nozzles 1 and 14.
9 - audio system display.
10 - audio system (is installed depending on the vehicle configuration). The audio system control methods are described in the operating manual supplied with it.
12 - Glove box. Used to store small items and opens by pressing up on the lock handle.
The glove compartment lock can be opened with a key intended for the vehicle door locks.
Warning: If the glove box lid is open in an accident, it may cause injury to a front passenger, even if the passenger is wearing a seat belt. Keep the glove box lid closed while the vehicle is moving.
15 - Hazard warning light switch. When you press the switch, all direction indicators and the corresponding indicator lamps installed in the instrument cluster flash. Pressing the switch again turns off the alarm. Use the hazard warning lights to inform other participants that your vehicle is dangerous.
The hazard warning light works in any position of the key in the ignition switch (lock).
16 - control unit for the heating, air conditioning and ventilation system
17 - Ashtray. The car is equipped with a removable ashtray.
The ashtray fits into the cup holder slots. To open the ashtray, pull its lid up.
Warning: Use the ashtray only for its intended purpose - for cigarette butts, cigars, etc. To avoid fire and subsequent damage to the vehicle, do not place scraps of paper, candy wrappers or other flammable materials in the ashtray.
18 - cigarette lighter.
To use the cigarette lighter, press the button on its moving part (the car ignition is on).
After heating the coil for 10-20 seconds, the moving part will automatically return to its original position with a click and the cigarette lighter can be removed for use.
Warnings: The cigarette lighter can be turned on again no earlier than after 20 seconds.
Do not forcefully hold the cigarette lighter in the pressed position.
Do not use the cigarette lighter socket to connect powerful electrical appliances (for example, for an electric coffee maker) - this may result in damage to the vehicle's electrical equipment.
If the cigarette lighter button does not return to its original position within 30 seconds after switching on, remove the cigarette lighter from the socket to prevent the coil from burning out.
19 - Parking brake lever. Engage the parking brake every time you leave or park the vehicle. On a vehicle with a manual transmission, additionally engage first gear, and on a vehicle with an automatic transmission, set the selector lever to position "P".
To brake the car with the parking brake, lift the lever all the way up - the red signal lamp 27 will light up in the instrument cluster (see fig. 1.8).
To release the brakes, pull the lever up slightly, press the button at the end of the lever handle and lower the lever all the way down - the signal lamp should go out.
Warning: It is strictly forbidden to use the parking brake to slow down a moving vehicle: the braking distance of the vehicle in this case is significantly longer, since only the rear wheels are braked.
20 - gearbox control lever.
Note: Depending on the vehicle's equipment, a selector lever for selecting automatic transmission modes may be installed.
21 - Central lock control button. By pressing the button you can lock and unlock all the doors of the car.
22 - accelerator pedal.
23 - brake pedal.
24 - steering wheel.
25 - clutch pedal.
26 - hood lock drive handle
27 - box for small items.
To use the box, press the handle up and pull the box lid towards you.
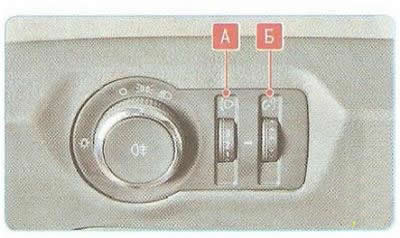
28 - regulator B for brightness of instrument and switch illumination, regulator A for electric headlight corrector.
When the external lighting is on, regulator B allows you to smoothly adjust the brightness of the instrument and switch illumination.
The headlight angle adjuster is equipped with an electric drive; by turning the regulator A, you can smoothly change the angle of the headlights in accordance with the vehicle load
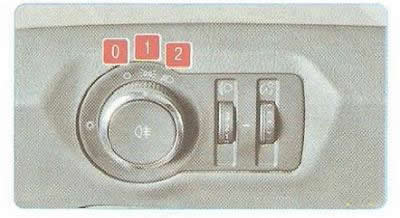
29 - External lighting switch. Turn the switch to select one of three positions:
- 0 - external lighting is off;
- 1 - side lights are on;
- 2 - low beam is on.
When you press the button, the fog lights are turned on - the control lamp 22 lights up in the instrument cluster (see fig. 1.8).
The text of the article was obtained from the website: «CHEVYMAN»