
ChevyMan.ru
Mazda Mitsubishi Toyota Land Rover Honda Kia Nissan
English Русский
Български
Беларускі
Український
Српски
Hrvatski
Română
Polski
Slovenský
Magyar
|
Articles | Sitemap | Contacts |


Home   Aveo   Captiva   Cruze   Lacetti   Lanos   Niva   Tahoe   Others  
Niva 1 (2002-2016)
  • Home
  • Niva
  • 1 (2002-2016)
  • Transmission
  • Transfer case
  • Methodology for determining the causes of vibration of the transfer case and the body floor (in the area of the front seats)

Methodology for determining the causes of vibration of the transfer case and the body floor (in the area of the front seats) (Chevrolet Niva 1)

            0

First of all, note at what speed the transfer case vibration occurs, then proceed to determine the causes of the vibration.

If vibrations occur after repair or replacement of transmission components:

1. Raise the car on a lift to a height convenient for work, loosen the nuts securing the crossmember of the gearbox support to the car body and move the unit to the left until it stops (figure 3-30). Tighten the nuts in this position. The arrow in the figure indicates the direction of movement of the car.

Warning. It is prohibited for people to be inside the vehicle while it is being lifted and repaired. Exercise extreme caution when working under the vehicle. To avoid injury, keep your hands and tools away from rotating transmission parts.
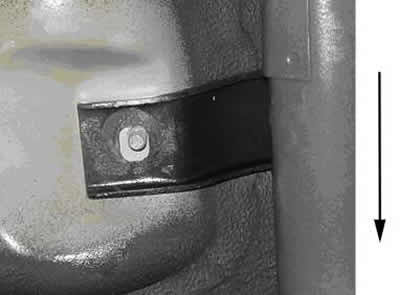

Figure 3-30. Installing the transmission support crossmember.

Figure 3-30. Installing the transmission support crossmember.


2. If the defect is not eliminated, center the transfer case:
  • set the transfer case gearshift handle to neutral. Start the engine, engage second gear with the gearshift lever. The car should not move. Raise the car on a lift to a height convenient for work;
  • loosen the six nuts securing the transfer case to the body;
  • by turning the transfer case on the studs, achieve such a position of the transfer case relative to the body, in which the vibration of the intermediate cardan shaft is minimal;
  • while holding this mode, tighten the nuts securing the transfer case to the body;
  • lower the car, stop the engine.

3. If the defect is not eliminated, install additional washers (figure 3-31) 2.5 mm thick between the cross member of the rear support of the transfer case and the car body (one washer for each stud).


4. If the defect is not eliminated, reinstall the rear propeller shaft, for which:
  • unscrew the bolts securing the propeller shaft to the flanges of the transfer case and the rear axle gearbox;
  • turn the shaft relative to the flanges of the transfer case and the rear axle gearbox by 180°;
  • secure the shaft in this position.

5. If the defect is not corrected, reinstall the front propeller shaft in the sequence indicated above.

6. If the defect is not corrected, replace the rear propeller shaft.

7. If the defect is not eliminated, replace the front propeller shaft.

8. If the defect is not eliminated, replace the intermediate cardan shaft.
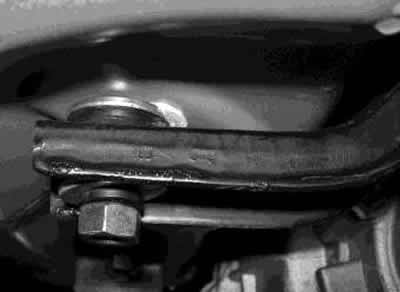
Figure 3-31. Installing washers under the transfer case rear support crossmember.

Figure 3-31. Installing washers under the transfer case rear support crossmember.

The article was checked: Vladimir Romannikov
This article is available at russian, bulgarian, belarusian, ukrainian, serbian, croatian, romanian, polish, slovak, hungarian

Share information:

Previous articles
Niva 1: Transfer case
Next articles

Possible malfunctions, their causes and methods of elimination
Transfer case device
Removal and installation the transfer case
Disassembly and assembly
Checking the technical condition
Transfer case testing
Removal and installation axle shafts


See similar articles on the topic of Chevrolet cars:
Adjusting the position of the front seats Chevrolet Aveo T300 (2012-2018)
Front seats Chevrolet Captiva 1 (2006-2018)
Adjusting the position of the front seats Chevrolet Cruze 1 (2008-2016)
Removal the front section of the floor tunnel lining Chevrolet Lacetti 1 (2002-2009)
Replacing the front crankshaft oil seal Chevrolet Lanos T150 (2002-2009)
Transfer case with manual control Chevrolet Tahoe 1 (1992-2000)
Body repair in case of significant damage Chevrolet Lumina 1 (1989-1994)
Link in different formats to this page


Visitor comments

No comments yet


How much will 30 + 19 =


Niva 1 (2002-2016) 
  • General information
  • Vehicle device
  • User manual
  • Maintenance
  • Power unit
  • Engine repair
  • Cooling system
  • Lubrication system
  • Power and exhaust system
  • Transmission
  • Clutch
  • Car gearbox
  • Transfer case
  • Cardan gear
  • Rear axle
  • Front axle
  • Chassis
  • Suspension and shock absorbers
  • Steering
  • Brake system
  • Body
  • Exterior (external elements)
  • Interior (internal elements)
  • Ventilation and heating
  • Electrical equipment
  • Power devices
  • Lighting and appliances


ChevyMan.ru © 2017-2026 · Mobile version · Feedback · Site search · Interesting to read · Sitemap: EN BG BY UA RS HR RO PL SK HU

Aveo 2003-2008 · Aveo 2006-2011 · Aveo 2012-2018 · Captiva 2006-2018 · Cruze 2008-2016 · Lacetti 2002-2009 · Lanos 2002-2009 · Niva 2002-2016 · Tahoe 1992-2000 · Tahoe 2000-2014 · Lumina 1 1989-1994 · Trailblazer 1 2001-2008 · Orlando 1 2010-2018 ·
🛡️ For your security and to improve our service, this site uses cookies. You can disable them in your browser.