
ChevyMan.ru
Mazda Mitsubishi Toyota Land Rover Honda Kia Nissan
English Русский
Български
Беларускі
Український
Српски
Hrvatski
Română
Polski
Slovenský
Magyar
|
Articles | Sitemap | Contacts |


Home   Aveo   Captiva   Cruze   Lacetti   Lanos   Niva   Tahoe   Others  
Orlando 1 (2010-2018) Trailblazer 1 (2001-2008, petrol) Lumina 1 (1989-1994)
  • Home
  • Chevrolet
  • Orlando 1
  • Electrical equipment
  • Equipment and devices
  • Block-headlamps

Block-headlamps (Chevrolet Orlando 1)

            0

The car is equipped with two headlights. For low and high beam, dual-filament halogen lamps are used. In addition to these, the headlights also contain side light and turn signal lamps.

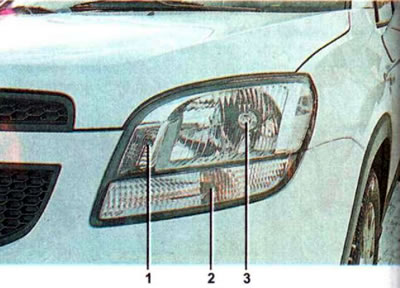
Location of lamps in the headlight: 1 — parking light bulb W5W; 2 — direction indicator lamp PY21W;…

Location of lamps in the headlight: 1 — parking light bulb W5W; 2 — direction indicator lamp PY21W; 3 — high/low beam lamp H4 60/55W


The headlight diffusers are made of plastic. To prevent them from becoming cloudy or scratched, they must not be cleaned of dust and dirt with a dry brush or rag, and gasoline or solvents must not be used to clean them. Contamination must be removed with a jet of water under pressure. Any small scratches that may appear can be removed by polishing the headlight.

To adjust the headlights, there are two regulators on the back wall of each headlight unit.
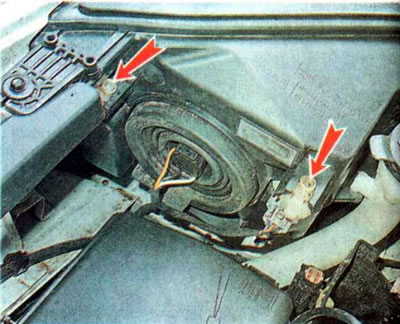
To adjust the headlights, there are two regulators on the back wall of each headlight unit.


With their help you can change the direction of light in the horizontal and vertical plane. The headlights are equipped with an electric headlight corrector. It allows you to adjust the direction of light in the vertical plane from the interior in accordance with the vehicle load.


The electric corrector control unit is located to the left of the steering wheel.
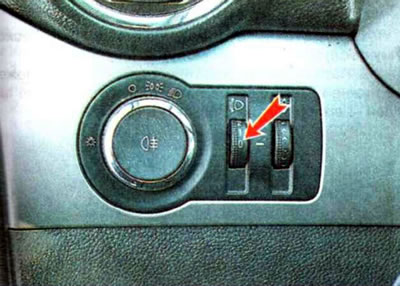
The electric corrector control unit is located to the left of the steering wheel.


Recommendation. When replacing lamps, make sure that the lamp filament is burnt out. There are cases when the lamp does not work due to oxidized contacts in the electrical connections. When replacing a faulty lamp, check the condition of the contacts in its socket. If necessary, treat them with a cleaner and protector for electrical contacts.


Warning. Do not touch halogen lamp bulbs with your fingers. Grease marks from fingers left on the lamp bulb will reduce its service life several times. Work in clean cotton gloves without rubber coating. After accidental contact with your fingers, wipe the lamp bulb with a clean cloth soaked in alcohol.


Original version of the article on the website CHEVYMAN.RU

The article was checked: Vladimir Romannikov
This article is available at russian, bulgarian, belarusian, ukrainian, serbian, croatian, romanian, polish, slovak, hungarian

Share information:

Previous articles
Orlando 1: Equipment and devices
Next articles

Replacing fuses and relays
Fuse and relay box in the passenger compartment
Fuse and relay boxes in the engine compartment
Fuse and relay box
Replacing speakers
Replacing the high/low beam lamp
Replacing the parking light bulb
Replacing the turn signal lamp
Removal and installation the headlight
Side direction indicator


See similar articles on the topic of Chevrolet cars:
Scheme 1 a. Consumers connected via the engine compartment mounting block Chevrolet Aveo T300 (2012-2018)
Cylinder block repair Chevrolet Captiva 1 (2006-2018)
Scheme 33. Mounting block in the instrument panel Chevrolet Cruze 1 (2008-2016)
Replacing the silent block and cushion of the front suspension arm Chevrolet Lanos T150 (2002-2009)
Control lamp block Chevrolet Niva 1 (2002-2016)
Cylinder Block — Cleaning Chevrolet Tahoe 1 (1992-2000)
Link in different formats to this page


Visitor comments

No comments yet


How much will 33 + 47 =


Orlando 1 (2010-2018) 
  • General information
  • Introduction to manual
  • User manual
  • Maintenance
  • Troubleshooting
  • Power unit
  • Engine repair
  • Fuel and control system
  • Cooling and lubrication system
  • Ignition system
  • Transmission
  • Clutch
  • Gearbox
  • Drive shafts
  • Chassis
  • Car suspension
  • Steering
  • Brake system
  • Body
  • Exterior (external elements)
  • Doors, locks and windows
  • Electrical equipment
  • Equipment and devices
  • Windscreen wipers
  • Power devices
  • Electrical diagrams


Trailblazer 1 (2001-2008) 
  • General information
  • User manual
  • Troubleshooting
  • Maintenance
  • Power unit
  • Engine in a car
  • Engine overhaul
  • Cooling and heating
  • Fuel and exhaust system
  • Engine electrical equipment
  • Engine control
  • Transmission
  • Automatic gearbox
  • Transfer case
  • Drive shafts and cardan
  • Chassis
  • Brake system
  • Car suspension
  • Steering
  • Body
  • Exterior (external elements)
  • Interior (internal elements)
  • Doors, locks and windows
  • Electrical equipment
  • Equipment and devices
  • Electrical circuits


Lumina 1 (1989-1994) 
  • General information
  • Maintenance
  • Power unit
  • Engine 3.1L V6
  • Engine 3.8L V6
  • Engine overhaul
  • Cooling system
  • Power and exhaust system
  • Fuel injection
  • Engine electrical equipment
  • Reduced exhaust gas toxicity
  • Transmission
  • Automatic gearbox
  • Drive shafts
  • Chassis
  • Brake system
  • Car suspension
  • Steering
  • Body
  • Heating and air conditioning
  • Repair of body elements
  • Doors, covers and windows
  • Interior (internal elements)
  • Electrical equipment
  • Equipment and devices
  • Electrical circuits


ChevyMan.ru © 2017-2026 · Mobile version · Feedback · Site search · Interesting to read · Sitemap: EN BG BY UA RS HR RO PL SK HU

Aveo 2003-2008 · Aveo 2006-2011 · Aveo 2012-2018 · Captiva 2006-2018 · Cruze 2008-2016 · Lacetti 2002-2009 · Lanos 2002-2009 · Niva 2002-2016 · Tahoe 1992-2000 · Tahoe 2000-2014 · Lumina 1 1989-1994 · Trailblazer 1 2001-2008 · Orlando 1 2010-2018 ·
🛡️ For your security and to improve our service, this site uses cookies. You can disable them in your browser.