ChevyMan.ru
Mazda Mitsubishi Toyota Land Rover Honda Kia Nissan
English Русский
Български
Беларускі
Український
Српски
Hrvatski
Română
Polski
Slovenský
Magyar
|
Articles | Sitemap | Contacts |


Home   Aveo   Captiva   Cruze   Lacetti   Lanos   Niva   Tahoe   Others  
Orlando 1 (2010-2018) Trailblazer 1 (2001-2008, petrol) Lumina 1 (1989-1994)
  • Home
  • Chevrolet
  • Orlando 1
  • General information
  • User manual
  • Audio system controls

Audio system controls (Chevrolet Orlando 1)

            0

Audio system controls 1 - turn on/off and adjust the sound volume; 2 - buttons for the set…

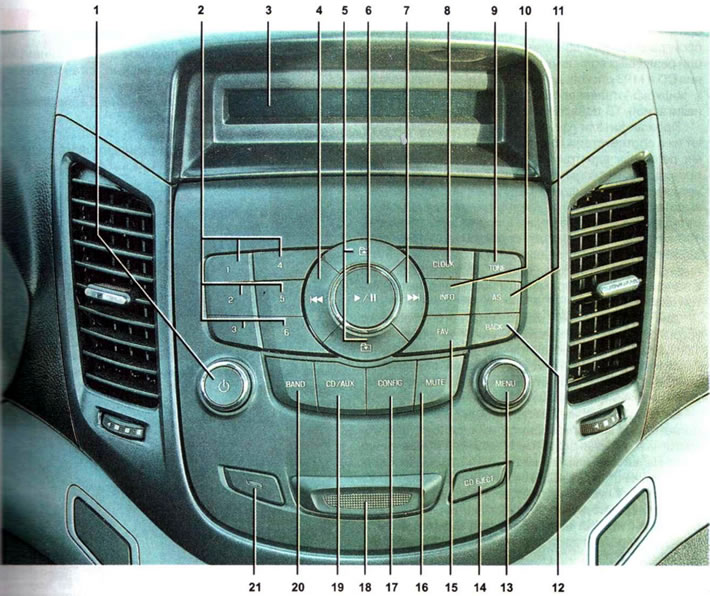
Audio system controls 1 - turn on/off and adjust the sound volume; 2 - buttons for the set frequencies of radio stations 1,2,3,4, 5, 6. To save the selected radio station, press and hold the button until you hear a beep; 3 - display; 4 - switch playing tracks or search radio station frequency back; 5 - switching folders in MP3 playback mode; 6 - play/pause in CD player mode; 7 - switch playing tracks or search radio station frequency forward; 8 - Date and time settings menu; 9 - sound settings menu. By pressing, we sequentially switch the sound level adjustment modes by frequencies (low, mid and high frequencies); balance of speaker volume level - (front/rear), balance (right/left); equalizer. To change the selected parameters, use knob 13; 10 - the mode of displaying the current INFO information. Each time this button is pressed in the CD playback or file listening mode, the following information is selected: disc title, artist, title of the record, total records. In MP3 and MMA playback mode, the following information is selected: file name, title, artist, album, folder name, number of files; 11 - list of saved radio stations, when pressed for a long time, automatic tuning and saving of radio stations with the best signal level occurs on the buttons of the set frequencies 1-6; 12 - return to the previous level in menu mode (BACK); 13 - switching on, moving and selecting in MENU mode; 14 - CD eject button; 15 - list of favorite radio stations and switching between lists*; 16 - mute sound MUTE; 17 - CONFIG system settings menu; 18 - audio system folding panel latch; 19 - switching between CD player mode and AUX external multimedia device connection mode; 20 - turns on the BAND radio mode, pressing it again switches the radio frequency range between FM and AM; 21 - indicator of loaded CD.


* Depending on the configuration.

Currently, there is a wide variety of head units, ranging from simple CD players with the ability to receive radio stations of various wave ranges and play CDs and MP3 discs, to multimedia systems with liquid crystal displays, satellite navigation, TV tuner and DVD playback.

Head unit manufacturers produce their units according to standards that define dimensions, electrical connectors, wire ends and mounting methods. The width of the head unit according to the 1DIN standard should be 180 mm, the height is 50 mm. Head units made according to the 2DIN standard have the same width, and the height is 100 mm. However, car manufacturers do not always adhere to these standards, in this case, standard head units can be integrated into the dashboard, non-standard electrical connectors are used.

To install a new head unit made according to 1DIN or 2DIN standards in place of the standard one, special kits are available. Such kits include dashboard covers or frames, mounting brackets, and adapters for electrical connectors.

There are basically three types of speakers used, divided according to the frequency they reproduce: high-frequency, mid-frequency and low-frequency speakers. Depending on the configuration, cars are equipped with two high-frequency speakers located in the lower part of the front pillar trims and four mid-range speakers located one at the lower part of the front and rear doors.

There are basically three types of speakers used, divided according to the frequency they…


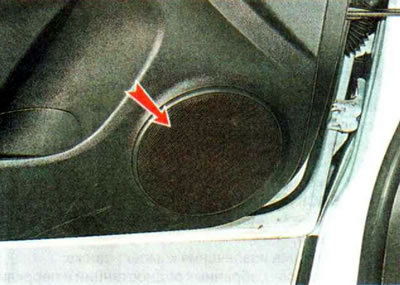
For better reproduction of low frequencies, special speakers are used that operate in a narrow range of low frequencies; such speakers are called subwoofers. Subwoofers operate from additional amplifiers, for connection of which the presence of linear outputs on the head units is required. Due to their large size, subwoofers are usually installed in the luggage compartment.

When choosing acoustic systems, you need to take into account the characteristics of the head unit and the availability of space for their installation. The nominal input power of the speaker should be greater than the output power of the amplifier, but it should not be exceeded by more than 1.5-2 times.

The article was checked: Vladimir Romannikov
This article is available at russian, bulgarian, belarusian, ukrainian, serbian, croatian, romanian, polish, slovak, hungarian

Share information:

Previous articles
Orlando 1: User manual
Next articles

Car audio system
Accessories — DVR
Accessories — Navigator
Seat covers
Roof crossbars for securing luggage
Security system
Systems that improve braking performance and vehicle handling
Air conditioning control unit
Towing a car
Towing with a rope


See similar articles on the topic of Chevrolet cars:
Electrical diagram of the audio system (without RDS) Chevrolet Aveo T200 (2003-2008)
Schematic and assembly diagrams of the audio system Chevrolet Captiva 1 (2006-2018)
Features of the car audio system Chevrolet Cruze 1 (2008-2016)
Removal the front speakers of the audio system Chevrolet Lacetti 1 (2002-2009)
Location of controls and instruments Chevrolet Lanos T150 (2002-2009)
Electronic anti-theft system Chevrolet Niva 1 (2002-2016)
Wiring diagram of a typical audio system Chevrolet Tahoe 1 (1992-2000)
Link in different formats to this page


Visitor comments

No comments yet


How much will 36 + 35 =


Orlando 1 (2010-2018) 
  • General information
  • Introduction to manual
  • User manual
  • Maintenance
  • Troubleshooting
  • Power unit
  • Engine repair
  • Fuel and control system
  • Cooling and lubrication system
  • Ignition system
  • Transmission
  • Clutch
  • Gearbox
  • Drive shafts
  • Chassis
  • Car suspension
  • Steering
  • Brake system
  • Body
  • Exterior (external elements)
  • Doors, locks and windows
  • Electrical equipment
  • Equipment and devices
  • Windscreen wipers
  • Power devices
  • Electrical diagrams


Trailblazer 1 (2001-2008) 
  • General information
  • User manual
  • Troubleshooting
  • Maintenance
  • Power unit
  • Engine in a car
  • Engine overhaul
  • Cooling and heating
  • Fuel and exhaust system
  • Engine electrical equipment
  • Engine control
  • Transmission
  • Automatic gearbox
  • Transfer case
  • Drive shafts and cardan
  • Chassis
  • Brake system
  • Car suspension
  • Steering
  • Body
  • Exterior (external elements)
  • Interior (internal elements)
  • Doors, locks and windows
  • Electrical equipment
  • Equipment and devices
  • Electrical circuits


Lumina 1 (1989-1994) 
  • General information
  • Maintenance
  • Power unit
  • Engine 3.1L V6
  • Engine 3.8L V6
  • Engine overhaul
  • Cooling system
  • Power and exhaust system
  • Fuel injection
  • Engine electrical equipment
  • Reduced exhaust gas toxicity
  • Transmission
  • Automatic gearbox
  • Drive shafts
  • Chassis
  • Brake system
  • Car suspension
  • Steering
  • Body
  • Heating and air conditioning
  • Repair of body elements
  • Doors, covers and windows
  • Interior (internal elements)
  • Electrical equipment
  • Equipment and devices
  • Electrical circuits


ChevyMan.ru © 2017-2026 · Mobile version · Feedback · Site search · Interesting to read · Sitemap: EN BG BY UA RS HR RO PL SK HU

Aveo 2003-2008 · Aveo 2006-2011 · Aveo 2012-2018 · Captiva 2006-2018 · Cruze 2008-2016 · Lacetti 2002-2009 · Lanos 2002-2009 · Niva 2002-2016 · Tahoe 1992-2000 · Tahoe 2000-2014 · Lumina 1 1989-1994 · Trailblazer 1 2001-2008 · Orlando 1 2010-2018 ·
🛡️ For your security and to improve our service, this site uses cookies. You can disable them in your browser.