
ChevyMan.ru
Mazda Mitsubishi Toyota Land Rover Honda Kia Nissan
English Русский
Български
Беларускі
Український
Српски
Hrvatski
Română
Polski
Slovenský
Magyar
|
Articles | Sitemap | Contacts |


Home   Aveo   Captiva   Cruze   Lacetti   Lanos   Niva   Tahoe   Others  
Niva 1 (2002-2016)
  • Home
  • Niva
  • 1 (2002-2016)
  • Body
  • Interior (internal elements)
  • Windshield installation

Windshield installation (Chevrolet Niva 1)

            0

Check the size of the gaps around the perimeter of the glass adjoining the windshield frame. The size of the gaps should not exceed 2 mm.

Degrease the edges of the windshield opening, prime them if necessary. Apply enamel primer to the primed edges of the window opening. Dry the primer under natural conditions for at least three minutes.

Place the removed or new glass on a workbench with the outer surface facing down. Clean the perimeter of the glass with cleaner or isopropyl alcohol, then apply a glass primer (from the adhesive system delivery set) on ceramic paint with a width of 20-25 mm. Dry the coating for at least three minutes in natural conditions.

Apply polyurethane adhesive from a special tube to the window opening in an even, continuous roll (see pos. 8) 12 mm high on the primer surface (see figure 8-60).
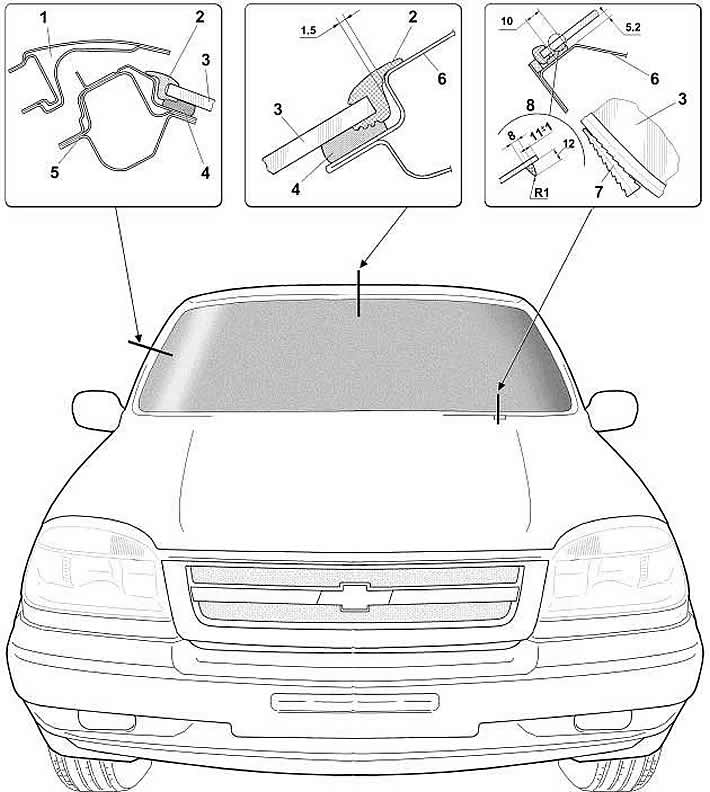
Figure 8-60. Removing and installing the windshield:

Figure 8-60. Removing and installing the windshield:
1 - cladding;
2 - windshield edging;
3 - windshield;
4 - adhesive seam;
5 - front pillar;
6 - Front roof panel cross member;
7 - adjusting wedge;
8 - dimensions of the glue bead before gluing the glass.


Degrease the edge of the windshield glass frame adjacent to the adhesive seam and install the frame on the glass, ensuring that the frame fits tightly along the edge of the glass.


Warning: The maximum holding time for glass with applied adhesive before mounting it on the body is 20 minutes.


Using holders (suction cups), install the glass into the window opening, ensuring uniform gaps with the mating body panels. Install adjusting wedges 7 to prevent the glass from lowering.

Note. The glue polymerizes after 3 hours of natural drying. Therefore, it is prohibited to move the car or slam the doors during this period. It is prohibited to close the door windows so as not to increase the air pressure in the car. Work related to applying force to the glass can begin 14 hours after the glue polymerizes. Optimum strength is achieved after 4-6 days, depending on the ambient temperature.


Check the tightness of the adhesive joint by generously pouring water on the installed glass. Seal possible leaks with mastic 51-G-7 GOST 24025-80.

Install trim, coverings and other parts removed from the vehicle in the reverse order of removal.

The original material is located on the website: ChevyMan.ru

The article was checked: Vladimir Romannikov
This article is available at russian, bulgarian, belarusian, ukrainian, serbian, croatian, romanian, polish, slovak, hungarian

Share information:

Previous articles
Niva 1: Interior (internal elements)
Next articles

Removal and installation the windshield
Windscreen washers
Removal and installation the rear seat
Removal and installation front seats
Removal the interior equipment of the car
Side glass replacement
Replacement of rear door glass
Removal car body upholstery
Removal the shield and front wing cover
Removal the shield and front wing cover for assembly 55


See similar articles on the topic of Chevrolet cars:
Windshield wiper blade replacement Chevrolet Aveo T300 (2012-2018)
Replacing windshield wiper blades Chevrolet Captiva 1 (2006-2018)
Windshield wiper blade replacement Chevrolet Cruze 1 (2008-2016)
Checking the fluid level in the windshield washer reservoir Chevrolet Lacetti 1 (2002-2009)
Checking the fluid level in the windshield washer reservoir Chevrolet Lanos T150 (2002-2009)
Windshield Washer Fluid Chevrolet Tahoe 1 (1992-2000)
Replacement of windshield and fixed windows Chevrolet Lumina 1 (1989-1994)
Link in different formats to this page


Visitor comments

No comments yet


How much will 37 + 14 =


Niva 1 (2002-2016) 
  • General information
  • Vehicle device
  • User manual
  • Maintenance
  • Power unit
  • Engine repair
  • Cooling system
  • Lubrication system
  • Power and exhaust system
  • Transmission
  • Clutch
  • Car gearbox
  • Transfer case
  • Cardan gear
  • Rear axle
  • Front axle
  • Chassis
  • Suspension and shock absorbers
  • Steering
  • Brake system
  • Body
  • Exterior (external elements)
  • Interior (internal elements)
  • Ventilation and heating
  • Electrical equipment
  • Power devices
  • Lighting and appliances


ChevyMan.ru © 2017-2026 · Mobile version · Feedback · Site search · Interesting to read · Sitemap: EN BG BY UA RS HR RO PL SK HU

Aveo 2003-2008 · Aveo 2006-2011 · Aveo 2012-2018 · Captiva 2006-2018 · Cruze 2008-2016 · Lacetti 2002-2009 · Lanos 2002-2009 · Niva 2002-2016 · Tahoe 1992-2000 · Tahoe 2000-2014 · Lumina 1 1989-1994 · Trailblazer 1 2001-2008 · Orlando 1 2010-2018 ·
🛡️ For your security and to improve our service, this site uses cookies. You can disable them in your browser.