


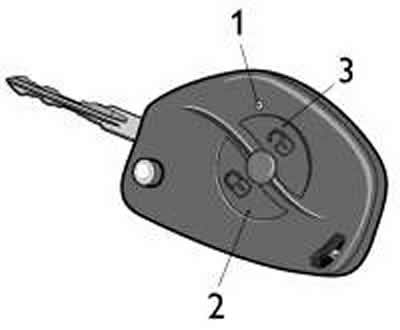
Figure 7-54. Key with remote control (remote control) 2123-6105470-10:
1 - indicator of confirmation of radiation and low battery of the remote control;
2 - lock release button;
3 - lock button.
If the supply voltage of the remote control is within the normal range, then each time you press any button on the remote control, indicator 1 lights up with a short flash.
If, when you press any button on the remote control, the indicator lights up with two short flashes or does not light up at all, then the battery should be replaced with a new one.
To do this, use a flat-head screwdriver to remove plug 1 from the lower housing 2, Figure 7-55, and unscrew self-tapping screw 4.
Press your thumb on the place indicated by the bold arrow, carefully separate the upper 3 housing from the lower 2 housing, taking into account that in the back of the housing (opposite side of the key head) there is another latch.
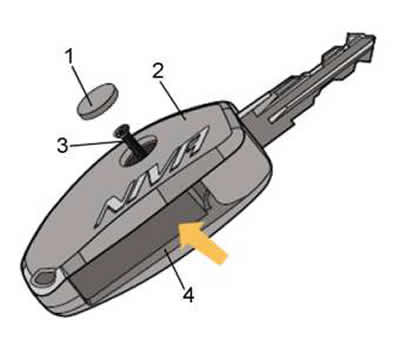
Figure 7-55. Disassembling the key:
1 - plug;
2 - upper key body;
3 - self-tapping screw 2.5x12;
4 - lower key body.
Remove the board from the upper case, replace the power element with a new one, observing the polarity of the connection. Install the board in the upper case of the key.
When the key housings are separated, under the influence of spring 3, Figure 7-56, key buttons key head 2 and key button 1 will fall out of their regular places.
Before connecting the upper body of the key to the lower one, insert button 1 of the key into head 2, aligning the projections of the button with the grooves of the key head. Install spring 3 of the button into the key button, aligning the spring trailer directed inward with the hooks inside the button.
Next, align the protruding spring trailer 3 with the groove of the lower body 4 of the key, indicated by the bold arrow.
Wind the spring 3 by turning the head 2 with the button one turn counterclockwise.
Holding the lower key body with one hand, with the head installed in it and the key button with the spring cocked, align the upper body with the lower one, first hooking the latch located in the back of the body, then fix the main latch.
Tighten screw 4, Figure 2, and install plug 1.
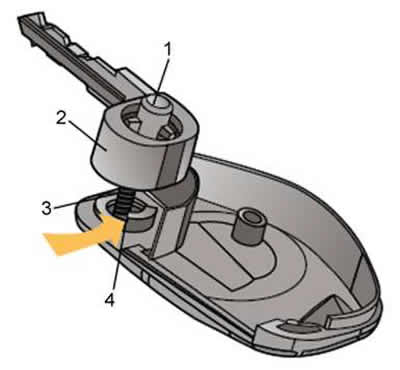
Figure 7-56. Assembling the key:
1 - key button;
2 - key head;
3 - key button spring;
4 - lower key body.