
ChevyMan.ru
Mazda Mitsubishi Toyota Land Rover Honda Kia Nissan
English Русский
Български
Беларускі
Український
Српски
Hrvatski
Română
Polski
Slovenský
Magyar
|
Articles | Sitemap | Contacts |


Home   Aveo   Captiva   Cruze   Lacetti   Lanos   Niva   Tahoe   Others  
Niva 1 (2002-2016)
  • Home
  • Niva
  • 1 (2002-2016)
  • Electrical equipment
  • Lighting and appliances
  • Removal and installation, checking of the instrument cluster

Removal and installation, checking of the instrument cluster (Chevrolet Niva 1)

            0

To remove the instrument cluster, do the following:
  • disconnect the wire from the negative terminal of the battery;
  • remove the instrument panel panel as described in Section 8 "Body";
  • unscrew the screws securing the instrument cluster to the instrument panel trim and, pulling it towards you, remove the instrument cluster from its socket;
  • disconnect the wiring harness from the instrument cluster.

Install the instrument cluster in the reverse order of removal.

Diagnostics of the instrument cluster on the car.

1. Turn on the ignition. Press the trip meter reset button and, after turning on the ignition, release it. After this, the instrument cluster enters the "test" mode:
  • the arrows of all instruments move three times over the entire range of the scale;
  • all segments of the liquid crystal display (LCD) are illuminated.

2. After this, it is necessary to clear the memory of the electronic instrument cluster processor by pressing the odometer reset button for at least 5 seconds.

3. Retest. Then briefly press and release the odometer reset button. The LCD will display the processor software version number (Uer 0.8, Uer 1.1 or other).

4. When you press the reset button again, one of the following codes will appear:
  • 0 - no faults;
  • 1 - the microprocessor is faulty;
  • 2 - open circuit of the fuel level indicator sensor;
  • 4 - increased voltage of the on-board network (more than 16+1.8 V);
  • 8 - low voltage of the on-board network (less than 8-0.6 V).

If there are several faults, the corresponding sum of codes is displayed, for example: 6 (2+4), 10 (2+8), 12 (4+8), 14 (2+4+8).


Checking the instrument cluster. The instrument cluster is checked in accordance with the technical conditions for delivery on the stand using special equipment (pulse generator, stabilized power supply, resistor box, etc.). Reference data for testing devices (at a supply voltage of 13.5±5 V and a temperature of 23±3°C) are given in Tables 7-9, 7-10, 7-11 and 7-12.

Table 7-9. Speedometer Test Data

Table 7-9. Speedometer Test Data

Table 7-10. Tachometer Check Data

Table 7-10. Tachometer Check Data

Table 7-11. Fuel gauge test data
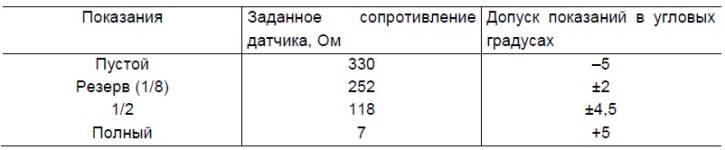
Table 7-11. Fuel gauge test data

Table 7-12. Coolant Temperature Gauge Test Data

Table 7-12. Coolant Temperature Gauge Test Data

The source of the article is available on the website: «ChevyMan.ru»

The article was checked: Vladimir Romannikov
This article is available at russian, bulgarian, belarusian, ukrainian, serbian, croatian, romanian, polish, slovak, hungarian

Share information:

Previous articles
Niva 1: Lighting and appliances
Next articles

Possible malfunctions of the instrument cluster, their causes and methods of elimination
Features of the instrument cluster
Data for checking the gear motor of the door locking system
Door locking system
Data for checking the motor reducer of the front door electric windows
Checking the sensors of control devices
Immobilizer
Remote control system for electrical package «Norma»
Electrical package control unit — removal and installation
Replacing the battery of the key with the remote control


See similar articles on the topic of Chevrolet cars:
Instrument cluster Chevrolet Aveo T300 (2012-2018)
Instrument Cluster Diagnostic Trouble Codes Chevrolet Captiva 1 (2006-2018)
Instrument cluster Chevrolet Cruze 1 (2008-2016)
Instrument cluster Chevrolet Lacetti 1 (2002-2009)
Instrument cluster Chevrolet Lanos T150 (2002-2009)
Instrument cluster Chevrolet Tahoe 2 and 3 (2000-2014)
Instrument cluster wiring diagram Chevrolet Lumina 1 (1989-1994)
Link in different formats to this page


Visitor comments

No comments yet


How much will 25 + 49 =


Niva 1 (2002-2016) 
  • General information
  • Vehicle device
  • User manual
  • Maintenance
  • Power unit
  • Engine repair
  • Cooling system
  • Lubrication system
  • Power and exhaust system
  • Transmission
  • Clutch
  • Car gearbox
  • Transfer case
  • Cardan gear
  • Rear axle
  • Front axle
  • Chassis
  • Suspension and shock absorbers
  • Steering
  • Brake system
  • Body
  • Exterior (external elements)
  • Interior (internal elements)
  • Ventilation and heating
  • Electrical equipment
  • Power devices
  • Lighting and appliances


ChevyMan.ru © 2017-2026 · Mobile version · Feedback · Site search · Interesting to read · Sitemap: EN BG BY UA RS HR RO PL SK HU

Aveo 2003-2008 · Aveo 2006-2011 · Aveo 2012-2018 · Captiva 2006-2018 · Cruze 2008-2016 · Lacetti 2002-2009 · Lanos 2002-2009 · Niva 2002-2016 · Tahoe 1992-2000 · Tahoe 2000-2014 · Lumina 1 1989-1994 · Trailblazer 1 2001-2008 · Orlando 1 2010-2018 ·
🛡️ For your security and to improve our service, this site uses cookies. You can disable them in your browser.