
ChevyMan.ru
Mazda Mitsubishi Toyota Land Rover Honda Kia Nissan
English Русский
Български
Беларускі
Український
Српски
Hrvatski
Română
Polski
Slovenský
Magyar
|
Articles | Sitemap | Contacts |


Home   Aveo   Captiva   Cruze   Lacetti   Lanos   Niva   Tahoe   Others  
Lacetti 1 (2002-2009)
  • Home
  • Lacetti
  • J200 (2002-2009)
  • Power unit
  • Exhaust system
  • Removal the exhaust manifold

Removal the exhaust manifold (Chevrolet Lacetti J200)

            0

We carry out the work when replacing the gasket in the exhaust manifold - cylinder head connection or when repairing the cylinder head.

The junction of the exhaust manifold with the mating plane of the cylinder head is sealed with a metal gasket. If the gasket has burned out or the manifold mounting nuts have become loose, exhaust gases can escape through this connection, which is accompanied by a characteristic sound. If tightening the exhaust manifold mounting nuts does not eliminate the defect, it is necessary to replace the gasket.

To avoid burns, it is recommended to start work after the exhaust system has cooled down.


Disconnect the oxygen concentration sensor wiring harness from the engine management system wiring harness (see Removal the oxygen concentration control sensor).

We unscrew the nuts of the studs securing the flanges of the catalytic converter and the exhaust manifold (see Removal the catalytic converter).

We take out the oil dipstick and insert a paper plug into its tube.

We moisten the nuts securing the exhaust manifold to the cylinder head with penetrating liquid.
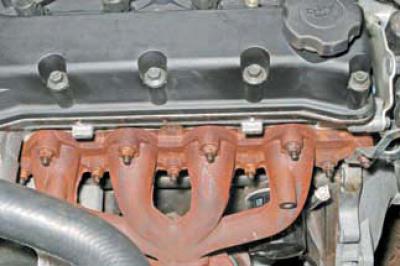
We moisten the nuts securing the exhaust manifold to the cylinder head with penetrating liquid.


Using a 12 mm socket, unscrew the ten nuts securing the exhaust manifold to the cylinder head.


If the nuts are stuck to the studs, they may come off along with the studs. This is normal.
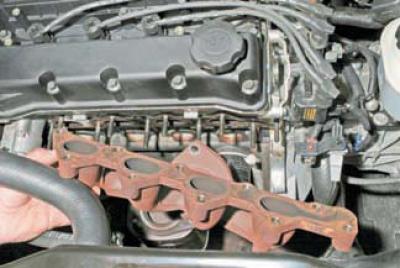
If the nuts are stuck to the studs, they may come off along with the studs. This is normal.


We move the exhaust manifold along the remaining studs of the cylinder head and remove it upwards.
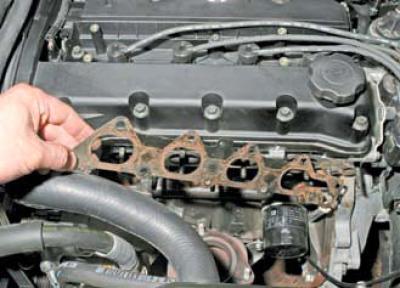
We move the exhaust manifold along the remaining studs of the cylinder head and remove it upwards.


We remove the metal gasket of the exhaust manifold.

We unscrew the remaining nuts on the studs.
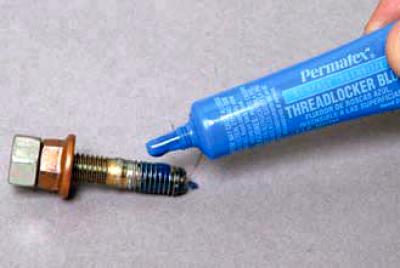
We unscrew the remaining nuts on the studs.


We apply a thin layer of thread sealant to the threaded part of the stud that is screwed into the cylinder head.


Before screwing the stud into the cylinder head, screw two nuts onto its threaded part and tighten them together. In this form, screw the stud until it stops and, having unfastened the nuts, unscrew them.

Further assembly is carried out in reverse order.

Before installing the exhaust manifold, clean the mating surfaces of the cylinder head and exhaust manifold from carbon deposits and install a new gasket.

Before tightening the new exhaust manifold mounting nuts, apply graphite grease to the cylinder head studs.

Tighten the exhaust manifold mounting nuts to the specified torque.
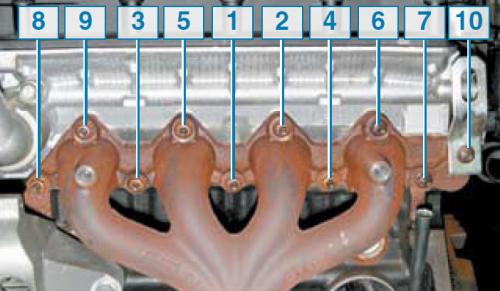
Tighten the exhaust manifold mounting nuts to the specified torque.


Tightening order of exhaust manifold mounting nuts

The article was checked: Vladimir Romannikov
This article is available at russian, bulgarian, belarusian, ukrainian, serbian, croatian, romanian, polish, slovak, hungarian

Share information:

Previous articles
Lacetti 1: Exhaust system
Next articles

Removal the catalytic converter
Removal the intermediate pipe
Replacing the exhaust system suspension cushions
Device of the exhaust system
Replacing the additional muffler
Replacing the main muffler


See similar articles on the topic of Chevrolet cars:
Replacing the intake manifold gasket Chevrolet Aveo T300 (2012-2018)
Exhaust manifold — removal and installation Chevrolet Captiva 1 (2006-2018)
Replacing the exhaust manifold gasket Chevrolet Cruze 1 (2008-2016)
Removal the exhaust manifold Chevrolet Lanos T150 (2002-2009)
Exhaust system Chevrolet Niva 1 (2002-2016)
Exhaust manifold — removal and installation Chevrolet Tahoe 1 (1992-2000)
Exhaust manifold — removal and installation Chevrolet Trailblazer 1 (2001-2008, petrol)
Link in different formats to this page


Visitor comments

No comments yet


How much will 37 + 18 =


Lacetti 1 (2002-2009) 
  • General information
  • User manual
  • Maintenance
  • Power unit
  • Engine repair
  • Control system
  • Supply system
  • Cooling system
  • Exhaust system
  • Transmission
  • Clutch
  • Manual gearbox
  • Front wheel drives
  • Chassis
  • Front suspension
  • Rear suspension
  • Steering
  • Brake system
  • Body
  • Repair of body elements
  • Heating and air conditioning
  • Electrical equipment
  • Engine electrics
  • Lighting and lamps
  • Equipment and devices
  • Electrical circuits


ChevyMan.ru © 2017-2026 · Mobile version · Feedback · Site search · Interesting to read · Sitemap: EN BG BY UA RS HR RO PL SK HU

Aveo 2003-2008 · Aveo 2006-2011 · Aveo 2012-2018 · Captiva 2006-2018 · Cruze 2008-2016 · Lacetti 2002-2009 · Lanos 2002-2009 · Niva 2002-2016 · Tahoe 1992-2000 · Tahoe 2000-2014 · Lumina 1 1989-1994 · Trailblazer 1 2001-2008 · Orlando 1 2010-2018 ·
🛡️ For your security and to improve our service, this site uses cookies. You can disable them in your browser.