


Remove the right and left rear seats.
Remove the 3 rear threshold trims, front and rear trunk floor mats.
Remove the trim 4 of the right rear pillar and the trim 5 of the arch and the right side.
Remove fuel tank cap 2.
Disconnect the rear wiring harness connector from the electric fuel pump.
Start the engine and let it idle to relieve pressure in the fuel system until it stops completely.
Disconnect the fuel line fittings from the electric fuel pump 7.
Loosen the clamps and disconnect hoses 10, 11, 13 from the fuel tank.
Remove the two bolts and two nuts securing the fuel tank and remove the fuel tank.
Install the fuel tank in reverse order.
Cleaning and inspection. Remove the electric fuel pump 7. To remove dirt and deposits, rinse the tank with gasoline. Then rinse and steam the tank from gasoline residues with a stream of hot water.
Carefully inspect the fuel tank along the joint line; the weld should be uniform and continuous, without cracks or unwelded areas.
Check the tank for leaks by supplying air under pressure of 0.02-0.03 MPa (0.15-0.25 kgf/cm²) in a water bath for 50 seconds, if necessary, solder the leak with soft solder.
Warning: Only a well-cleaned fuel tank that does not contain gasoline vapors, which may ignite during soldering, may be soldered.
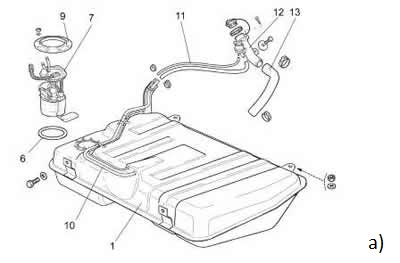
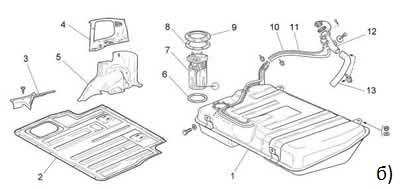
Figure 2-76. Removing the fuel tank:
a) for ECU with MP7.0 controller;
b) for ECU with controller M7.9.7;
1 - fuel tank;
2 - fuel tank cap;
3 - rear threshold trim;
4 - right rear pillar trim;
5 - right arch and side trim;
6 - gasket;
7 - Electric fuel pump;
8 - distance ring;
9 - pressure ring;
10 - air duct hose;
11 - Fuel tank ventilation hose;
12 - filling pipe;
13 - filler pipe hose.