
ChevyMan.ru
Mazda Mitsubishi Toyota Land Rover Honda Kia Nissan
English Русский
Български
Беларускі
Український
Српски
Hrvatski
Română
Polski
Slovenský
Magyar
|
Articles | Sitemap | Contacts |


Home   Aveo   Captiva   Cruze   Lacetti   Lanos   Niva   Tahoe   Others  
Niva 1 (2002-2016)
  • Home
  • Niva
  • 1 (2002-2016)
  • Transmission
  • Rear axle
  • Rear axle beam straightening

Rear axle beam straightening (Chevrolet Niva 1)

            0

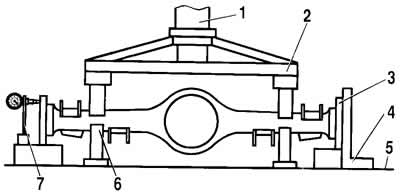
Attach flanges A.70172 to each end of the beam (used for straightening, not for checking beams) and install it on the supports of the hydraulic press so that the ends of the clamping crossbar 2 (figure 3-54) were in the deformation zone. The most probable location of the zone is at a distance of 200-300 mm from the ends of the beam flange.

Figure 3-54. Rear axle beam straightening diagram:

Figure 3-54. Rear axle beam straightening diagram:
1 - hydraulic cylinder;
2 - pressure crossbar;
3 - flange A.70172;
4 - square;
5 - press table;
6 - emphasis;
7 - indicator stand.


Install the stand 7 with the indicator so that the indicator leg rests against the upper part of the side surface of the flange, and the indicator pointer is on the division equal to the value of the beam deformation measured with the feeler gauge when checking the beam. On the other side of the beam, install either the stand with the indicator or the square 4.

Installed under the beam (in the deformation zone) limit stops 6, straighten the beam with a hydraulic press sequentially in the horizontal and vertical planes, monitoring the results of straightening with an indicator or a feeler gauge on a square 4.


The maximum force of the press during beam straightening should not exceed 98 kN (10,000 kgf) to avoid excessive deformation of the casing section.

Note: If the stop height is chosen correctly by trial and error, the beam can be adjusted without checking with a square or indicator.


Remove the beam from the press and check it as described above, replacing the A.70172 flanges with "test" ones.

In the absence of appropriate equipment, as an exception, it is permissible to straighten the rear axle beam sequentially from each side, but with mandatory checking of deformation on both sides (see "Checking the rear axle beam").

[The source of the article is available on the website: chevyman.ru]

The article was checked: Vladimir Romannikov
This article is available at russian, bulgarian, belarusian, ukrainian, serbian, croatian, romanian, polish, slovak, hungarian

Share information:

Previous articles
Niva 1: Rear axle
Next articles

Checking the rear axle beam
Disassembly and assembly of the rear axle
Removal and installation the rear axle
Possible malfunctions, their causes and methods of elimination
Rear axle structure


See similar articles on the topic of Chevrolet cars:
Removal and installation the rear suspension beam Chevrolet Aveo T300 (2012-2018)
Diagnostics of faults of the rear drive axle Chevrolet Captiva 1 (2006-2018)
Removal and installation the rear suspension beam Chevrolet Cruze 1 (2008-2016)
Replacing the rear crankshaft oil seal Chevrolet Lacetti 1 (2002-2009)
Removal the rear suspension beam Chevrolet Lanos T150 (2002-2009)
Rear axle lubrication Chevrolet Tahoe 1 (1992-2000)
Removal and installation the rear axle Chevrolet Lumina 1 (1989-1994)
Link in different formats to this page


Visitor comments

No comments yet


How much will 11 + 40 =


Niva 1 (2002-2016) 
  • General information
  • Vehicle device
  • User manual
  • Maintenance
  • Power unit
  • Engine repair
  • Cooling system
  • Lubrication system
  • Power and exhaust system
  • Transmission
  • Clutch
  • Car gearbox
  • Transfer case
  • Cardan gear
  • Rear axle
  • Front axle
  • Chassis
  • Suspension and shock absorbers
  • Steering
  • Brake system
  • Body
  • Exterior (external elements)
  • Interior (internal elements)
  • Ventilation and heating
  • Electrical equipment
  • Power devices
  • Lighting and appliances


ChevyMan.ru © 2017-2026 · Mobile version · Feedback · Site search · Interesting to read · Sitemap: EN BG BY UA RS HR RO PL SK HU

Aveo 2003-2008 · Aveo 2006-2011 · Aveo 2012-2018 · Captiva 2006-2018 · Cruze 2008-2016 · Lacetti 2002-2009 · Lanos 2002-2009 · Niva 2002-2016 · Tahoe 1992-2000 · Tahoe 2000-2014 · Lumina 1 1989-1994 · Trailblazer 1 2001-2008 · Orlando 1 2010-2018 ·
🛡️ For your security and to improve our service, this site uses cookies. You can disable them in your browser.