
ChevyMan.ru
Mazda Mitsubishi Toyota Land Rover Honda Kia Nissan
English Русский
Български
Беларускі
Український
Српски
Hrvatski
Română
Polski
Slovenský
Magyar
|
Articles | Sitemap | Contacts |


Home   Aveo   Captiva   Cruze   Lacetti   Lanos   Niva   Tahoe   Others  
Lacetti 1 (2002-2009)
  • Home
  • Lacetti
  • J200 (2002-2009)
  • Power unit
  • Engine repair
  • Removal camshafts and hydraulic valve lifters

Removal camshafts and hydraulic valve lifters (Chevrolet Lacetti J200)

            0

We perform the work to replace failed camshafts (cam wear, shaft journal scoring) or hydraulic valve lifters (loss of working capacity), and also when replacing valve stem seals and repairing the cylinder head. We perform operations to identify a faulty hydraulic tappet after a short period of time (15–20 min) after stopping the engine. Remove the cylinder head cover (see Replacing the cylinder head cover gasket).

To check the serviceability of the hydraulic tappet…
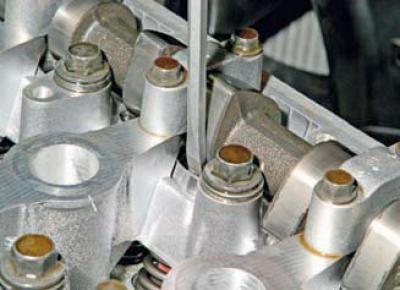
To check the serviceability of the hydraulic tappet…


...we press on it with a screwdriver, trying to press the pusher into the socket of the cylinder head (in this case, the corresponding camshaft cam should be facing the pusher with its "back", i.e. do not press on it).

In this case, a serviceable hydraulic tappet will move in the cylinder head socket with significant force, compressing the valve spring. If the hydraulic tappet itself is pressed with little force, it must be replaced.

To do this, remove the camshaft pulley (see Replacing the camshaft seal).
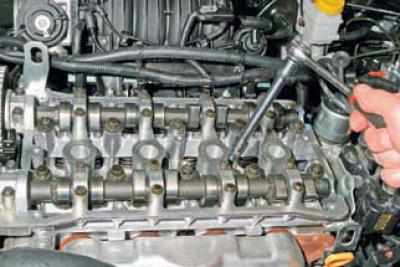
To do this, remove the camshaft pulley (see Replacing the camshaft seal).


With a "10" head, evenly, in several steps (half a turn per pass) we unscrew two bolts securing each of the five camshaft bearing caps.
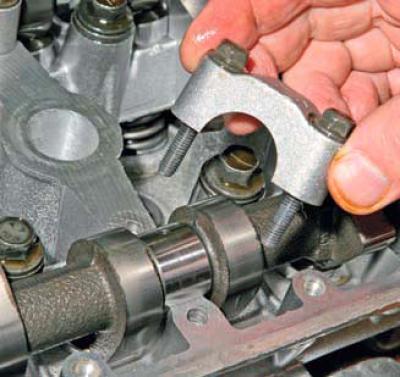


With a «10» head, evenly, in several steps (half a turn per pass) we unscrew two bolts securing…


We remove the camshaft bearing caps.

We remove the camshaft bearing caps.
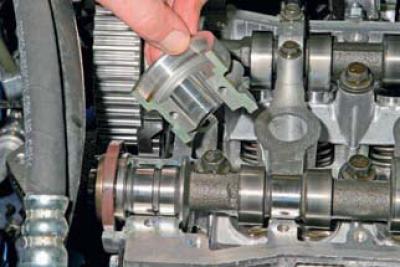

First (far right) the lid is different from other lids.
First (far right) the lid is different from other lids.


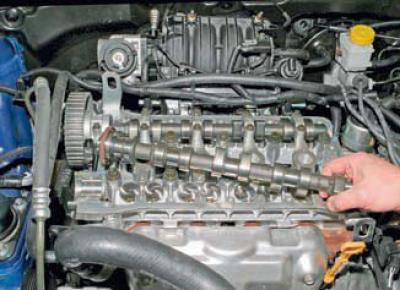
We remove the exhaust camshaft from the cylinder head beds.

If necessary, we similarly dismantle the intake camshaft.
If necessary, we similarly dismantle the intake camshaft.


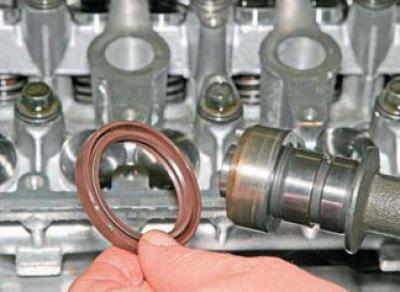
We remove the oil seal from the shaft journal.


We remove the oil seal from the shaft journal.


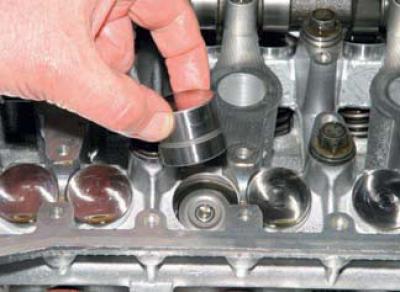
We remove the hydraulic tappet from the socket in the cylinder head.

Before installation, place the new hydraulic tappet in a container with clean engine oil and press the plunger pair of the hydraulic tappet several times until air bubbles stop escaping from the hole in its groove.

We install the hydraulic tappet in the reverse order. Other hydraulic tappets are replaced similarly.

Before placing the camshaft in the cylinder head bed, apply a thin layer of engine oil to the bearing journals and cams of the shaft.

Having laid the shaft, we install the shaft bearing caps in accordance with the order of their designation in the cylinder head and the markings on the outer surface of the caps.
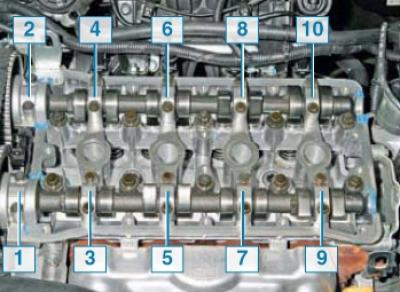
Having laid the shaft, we install the shaft bearing caps in accordance with the order of their…


The order of designation of the covers in the cylinder head


The order of designation of the covers in the cylinder head


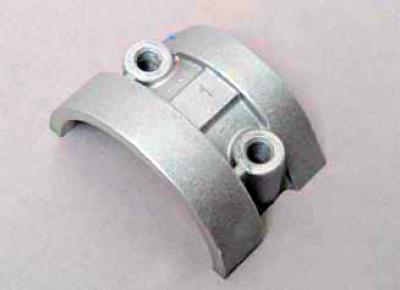
Lid marking No.1.
Lid marking No.1.


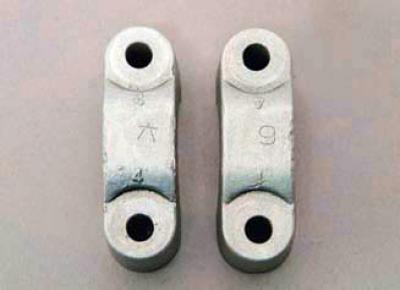
Cap marking No.6 (in the photo on the left) and No.9 camshaft bearings.

We tighten the bolts for fastening the shaft bearing caps evenly, moving from cap to cap, in several steps (gradually increasing the tightening torque) tighten the bolts to the required torque (see Tightening torques for critical threaded connections).

We press in the camshaft oil seal (see Replacing the camshaft seal).

We carry out further assembly in reverse order.

After replacing the hydraulic tappet, the engine may operate with increased noise for a short time until the hydraulic tappet is bled.

The original material is located on the website «ChevyMan.ru»

The article was checked: Vladimir Romannikov
This article is available at russian, bulgarian, belarusian, ukrainian, serbian, croatian, romanian, polish, slovak, hungarian

Share information:

Previous articles
Lacetti 1: Engine repair
Next articles

Replacing the cylinder head cover gasket
Replacing the camshaft seal
Checking the condition and replacing the timing belt
Engine structure
Replacing the front crankshaft oil seal
Replacing the rear crankshaft oil seal
Removal the low oil pressure sensor
Replacing the powertrain mounts
Removal and installation the engine


See similar articles on the topic of Chevrolet cars:
Door window glass lifters Chevrolet Aveo T300 (2012-2018)
Stationary hydraulic valve clearance compensator Chevrolet Captiva 1 (2006-2018)
Door locks and window lifters Chevrolet Cruze 1 (2008-2016)
Replacing fluid in hydraulic brake and clutch drives Chevrolet Lanos T150 (2002-2009)
Clutch release hydraulic drive Chevrolet Niva 1 (2002-2016)
Valve lifters — removal and installation Chevrolet Tahoe 2 and 3 (2000-2014)
Removal, inspection and installation of hydraulic valve lifters Chevrolet Lumina 1 (1989-1994)
Link in different formats to this page


Visitor comments

No comments yet


How much will 10 + 36 =


Lacetti 1 (2002-2009) 
  • General information
  • User manual
  • Maintenance
  • Power unit
  • Engine repair
  • Control system
  • Supply system
  • Cooling system
  • Exhaust system
  • Transmission
  • Clutch
  • Manual gearbox
  • Front wheel drives
  • Chassis
  • Front suspension
  • Rear suspension
  • Steering
  • Brake system
  • Body
  • Repair of body elements
  • Heating and air conditioning
  • Electrical equipment
  • Engine electrics
  • Lighting and lamps
  • Equipment and devices
  • Electrical circuits


ChevyMan.ru © 2017-2026 · Mobile version · Feedback · Site search · Interesting to read · Sitemap: EN BG BY UA RS HR RO PL SK HU

Aveo 2003-2008 · Aveo 2006-2011 · Aveo 2012-2018 · Captiva 2006-2018 · Cruze 2008-2016 · Lacetti 2002-2009 · Lanos 2002-2009 · Niva 2002-2016 · Tahoe 1992-2000 · Tahoe 2000-2014 · Lumina 1 1989-1994 · Trailblazer 1 2001-2008 · Orlando 1 2010-2018 ·
🛡️ For your security and to improve our service, this site uses cookies. You can disable them in your browser.