
ChevyMan.ru
Mazda Mitsubishi Toyota Land Rover Honda Kia Nissan
English Русский
Български
Беларускі
Український
Српски
Hrvatski
Română
Polski
Slovenský
Magyar
|
Articles | Sitemap | Contacts |


Home   Aveo   Captiva   Cruze   Lacetti   Lanos   Niva   Tahoe   Others  
Captiva 1 (2006-2018)
  • Home
  • Captiva
  • 1 (2006-2018)
  • Chassis
  • Car suspension
  • Removal and installation a wheel

Removal and installation a wheel (Chevrolet Captiva 1)

            0

Contents: Removal procedure ↧ Installation procedure ↧

Removal procedure


1. Remove the wheel cap (only for steel wheel).
1. Remove the wheel cap (only for steel wheel).


2. Loosen the wheel nuts.

3. Raise the vehicle and place it on the supports provided for this purpose.

4. Remove the wheel nuts.

Note: Never heat a wheel that cannot be removed. This may shorten the life of the wheel, wheel nuts and bearings. Since damage to the wheel can also be caused by applying excessive force, such as hitting the wheel or tire with a hammer, this is not recommended. Lightly tapping the wheel from the side with your hand or a rubber mallet is acceptable.


5. Remove the tire and wheel assembly.

Difficulty in removing wheels may be caused by foreign materials or a tight fit of the wheel on the hub or disk. Such wheels can be removed as follows:

1. Retighten the lug nuts on the stubborn wheel, then loosen them two turns.

1. Retighten the lug nuts on the stubborn wheel, then loosen them two turns.

2. To loosen a wheel, lower the car and rock it from side to side as hard as possible, using your own body weight or someone else's help.

3. Raise the car and remove the wheel.


Caution! Do not allow penetrating oil to come into contact with vertical surfaces between the wheel and the drum (or disk), because the presence of penetrating oil on these surfaces can lead to poor handling while driving and cause an accident.


Penetrating oil does not provide the desired effect when removing stubborn wheels. If it is used, apply it sparingly and only in the area of the central hole of the wheel.

Installation procedure


Note: Before installing the wheels, remove all traces of corrosion on the wheel and brake disc mating surfaces by scraping and wire brushing. Installing the wheels without ensuring good metal-to-metal contact on the mating surfaces may cause the wheel nuts to come loose, causing the wheel to fall off while driving. Wheel bolts must be tightened in the specified sequence and to the specified torque to avoid deformation of the wheel or brake disc.


1. Install the wheel and tire assembly.

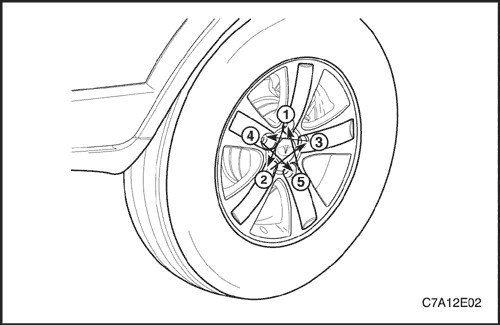
2. Install the wheel nuts in the sequence shown. Do not over tighten the wheel nuts.

3. Lower the car.

Tighten

Tighten the wheel nuts to a torque of 125 Nm (92 ft·lbs).

4. Install the wheel cap (only for steel wheel).

The article was checked: Vladimir Romannikov
This article is available at russian, bulgarian, belarusian, ukrainian, serbian, croatian, romanian, polish, slovak, hungarian

Share information:

Previous articles
Captiva 1: Car suspension
Next articles

Diagnosis of wheel faults
Tire size and air pressure
General description and operation of tires and wheels
Rear suspension toe arm
Compression spring buffer
Wheel balancing without dismantling from the car
Wheel and tire repair


See similar articles on the topic of Chevrolet cars:
Adjusting the position of the steering wheel Chevrolet Aveo T300 (2012-2018)
Steering wheel-mounted controls Chevrolet Cruze 1 (2008-2016)
Wheel replacement Chevrolet Lacetti 1 (2002-2009)
Changing a wheel on the road Chevrolet Lanos T150 (2002-2009)
Adjusting the position of the steering wheel Chevrolet Niva 1 (2002-2016)
Removal the worn wheel and installing the spare Chevrolet Tahoe 1 (1992-2000)
Removal, repair and installation of the rear wheel brake cylinder Chevrolet Lumina 1 (1989-1994)
Link in different formats to this page


Visitor comments

No comments yet


How much will 36 + 18 =


Captiva 1 (2006-2018) 
  • Manual
  • Before leaving
  • Keys, doors and windows
  • Seats, protection systems
  • Instruments and controls
  • Lighting system
  • Information and entertainment
  • Navigation system
  • Climate control
  • Driving a car
  • Car care
  • Maintenance
  • Engine 2.0 l (diesel)
  • Engine device
  • Troubleshooting
  • Engine repair
  • Cooling system
  • Engine electrical equipment
  • Control and power systems
  • Exhaust system
  • Engine FAM II 2.4D
  • Engine device
  • Troubleshooting
  • Engine repair
  • Cooling system
  • Engine electrical equipment
  • Control and power systems
  • Exhaust system
  • Engine HFV6 3.2L
  • Engine device
  • Troubleshooting
  • Engine repair
  • Cooling system
  • Engine electrical equipment
  • Control and power systems
  • Exhaust system
  • Transmission
  • Front drive axle
  • Rear drive axle
  • Automatic gearbox - device
  • Automatic gearbox - service
  • Automatic gearbox - repair
  • Manual gearbox - device
  • Manual gearbox - service and repair
  • Clutch
  • Transfer case
  • Chassis
  • Car suspension
  • Brake system
  • Steering
  • Body
  • Heating and ventilation
  • Air conditioning (manual)
  • Air conditioning (automatic)
  • Seat belts
  • Airbags
  • Car seat
  • Interior (internal elements)
  • Exterior (external elements)
  • Doors and windows
  • Electrical equipment
  • Equipment and devices
  • Lighting and lamps
  • Windshield wipers and washers
  • Electrical circuits


ChevyMan.ru © 2017-2026 · Mobile version · Feedback · Site search · Interesting to read · Sitemap: EN BG BY UA RS HR RO PL SK HU

Aveo 2003-2008 · Aveo 2006-2011 · Aveo 2012-2018 · Captiva 2006-2018 · Cruze 2008-2016 · Lacetti 2002-2009 · Lanos 2002-2009 · Niva 2002-2016 · Tahoe 1992-2000 · Tahoe 2000-2014 · Lumina 1 1989-1994 · Trailblazer 1 2001-2008 · Orlando 1 2010-2018 ·
🛡️ For your security and to improve our service, this site uses cookies. You can disable them in your browser.