
Contents: Wheel and tire balancing ↧ General precautions when performing… ↧ Balancing weights ↧ Installing adhesive balancing… ↧ Use of snow chains ↧ Tire replacement ↧ All season tires ↧ Tire markings ↧ Spare tire ↧ Wheels ↧ Inflating tires ↧ Tire rotation ↧
Wheel and tire balancing
There are two types of tire balancing: static and dynamic.
Static balance is the uniform distribution of mass around the circumference of the wheel. Assemblies that have static imbalance will experience vertical vibration, called wheel bounce. This can ultimately result in uneven wheel wear.
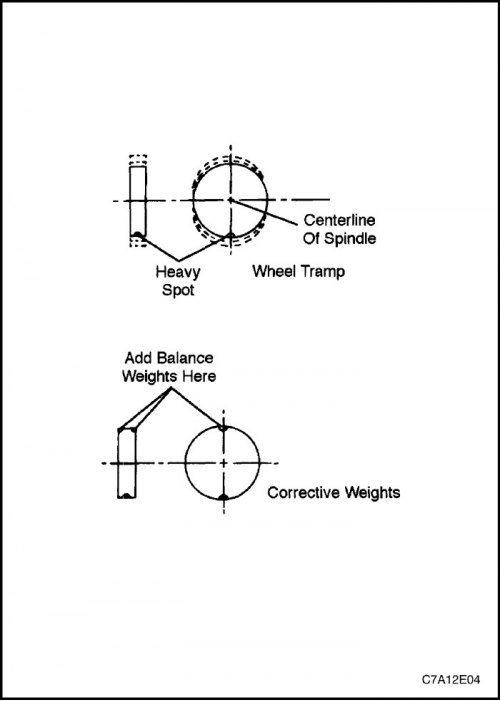
Dynamic balance is an even distribution of mass on both sides of the axle, so that there is no tendency for the assembly to move from side to side as it rotates. Assemblies that have dynamic imbalance may experience wheel shimmy.

General precautions when performing balancing
Remove all foreign material from inside the wheel.
Caution: Remove any stones stuck in the tread to prevent injury to the operator when performing dynamic balancing.
Check the tire for damage. Balance the tire according to the equipment manufacturer's recommendations.
Balancing weights
If additional weight greater than 85 grams (3.0 oz) is required to statically balance a wheel, the balance weights should be divided as equally as possible between the inner and outer rim flanges.
To balance tires and alloy wheel assemblies installed at the assembly plant, special nylon-coated weights that snap onto the wheel must be used. These weights are designed for the thicker rim flanges of alloy wheels. Use a plastic-headed hammer to install these weights.
Glued-on wheel weights are also used. To install glued-on wheel balancing weights, follow these steps:.
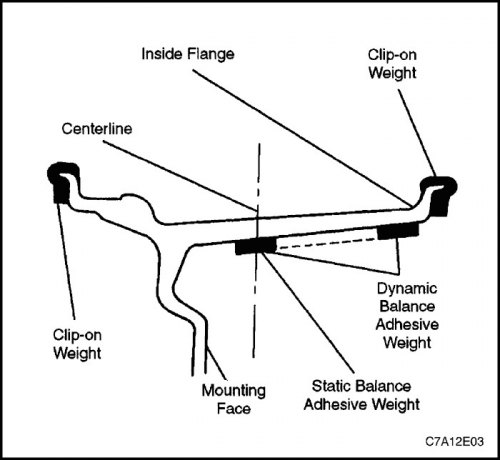
Installing adhesive balancing weights on a wheel
1. Use grinding to clean the wheel down to the alloy where the balancing weight is installed.
2. Using a clean cloth or paper towel dampened with a mixture of one part isopropyl alcohol and one part water, wipe down the area where the weight will be installed.
3. Dry the area with hot air. The wheel surface should be warm to the touch.
4. Warm up the adhesive layer on the back of the weights to room temperature.
5. Remove the film covering the weights from the back. Do not touch the adhesive surface.
6. Place the balancing weight on the wheel and press it down with your hand.
7. Fix the balancing weight on the wheel by pressing it with a roller with a force of 70 - 110 N (16 - 25 pounds).
Use of snow chains
Because tire-to-body clearance is limited on certain vehicles, please refer to your vehicle owner's manual for tire chain recommendations.
To ensure proper placement of the chain on the tire, snow chain manufacturers have specific chain sizes for each tire size. Make sure you purchase chains that are designed specifically for your tires. Use rubber compensators to eliminate chain slack or play.
The use of chains may adversely affect vehicle handling.
After installing snow chains, take the following precautions:
- Choose your speed according to road conditions.
- Avoid sharp turns.
- Avoid locking the wheels when braking.
To avoid damage to the car by chains, install chains on the front wheels as tightly as possible. After driving 0.4 - 0.8 km (0.3 - 0.5 miles), tighten them again. Using chains on the rear wheels is not recommended, as they may come into contact with the car and damage it. If you must use chains on the rear wheels, ensure that there is sufficient clearance between the chains and the car body. Do not exceed 70 km/h (45 miles/hour) or the value recommended by the chain manufacturer, if less. Avoid strong impacts, potholes, sharp turns and any maneuvers that may cause the wheels to bounce. Follow any instructions from the chain manufacturer that do not contradict the recommendations above.
Tire replacement
On the sidewall of all tires installed at the assembly plant, next to the size, is embossed a TPC number reflecting the tire's performance characteristics. The presence of this number confirms that the tire meets performance standards for traction, service life, noise, handling and rolling resistance. Typically, each tire size is assigned a specific TPC number
Warning! Never, except in emergency situations, install different types of tires on your vehicle, such as radial, diagonal, or radial-diagonal tires, as this may seriously impair the vehicle's performance and result in loss of control.
As new tires, use only tires that have the same size, load range, and construction as the tires that were installed at the assembly plant. Using tires of any other size or construction type may seriously affect ride quality, handling, speedometer and odometer calibration, ground clearance, and tire-to-body and chassis clearance. This requirement does not apply to the spare tire supplied with the vehicle.
If you replace the bus with an alternative one, you need to enter the technical characteristics of the alternative bus into the ECM controller (ECM) using a diagnostic device.
If only one tire needs to be replaced, pair it with a tire with the most remaining tread to equalize braking performance.
Tires made by different manufacturers but having the same TPC number can be used on the same vehicle even though the tread pattern may differ in appearance.
All season tires
Most vehicles now come standard with all-season steel-belted radial tires. These tires are called "snow tires" and have 37% higher average traction on snow than the previous non-all-season radial tires. Other performance factors such as wet traction, rolling resistance, tread life, and air pressure retention have also been improved. This has been achieved through improvements in both the construction and tread materials. These tires have the "M+S" designation embossed on the sidewall of the tire, following the tire size. The letters "MS" are also embossed on the sidewall following the TPC number.
Optional enhanced handling tires on some vehicles are not all-season tires. These tires do not have the "MS" designation after the tire size or TPC number.
Tire markings
The tire marking is located on the end of the driver's door and should be used to obtain the technical characteristics of the tire. It contains the maximum load of the vehicle, the tire size (including spare) and air pressure in cold tires (including spare).
Spare tire
This vehicle is equipped with a temporary spare tire (155/90R16) and wheel (4T16). Standard tire (215/70R16) and wheel (6.5JX 16) sizes are available depending on regions.
Wheels
Wheels should be replaced if they are bent, dented, have excessive lateral or radial runout, leak air through welds, have oval bolt holes, or if wheel bolts do not retain a tight fit or are severely rusted. Excessive wheel runout can cause vehicle vibration. New wheels should have the same load rating, diameter, rim width, offset, and fastener configuration as the wheels that were installed at the assembly plant. A wheel that is not the specified size or type may adversely affect wheel and bearing life, brake cooling, speedometer and odometer calibration, vehicle ground clearance, and tire-to-body/chassis clearance. Wheel offset is 49 + 1 mm (1.93 + 0.04 in). Steel wheels can be identified by a two- or three-letter designation stamped on the rim near the valve. Alloy wheels must have a code, product number and manufacturer's identification number cast on the back.
Inflating tires
The pressure recommended for any given vehicle model is carefully calculated to ensure good ride quality, handling, tire life and load carrying capacity.
It is recommended that you check your tire pressure monthly and before any long trip. Check your tires when cold, after the vehicle has been stationary for 3 hours or more, or after driving no more than 1 mile (1.6 km). Inflate the tire to the pressure indicated on the placard located on the end of the driver's door. Tire pressure is also listed in this section under "Tire Size and Air Pressure".
Valves must be covered with caps or tips to prevent dust and water from entering.
For continuous movement at speeds up to 140 km/h (85 mph) inflate the tires to the pressure indicated on the tire. Continuous driving at speeds over 140 km/h (85 mph), even if permitted by law, it is not recommended unless the vehicle is fitted with special high-speed tyres, which are available from many tyre dealers. If the tyre is hot, the air pressure in it can increase to 41 kPa (6 psi).
Air pressure exceeding the recommended value may cause the following:
- Deterioration of ride smoothness.
- Dents or damage on the tire.
- Rapid wear of the middle part of the tread.
Air pressure below the recommended value may cause the following:
- Tire squeal when turning corners.
- Difficulty steering.
- Rapid and uneven wear at the edges of the tread.
- Dents and rim tear of the tire
- Tire cord break.
- High tire temperature.
Unequal air pressure in tires on the same axle can cause the following:
- Uneven braking.
- Lateral steering pull.
- Deterioration of controllability.
- Deviation from course during acceleration.
- Car pulls away during acceleration.
Tire rotation
To distribute wear evenly, rotate your tires and wheels at regular intervals. In addition to the scheduled rotations, rotate your tires and wheels whenever you notice any uneven wear on your tires.
Radial tires tend to wear faster in the shoulder area, especially at the front. Radial tires can develop uneven wear patterns in areas that do not contact the road, which can increase tire noise.
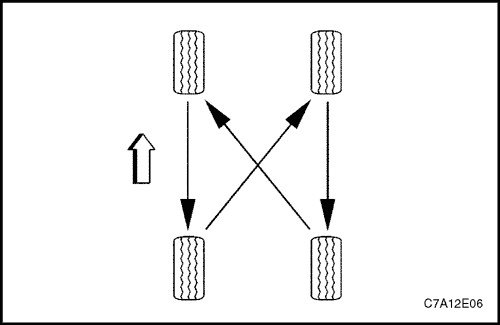
Always use a 4-wheel rotation. After rotation, check that the wheel nuts are tightened to the specified torque. Then inflate the tires.