
Necessary equipment
- J-25070 Jet Dryer
- DT-48076 Stone Chip Protection Installation Tool
- DT-48094 Primary shaft seal guard
Assembly order
1. Install the dowel pins (1) of the transfer case halves.
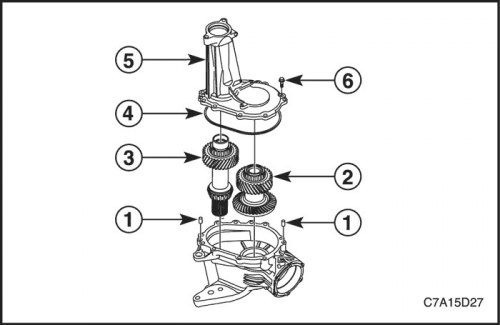
2. Install the transfer case rear output drive shaft (2) and the transfer case input shaft (3) as a set with the splines engaged.
3. Install the transfer case seal (4) onto the transfer case (5).
4. Install 11 bolts (6) securing the transfer case halves.
Tighten
Tighten the bolts (6) securing the transfer case halves to a torque of 29 Nm (21 ft·lbs).
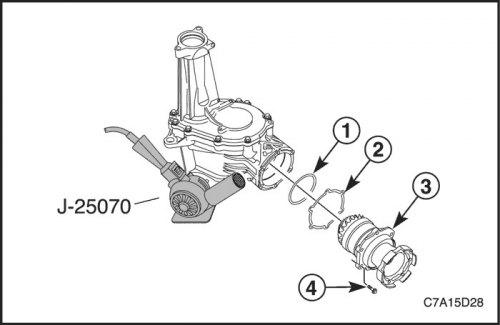
5. Install a new sealing ring (1) on the transfer case rear output shaft housing.
6. Install the adjusting shim (2) of the rear secondary shaft of the transfer case.
Important: Do not use a driving hammer when the splines are not engaged. Using a driving hammer when the splines are not engaged will damage the secondary drive shaft teeth.
Important: Using a jet dryer during assembly makes it easier to align the bolt holes relative to the crankcase.
7. Heat the drive case flange area with the J-25070 Jet Dryer to facilitate installation of the transfer case rear output drive shaft housing (3).
8. Rotate the satellite during assembly to engage the gear teeth and install the rear output drive housing.
9. Install the bolts (4) of the transfer case rear output drive shaft housing.
Tighten
Tighten the bolts (4) of the transfer case rear output shaft housing to a torque of 29 N·m (21 ft·lbs).
Important: It should be noted that the length of the intermediate shaft varies depending on whether it is intended for a manual or automatic transmission with the final drive assembly. It is necessary to select a shaft of the required length. Otherwise, an incorrect selection will lead to wear of the intermediate shaft.
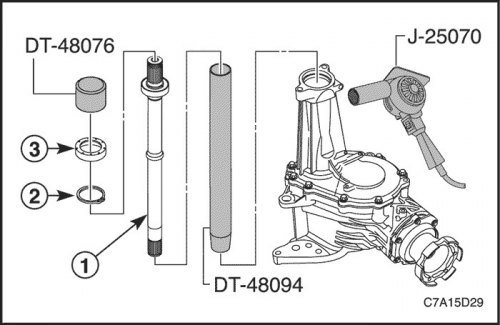
10. Heat the end of the transfer case housing with a J-25070 jet dryer to facilitate installation of the front wheel drive intermediate shaft.
11. Install the front wheel drive intermediate shaft (1) using DT-48094 to prevent the intermediate shaft seal from being damaged.
12. Install the retainer (2) of the intermediate shaft of the front wheel drive.
13. Using the DT-48076 stone impact protection installation tool, install the front wheel drive shaft shield (3).
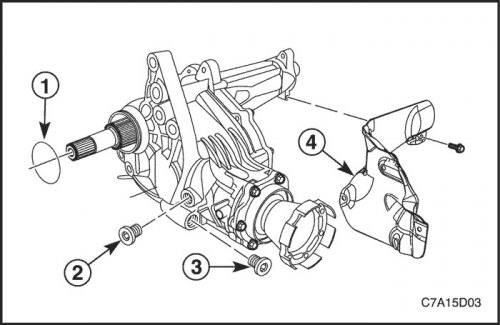
14. Install the transfer case O-ring (1).
15. Install the drain plug (3) of the transfer case.
Tighten
Tighten the drain plug (3) of the transfer case to a torque of 39 N·m (29 ft·lbs).
16. Fill the transfer case fluid through the filler hole (2). See "Transfer Case Fluid Replacement" in this section.
17. Install the filler plug (2) of the transfer case.
Tighten
Tighten the transfer case filler plug (2) to 39 Nm (29 ft·lbs).
18. Install the heat shield (4) and transfer case heat shield mounting bolts.
Tighten
Tighten the transfer case heat shield mounting bolts to 11 N·m (97 ft·lbs).
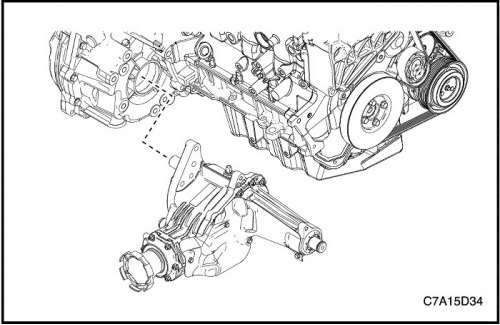
19. Install the transfer case on the vehicle. See "Transfer case" in this section.