
Contents: Removal procedure ↧ Installation procedure ↧
Removal procedure
1. Raise the vehicle and place it on the supports provided for this purpose.
2. Remove the exhaust pipe. See Section 1G1, Engine Exhaust System - 2.0 Diesel; Section 1G2, Engine Exhaust System - FAM II 2.4D; Section 1G3, Engine Exhaust System - HFV6 3.2L.
3. Remove the propeller shaft. See Section 3B, Rear Drive Axle.
4. Disconnect the right axle shaft. See Section 3A, Front Drive Axle.

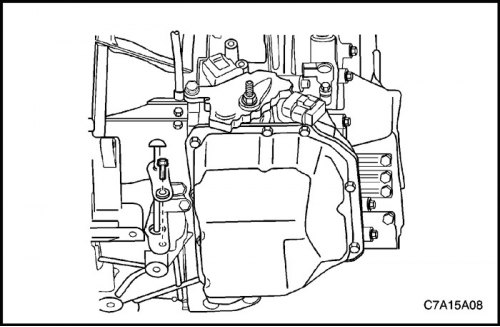
5. Remove the upper bolt (1) securing the transfer case.
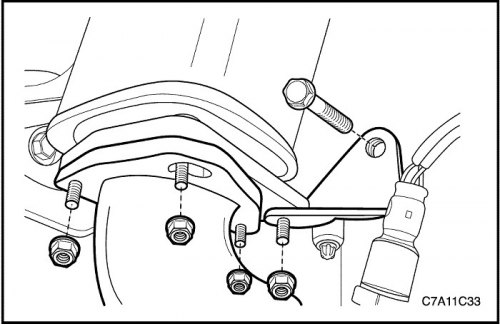
6. Remove the transfer case bracket mounting bolts (3) and the bracket itself (2).
7. Remove the transfer case bracket mounting bolts (5, 6) and the bracket itself (4).
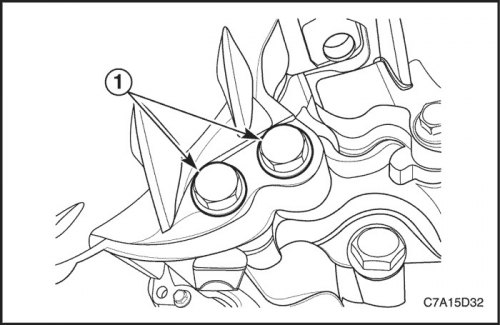
8. Remove the lower bolts (1) securing the transfer case.
9. Support the transfer case with a jack.

10. Remove the through bolt (1) securing the rear suspension of the gearbox with the final drive assembly to the bracket.
11. Remove the mounting bolts and nut (2) from the rear bracket of the gearbox with the final drive assembly.
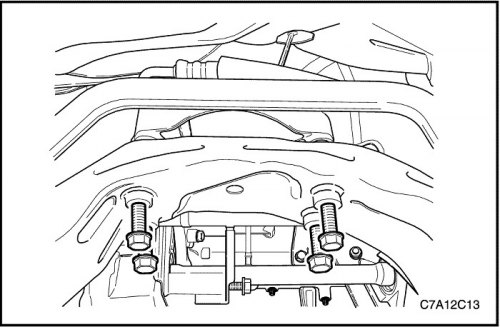
12. Remove the bolts securing the rear suspension of the gearbox with the final drive assembly from the frame.
13. Remove the rear gearbox bracket with the final drive assembly.
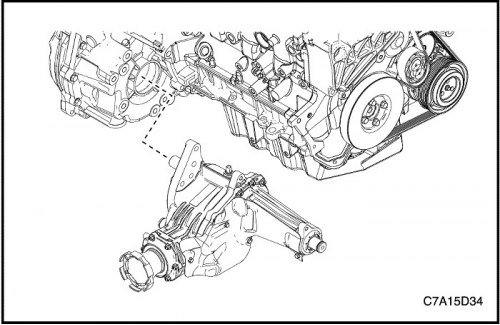
14. Remove the transfer case from the gearbox with the final drive assembly.
15. Seal the main transmission assembly to minimize leakage of the main transmission fluid.

Installation procedure
1. Install the transfer case into the gearbox with the final drive assembly.

2. Install the rear gearbox bracket with the final drive assembly.
3. Install the bolts securing the rear suspension of the gearbox with the final drive assembly onto the frame.
Tighten
Tighten the rear transmission suspension mounting bolts with the final drive assembly to a torque of 90 N·m (66 ft·lbs).

4. Install the through bolt (1) securing the rear suspension of the gearbox with the final drive assembly to the bracket.
Tighten
Tighten the through bolt (1) securing the rear suspension of the gearbox with the final drive assembly to the bracket to a torque of 90 N·m (66 ft·lbs).
5. Install the mounting bolts and nut (2) of the rear bracket of the gearbox with the final drive assembly.
Tighten
Tighten the mounting bolts and nut (2) of the rear bracket of the gearbox with the final drive assembly to a torque of 90 N·m (66 ft·lbs).

6. Install the lower transfer case mounting bolts (1).
Tighten
Tighten the lower transfer case mounting bolts (1) to 75 Nm (55 ft·lbs).

7. Install the upper bolt (1) securing the transfer case.
Tighten
Tighten the upper bolt (1) of the transfer case to a torque of 75 N·m (55 ft·lbs).
8. Install the bracket (2) and the transfer case mounting bolts (3).
Tighten
Tighten the bolts (3) securing the transfer case bracket to a torque of 60 Nm (44 ft·lbs).
9. Install the transfer case bracket (4) and bolts (5).
Tighten
Tighten the transfer case bracket mounting bolts (5) to 60 Nm (44 ft·lbs).
10. If the vehicle is equipped with a 3.2L engine, install the transfer case bracket mounting bolt (6) and the remaining four bolts (5).
Tighten
Tighten the bolt (6) of the transfer case bracket to a torque of 40 Nm (30 ft·lbs).
Tighten the remaining four transfer case bracket mounting bolts (5) to 60 Nm (44 ft·lbs).

11. Install the right axle shaft. See Section 3A, Front Drive Axle.
12. Install the propeller shaft. See Section 3B, Rear Drive Axle.
13. Install the exhaust pipe. See Section 1G1, Engine Exhaust System - 2.0 Diesel; Section 1G2, Engine Exhaust System - FAM II 2.4D; Section 1G3, Engine Exhaust System - HFV6 3.2L.
14. Lower the car.
15. Check the oil level in the gearbox with the final drive assembly and top up if necessary. See Section 5A, Automatic Transmission with Final Drive Assembly AISIN 55-51LE.