


Contents: Block headlights ↧ Fog light ↧ Rear light ↧ Interior light ↧ License plate light ↧ Side direction indicator ↧ Individual lighting plafond ↧ Glove compartment light ↧
Block headlights
Before replacing the bulbs in the headlight, remove the protective cover 4 (see figure 7-27), which is fixed with a wire holder 3. To replace the low beam lamp (or distant) remove the block 7, remove the spring latch 8 from the grooves and remove the lamp 6.
To replace the turn signal bulb, turn socket 1 counterclockwise and remove it from the socket.
To access the side light bulb, you need to remove the low beam headlight socket.
Fog light
Depending on the configuration, two types of fog lights are installed on the car. In the fog light 1 (figure 7-30a) (gLS package) replace the burnt-out lamp 3 after removing the headlight from the car. To remove the lamp, remove the protective rubber cover 4 and remove the spring latch antennae 2 from the grooves. To make it easier to remove the lamp, first remove the socket 5 from it.
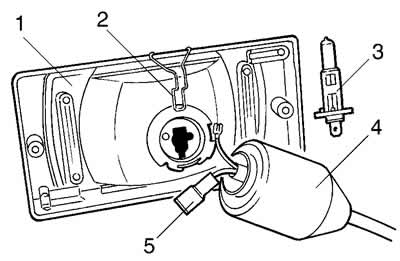
Figure 7-30. Replacing the fog light bulb:
a) on a vehicle with GLS trim level:
1 - fog lamp housing;
2 - latch;
3 - lamp;
4 - protective cover;
5 - lamp socket.
To replace the bulb in the fog light 2 (figure 7-30b) (gLC package) disconnect block 4 of the front wiring harness from the lamp and remove lamp 3 from the headlight housing.
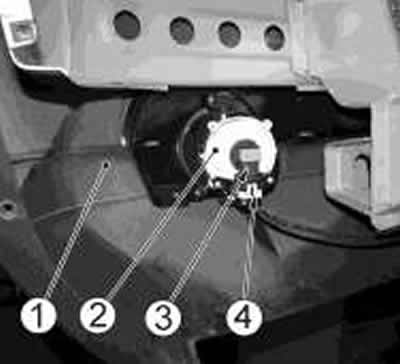
Figure 7-30. Replacing the fog light bulb:
b) on a vehicle with GLC trim level:
1 - front bumper;
2 - fog light;
3 - lamp;
4 - front wiring harness block.
Rear light
Replace the bulbs in the rear light from the luggage compartment side, after opening the valve in the luggage compartment side trim. To access the burnt-out bulb 1 (figure 7-31) turn the socket 2 counterclockwise and remove it together with the lamp. To remove the lamp from the socket, press the lamp and turn it counterclockwise.
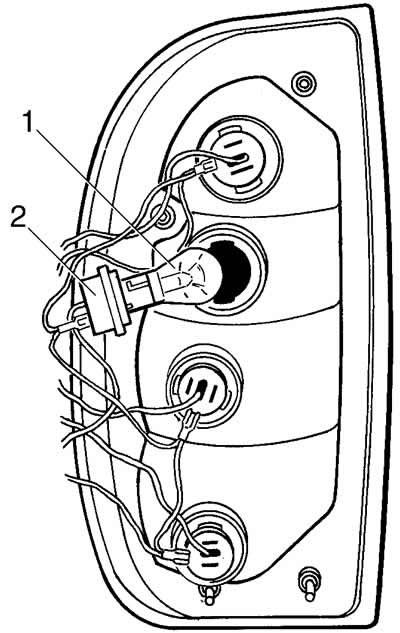
Figure 7-31. Replacing the bulbs in the rear light:
1 - lamp;
2 - cartridge.
Interior light
In the interior lighting lamp (figure 7-32) replace the burnt-out lamp 2 by removing the diffuser 1, for which press your fingers on the sides of the diffuser along its on/off axis and pull it down. The lamp is held in the lampshade by spring contacts.
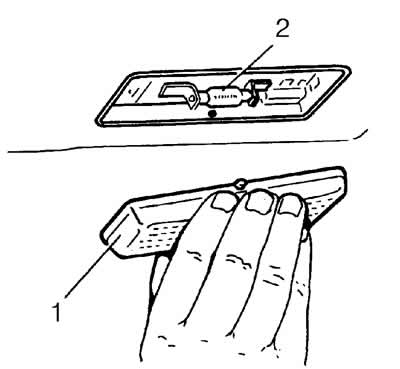
Figure 7-32. Replacing the bulb in the interior light:
1 - diffuser;
2 - lamp.
License plate light
Burnt out lamp 3 (figure 7-33) in the license plate light, change it only after removing it from the car, for which unscrew screws 6, insert a screwdriver into groove 4, press latch 5 towards the center with your finger and carefully remove diffuser 2 with a screwdriver. The lamp in housing 1 is held by spring contacts.
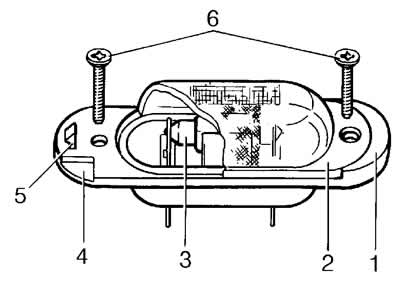
Figure 7-33. Replacing the license plate light bulb:
1 - body;
2 - diffuser;
3 - lamp;
4 - grooves;
5 - latch;
6 - mounting screws.
Side direction indicator
To replace the bulb in the side turn signal (figure 7-34) remove it from the car. The pointer is held in the socket by spring clips. Then remove the protective rubber cap 1, remove the socket assembly with the lamp from the housing 2 and remove the lamp.
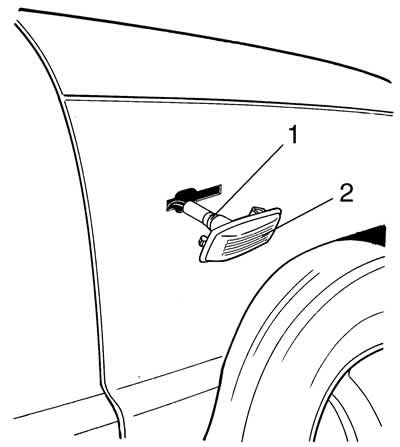
Figure 7-34. Replacing the bulbs in the side turn signal:
1 - protective cap;
2 - side direction indicator housing.
Individual lighting plafond
To replace a burnt-out lamp in an individual lighting lampshade, you need to dismantle its switch. To do this, press the switch from the sides along its on-off axis, disengage the axis protrusions from the holes in the fixed part of the lampshade, and then pull the switch down.
Glove compartment light
To replace the bulb in the glove compartment light, remove it from its socket by carefully prying it up from above with a screwdriver.