


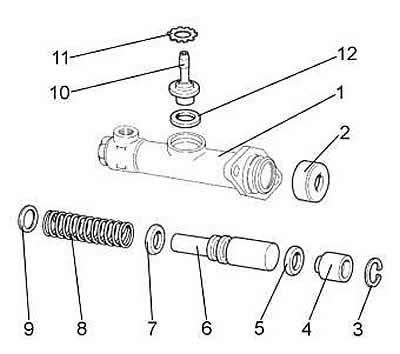
Figure 3-5. Master cylinder parts:
1 - cylinder;
2 - protective cap;
3 - retaining ring;
4 - pusher piston;
5 - sealing ring;
6 - master cylinder piston;
7 - sealing ring;
8 - return spring;
9 - sealing gasket;
10 - nipple;
11 - lock washer;
12 - gasket.
The cylinder bore and the outer surface of the piston must not have any damage or scratches. Check the condition of the piston spring and replace it if it has lost its elasticity.
Replace the piston seal and all sealing elements. Check the protective boot on the rear end of the cylinder and, if the boot is damaged, replace it with a new one. Before assembly, carefully clean and rinse the parts with brake fluid. Do not allow mineral oil, gasoline, kerosene or diesel fuel to come into contact with the parts, as these substances cause the rubber seals to swell.
After checking all parts, assemble the master cylinder in the reverse order of disassembly, while:
- apply a thin layer of DT-1 grease to the piston surfaces that contact the cylinder, support sleeve and pusher;
- lubricate all other parts of the cylinder with brake fluid.
Working cylinder. Remove the protective rubber boot 6 (figure 3-6) together with the pusher 5, then remove the retaining ring 7. This will allow you to remove the piston 8, piston cuff 9, spring cup 10 and spring 11.
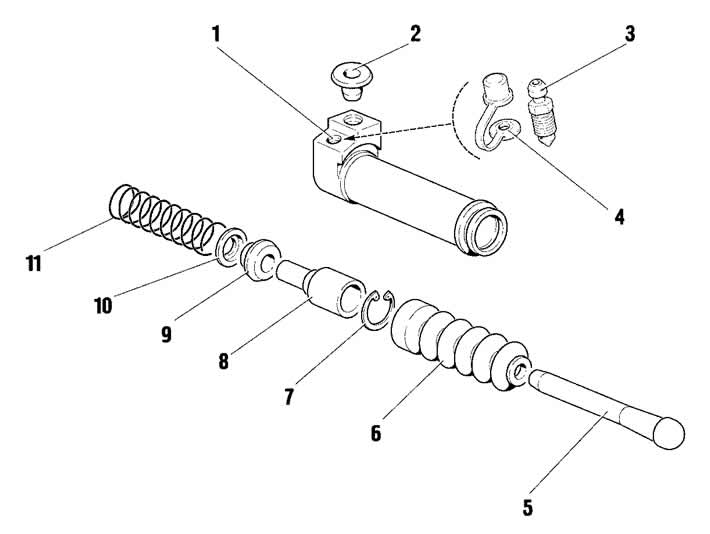
Figure 3-6. Clutch Release Cylinder Components (working cylinder):
1 - body;
2 - transport plug;
3 - nipple;
4 - nipple cap;
5 - Clutch release fork pusher;
6 - protective cover;
7 - retaining ring;
8 - piston;
9 - piston cuff;
10 - spring cup;
11 - spring.
After disassembly, carefully wash and check all parts as specified for the master cylinder. Do not install a deformed tappet.
After checking, proceed with assembly (the order is the reverse of disassembly), in this case:
- apply a thin layer of DT-1 grease to the piston surfaces that contact the cylinder and pusher;
- lubricate all other parts of the cylinder with brake fluid.