ChevyMan.ru
Mazda Mitsubishi Toyota Land Rover Honda Kia Nissan
English Русский
Български
Беларускі
Український
Српски
Hrvatski
Română
Polski
Slovenský
Magyar
|
Articles | Sitemap | Contacts |


Home   Aveo   Captiva   Cruze   Lacetti   Lanos   Niva   Tahoe   Others  
Tahoe 2 and 3 (2000-2014) Tahoe 1 (1992-2000)
  • Home
  • Tahoe
  • 2 (2000-2014)
  • Body (until 2007)
  • Interior (internal elements)
  • Front of the ceiling panel

Front of the ceiling panel (Chevrolet Tahoe 2)

            0

Contents: Removal ↧ Installation ↧
Caution: Do not repair or replace the energy absorbing material adhered to the ceiling panel or stud panels. If the material is damaged, replace the ceiling panel or stud panel.


Removal


1. Remove the upper instrument panel trim.

2. Remove the first pillar trim panel.

3. Disconnect the overhead panel wire harness connectors at the mounting block located next to the brake pedal.
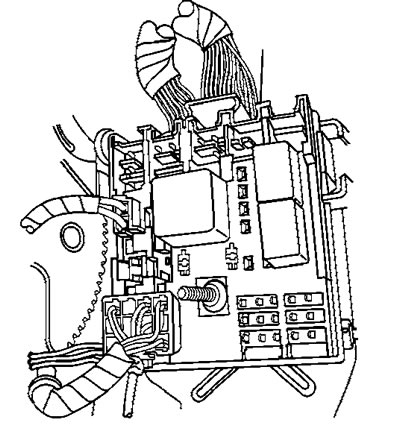
3. Disconnect the overhead panel wire harness connectors at the mounting block located next to the…


4. Remove the wire harness holders located along the windshield opening and the instrument panel.

5. Remove the center pillar trim panels.

6. Remove the third pillar trim panels.

7. Remove the rear corner panels.

8. Disconnect the rear view mirror wiring connector.

9. Remove the upper console.

10. Remove the DVD player if installed.

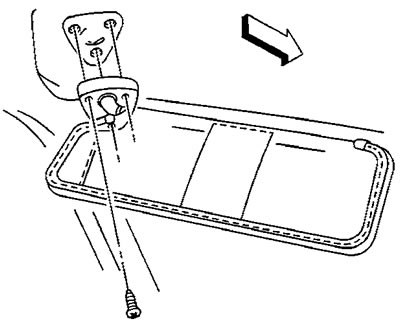
11. Remove the sun blinds.
  • a) Loosen the curtain mounting screws.
  • b) Disconnect the wiring connector if equipped.
  • c) Remove the curtain.

c) Remove the curtain.


12. Remove the sunshade holders.


13. Remove the rear coat hook if equipped.

14. Remove the auxiliary handle.

15. Remove the auxiliary climate control console.

16. Remove the ventilation grille by turning it counterclockwise until it releases from the retainer.

17. Remove the retainer.

18. Remove the sunroof bezel, if equipped.

19. If necessary, release the rear part of the ceiling panel from the clips.

20. Carefully separate the right 3rd pillar air duct from the ceiling panel.

21. Carefully release the ceiling panel from the Velcro® fasteners on the roof.
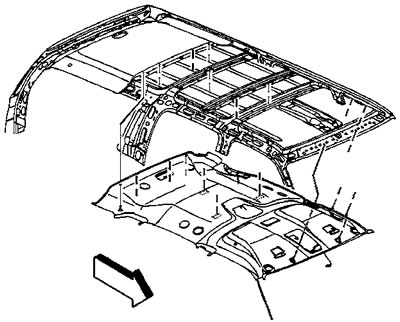
21. Carefully release the ceiling panel from the Velcro® fasteners on the roof.


22. With the help of an assistant, carefully remove the ceiling panel through the cargo area door.

23. Move the interior light to the new ceiling panel.

Installation


24. Installation is carried out in reverse order.

[Information taken from the official website: CHEVYMAN.ru]

The article was checked: Vladimir Romannikov
This article is available at russian, bulgarian, belarusian, ukrainian, serbian, croatian, romanian, polish, slovak, hungarian

Share information:

Previous articles
Tahoe 2 and 3: Interior (internal elements)
Next articles

Upper console — removal and installation
Rear corner panel
Upper cargo door molding
Cargo compartment door panel
Rear Fender Trim Panel
Back of the ceiling panel
Front carpet — removal and installation
Rear mat — removal and installation


See similar articles on the topic of Chevrolet cars:
Front door trim panel Chevrolet Aveo T250 (2006-2011)
Intermediate shaft, hinge and front panel seal Chevrolet Captiva 1 (2006-2018)
Adjusting the position of the front seats Chevrolet Cruze 1 (2008-2016)
Replacing the front crankshaft oil seal Chevrolet Lacetti 1 (2002-2009)
Replacing the front crankshaft oil seal Chevrolet Lanos T150 (2002-2009)
Instrument panel Chevrolet Niva 1 (2002-2016)
Instruments and controls on the front panel and console Chevrolet Trailblazer 1 (2001-2008, petrol)
Link in different formats to this page


Visitor comments

No comments yet


How much will 35 + 25 =


Tahoe 2 and 3 (2000-2014) 
  • General information
  • Vehicle characteristics
  • Vehicle device
  • Manual
  • Maintenance
  • Power unit
  • Engine repair
  • Engine overhaul
  • Cooling system
  • Injection and control system
  • Exhaust system
  • Engine electrical equipment
  • Transmission
  • Automatic gearbox 4L60, 4L65, 4L70
  • Automatic gearbox 6L50, 6L80, 6L90
  • Transfer case
  • Drive shafts and cardan
  • Front drive axle
  • Rear drive axle
  • Chassis
  • Car suspension
  • Steering
  • Brake system
  • Body (until 2007)
  • Exterior (external elements)
  • Interior (internal elements)
  • Doors, locks and windows
  • Heating and air conditioning
  • Security System (SRS)
  • Body (since 2007)
  • Exterior (external elements)
  • Doors, locks and windows
  • Interior (internal elements)
  • Electrical equipment
  • Electrical appliances (until 2007)
  • Lighting and lamps (until 2007)
  • Audio system (until 2007)
  • Electrical appliances (since 2007)
  • Lighting and lamps (since 2007)
  • Audio system (since 2007)
  • Wiring diagrams (2000-2005)
  • Wiring diagrams (2005-2007)
  • Wiring diagrams (since 2007)


Tahoe 1 (1992-2000) 
  • General information
  • User manual
  • Maintenance
  • Power unit
  • Engine in a car
  • Engine removed
  • Cooling system
  • Heating and air conditioning
  • Fuel and exhaust systems
  • Decreased toxicity
  • Transmission
  • Manual gearbox
  • Automatic gearbox
  • Transfer case
  • Clutch and drive shafts
  • Chassis
  • Brake system
  • Car suspension
  • Steering
  • Body
  • Repair of body elements
  • Electrical equipment
  • Engine electrics
  • Equipment and devices
  • Electrical circuits


ChevyMan.ru © 2017-2026 · Mobile version · Feedback · Site search · Interesting to read · Sitemap: EN BG BY UA RS HR RO PL SK HU

Aveo 2003-2008 · Aveo 2006-2011 · Aveo 2012-2018 · Captiva 2006-2018 · Cruze 2008-2016 · Lacetti 2002-2009 · Lanos 2002-2009 · Niva 2002-2016 · Tahoe 1992-2000 · Tahoe 2000-2014 · Lumina 1 1989-1994 · Trailblazer 1 2001-2008 · Orlando 1 2010-2018 ·
🛡️ For your security and to improve our service, this site uses cookies. You can disable them in your browser.