
Contents: Dashboard ↧ Alarms for emergency situations ↧ CHECK TIRE PRESSURE message (Check… ↧ Driver Information Center… ↧ Driver Information Center Buttons… ↧ Personalized function settings ↧ LOCK DOORS (Locking doors) ↧ LOCK DOORS: IN GEAR (Door locking:… ↧ LOCK DOORS: WITH SPEED (Locking… ↧ UNLOCK DOORS (Unlocking doors) ↧ LOCK FEEDBACK (Confirmation of door… ↧ LOCK FEEDBACK: OFF (Door lock… ↧ UNLOCK FEEDBACK (Confirmation of… ↧ UNLOCK FEEDBACK (Confirmation of… ↧ HEADLAMP DELAY (Headlights off… ↧ PERIMETER LIGHTS (Lighting the space… ↧ EASY EXIT SEAT (Automatic seat… ↧ SEAT RECALL (Restoring the seat… ↧ ALARM WARNING (Anti-theft alarm… ↧ LANGUAGE (Display language for… ↧ DISPLAY UNITS (Units of measurement) ↧ Driver Information Center Messages ↧
1. The instruments and controls on the front panel and console are arranged in the following order: (see illustration).
Dashboard
2. The figure shows a typical instrument panel. The instrument cluster installed in your vehicle may differ from the one shown in the illustration. It depends on the equipment of your car.
The instrument cluster is designed to let you know at a glance how your vehicle's major systems are operating (see illustrations).
3. Your vehicle may be equipped with a driver information center that interacts with the instruments, indicators and emergency warning lights. See the Driver Information Center Messages subsection later in this section.
1 High beam indicator
4. The indicator lights up when the high beam headlights are turned on.
2 Direction indicator lights
5. When the turn signal is turned on, one of the two indicators, made in the form of arrows pointing in the direction of the turn or lane change, begins to flash.
3 Engine coolant temperature gauge
6. This indicator shows the engine coolant temperature (see illustration). If the pointer enters the red zone, it means that the engine is overheated! In this case, stop the car immediately and turn off the engine.
4 Total/partial mileage counter
Vehicles not equipped with a driver information center
7. The total mileage counter shows the total mileage of your vehicle since it was first driven.
The trip meter shows the distance traveled by the vehicle since the trip meter was last reset to zero.
8. To switch the counter from the total mileage display to the partial mileage display, press the partial mileage counter zero setting button.
9. To view the trip meter readings when the engine is not running, press the trip meter reset button located on the instrument panel.
10. To reset the trip meter, display its readings, then press and hold the reset button.
11. If you forget to reset the trip odometer before starting a trip, first display the desired trip odometer, and then press and hold the reset button located on the instrument panel for at least four seconds. The display will show the mileage since the ignition was last turned off.
Vehicles equipped with a driver information center
12. For more details, see. see the "Trip Information Button" section in the "Driver Information Center Buttons" section later in this chapter.
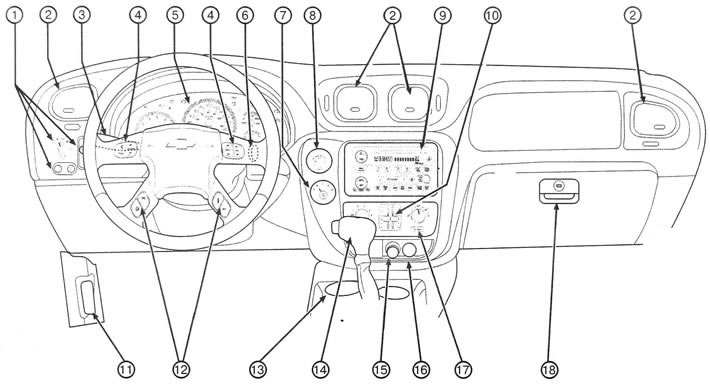
1.1 Instruments and controls on the front panel and console: 1. Main switch for external lighting; 2. Ventilation grilles; 3. Multifunctional lever; 4. Audio system control buttons located on the steering wheel (additional equipment); 5. Instrument panel; 6. Ignition switch; 7. Rear window wiper/washer; 8. Transfer case switch; 9. Audio system and clock; 10. Heating and air conditioning system; 11. Hood release lever; 12. Driver Information Center (additional equipment); 13. Ashtray; 14. Automatic transmission selector, Stabilitrak® dynamic stabilization system off button; 15. Cigarette lighter; 16. Sockets for connecting additional electrical equipment; 17. Rear window defroster switch; 18. Glove box
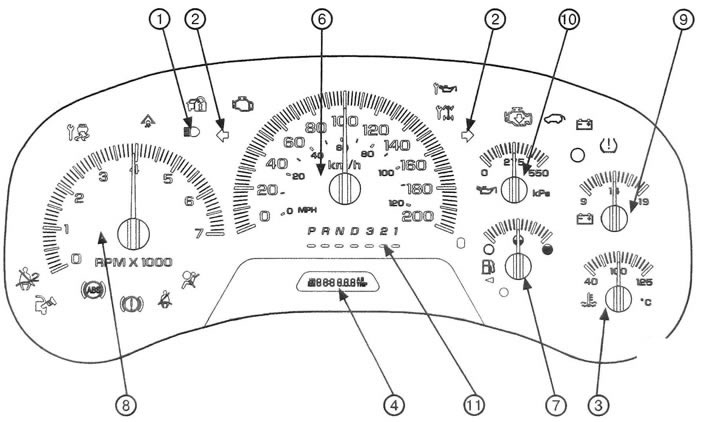
1.2a Instrument cluster on a vehicle without a driver information center
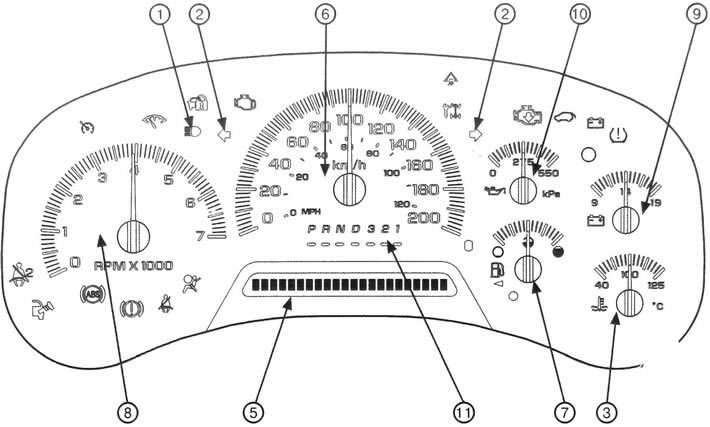
1.2b Instrument cluster on a vehicle with a driver information center
5 Driver Information Center Display(additional equipment)
13. See the Driver Information Center subsection later in this section.
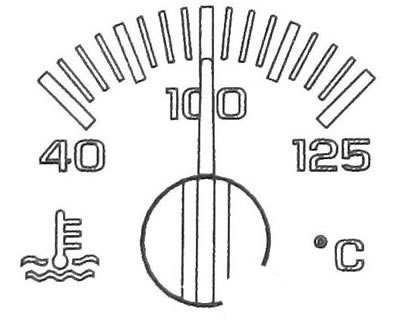
1.6 Coolant temperature gauge
6 Speedometer
14. The speedometer shows the speed of the car. The speed will be shown in metric units of km/h (kilometers per hour) or in British units of measurement MPH (miles per hour).
7 Fuel level indicator
15. The fuel gauge shows the amount of fuel remaining in the tank. The fuel gauge only works when the ignition is on (see illustration).
8 Tachometer
16. The tachometer shows the engine crankshaft speed in thousands of revolutions per minute (RPM).
9 Voltmeter
17. When the engine is running, the voltmeter shows the voltage in the battery charging system. If the ignition is on but the engine is not running, the voltmeter shows the state of the battery. The pointer needle may fluctuate between lower and higher readings. This is a normal phenomenon. The voltmeter may also give lower readings when driving in fuel economy mode. This is a normal phenomenon.
18. If the voltmeter needle is constantly in any warning zone, this indicates a malfunction of the electrical system. The cause of the malfunction should be identified and eliminated immediately.
19. The voltmeter may show low voltage if a large number of electrical consumers have been left on for an extended period of time with the engine idling. Once the engine is running under load and at a higher crankshaft speed, the voltage should return to normal.
10 Engine oil pressure gauge
20. The engine oil pressure gauge shows the pressure at which engine oil is supplied to the various engine parts requiring lubrication. If the readings are constantly in the low pressure zone, this may indicate a problem with the lubrication system and/or engine.
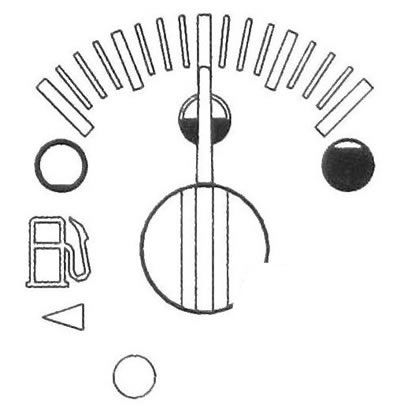
1.15 Fuel level indicator
Caution: Do not operate vehicle with low engine oil pressure. The engine may overheat and catch fire. This may result in burns to you or others. Check the engine oil level as soon as possible. If necessary, contact a service station.
Engine failure due to inattention to monitoring oil level and pressure may require costly repairs that are not covered by the manufacturer's warranty.
11 Automatic transmission selector position indicator
21. This indicator shows the position of the automatic transmission selector.
Alarms for emergency situations
22. Your vehicle has a number of warning lights. The indicators light up when a malfunction has occurred or may occur in one of the systems. Some warning lights will come on briefly when you turn on the ignition to let you know they are working.
23. Your vehicle may be equipped with a driver information center that interacts with the instruments, indicators, and emergency warning lights. See the Driver Information Center Messages subsection later in this section.
Engine oil change indicator (additional equipment)
24. When this indicator comes on, it indicates that the engine oil needs to be replaced.
After changing the engine oil, it is necessary to reset the engine oil life monitor.
For more details, see. paragraph "Frequency of engine oil change".
For more information on changing your engine oil see chapter 4.
Also, refer to the Service Booklet for more detailed information.
Battery charging system malfunction indicator
25. This indicator should light up when the ignition is on, when the engine has not yet started, to indicate its functionality.
26. If this indicator does not light when the ignition is turned on, this may indicate that an electrical fuse or lamp has burned out. It is necessary to immediately restore the functionality of the alarm so that it can warn you of a malfunction at any time.
27. If the indicator does not go out after starting the engine or lights up while the vehicle is moving, this indicates a possible malfunction of this system.
The cause of the malfunction should be identified and eliminated immediately.
28. On the driver information center display (if available) a warning message may also appear.
29. Driving with the indicator light on can lead to rapid battery discharge. If you need to drive a short distance with the indicator on, turn off all non-essential electrical equipment, such as the audio system and air conditioning.
Brake system malfunction indicator
30. Your vehicle is equipped with a dual-circuit braking system. If one circuit of the system fails, the other will allow you to brake the car.
31. This indicator should light briefly when the engine is started to indicate that it is working.
32. If this indicator does not light when the ignition is turned on, this may indicate that an electrical fuse or lamp has burned out. It is necessary to immediately restore the functionality of the alarm so that it can warn you of a malfunction at any time.
33. If the indicator lights up while driving, immediately reduce speed and stop the vehicle, taking precautions. You may have to apply more force to the brake pedal, and the brake pedal travel may increase. The vehicle's braking distance may also increase.
34. If the indicator remains on, have the vehicle towed to a service station. The brake system should be checked immediately.
35. The brake system malfunction indicator also lights up when the parking brake lever is not fully released. If the indicator light does not go out after you have fully released the parking brake, this indicates a fault in the brake system. When the indicator lights up, a gong signal may also sound.
Warning: Driving with the brake system malfunction indicator illuminated may result in an accident. Have the brake system checked immediately if the brake system malfunction indicator remains on.
36. If the brake system malfunction indicator comes on simultaneously with the anti-lock braking system malfunction indicator and a gong signal sounds for ten seconds, there may be a malfunction in the rear brake force distribution system.
37. Until the fault is corrected, the indicator lights will come on and a gong will sound each time the ignition is turned on. Contact your dealer to perform necessary service.
Anti-lock brake system malfunction indicator
38. This indicator should light briefly when the engine is started to indicate that it is working.
39. If this indicator does not light when the ignition is turned on, this may indicate that a fuse or bulb has blown. It is necessary to immediately restore the functionality of the alarm so that it can warn about a malfunction at any time.
40. If the indicator continues to light or lights up while driving, this indicates a possible system malfunction. Stop at the first opportunity and turn off the ignition. Then start the engine again to reset the system.
41. If the indicator light remains on or comes on while driving, the vehicle needs repair. Before repair, the brake system can be used, however, the anti-lock system will not function.
42. If the brake system malfunction indicator also lights up, this means that the anti-lock braking system is not functioning and there is a malfunction in the brake system. Take precautions to slow down and pull over to the side of the road. Have the vehicle towed to a service station for repairs.
43. On the driver information center display (if available) a warning message may also appear.
44. If the brake system malfunction indicator comes on simultaneously with the anti-lock braking system malfunction indicator and a gong signal sounds for ten seconds, there may be a malfunction in the rear brake force distribution system.
45. Until the fault is corrected, the indicator lights will come on and a gong will sound each time the ignition is turned on.
Engine malfunction indicator
46. This indicator monitors the health of the fuel system, ignition system and emission control system.
47. This indicator should light briefly when the engine is started to indicate that it is working.
48. If this indicator does not light when the ignition is turned on, this may indicate that a fuse or bulb has blown. It is necessary to immediately restore the functionality of the alarm so that it can warn of a malfunction at any time.
49. If the indicator continues to light or lights up while driving, this indicates a possible system malfunction. The cause of the malfunction should be identified and eliminated immediately.
50. If this indicator is flashing, you must:
- a) Reduce the speed of movement.
- b) Avoid sudden acceleration.
- c) Avoid moving uphill.
- d) If a trailer is towed, reduce the load weight as soon as possible.
51. If the indicator continues to flash, stop the vehicle, turn off the ignition and wait at least 10 seconds, then start the engine again. If the indicator continues to flash, contact your authorized dealer to have the problem corrected.
52. If the indicator is constantly on, try the following:
- a) If you have just filled the tank with fuel, this may indicate that the fuel tank cap is not closed properly. Close the fuel cap properly and the indicator light should go out.
- b) If you have just driven through a deep puddle, this may have caused water to come into contact with electrical components, and this condition may resolve itself once the electrical system components dry out.
- c) If the fuel level is low, the problem may be resolved by filling the fuel tank.
- d) Make sure that high quality fuel is used.
53. If after some time the indicator does not go out, the car requires maintenance.
54. If the indicator light is constantly on, then immediately after refueling, check that the fuel tank filler cap is installed correctly.
Caution: Continuing to drive the vehicle with the indicator on may, over time, result in decreased emission control system performance, increased fuel consumption and engine instability. This may result in the need for expensive repairs that are not covered by the manufacturer's warranty.
Changes made independently to the design of the engine, transmission, exhaust, intake or fuel systems, replacement of original tires with tires having different technical characteristics, may affect the efficiency of the toxicity reduction system and cause this indicator to light. Changes to the above systems may result in costly repairs that will not be covered by the manufacturer's warranty.
55. In order for the vehicle to successfully pass the technical inspection to check the serviceability of the exhaust gas toxicity reduction system, it is necessary that the engine malfunction indicator be operational and do not light up while the vehicle is moving.
56. If you have recently replaced your battery, or if it has been severely discharged, the on-board diagnostic system may determine that the vehicle is not ready for a service check. In this case, it may be necessary to drive the vehicle normally for several days so that the diagnostic system accumulates enough data to perform a technical inspection.
57. If prior to the technical inspection, trips were made over several days (with a fully charged battery), but the vehicle still cannot pass the technical inspection due to the unreadiness of the on-board diagnostic system, contact a diagnostic center with qualified personnel to prepare the vehicle for technical inspection.
Limit state indicator for pointer instruments(additional equipment)
58. This indicator should light briefly when the engine is started to indicate that it is working.
59. If this indicator does not light when the ignition is turned on, this may indicate that an electrical fuse or lamp has burned out. It is necessary to immediately restore the functionality of the alarm so that it can warn you of a malfunction at any time.
60. If this indicator comes on and remains on while the vehicle is moving, check the readings on all instruments to make sure that the needles are not in the warning zone of the scale.
Stabilitrak® System Malfunction Indicator (additional equipment)
61. This indicator should light briefly when the engine is started to indicate that it is working.
62. If this indicator does not light when the ignition is turned on, this may indicate that an electrical fuse or lamp has burned out. It is necessary to immediately restore the functionality of the alarm so that it can warn you of a malfunction at any time.
63. If the indicator continues to light or lights up while driving, this indicates a possible system malfunction.
64. On the driver information center display (if available) a warning message may also appear.
Stabilitrak® System Performance Indicator
65. This indicator should light briefly when the engine is started to indicate that it is working.
66. If this indicator does not light when the ignition is turned on, this may indicate that an electrical fuse or lamp has burned out. It is necessary to immediately restore the functionality of the alarm so that it can warn you of a malfunction at any time.
67. When the Stabilitrak system is turned on, the Stabilitrak indicator will flash. This is a normal phenomenon.
68. If this indicator remains on after the engine has been started or comes on while driving and you have not turned off the Stabilitrak system. then this indicates a possible malfunction of this system.
69. On the driver information center display (if available) a warning message may also appear.
Non-attached seat belt warning light
70. For more details, see. section "Seat belts".

Front passenger seat belt reminder
71. For more details, see. section "Seat belts".

Airbag malfunction indicator
72. This indicator should come on when the engine is started and may flash for a few seconds.
73. If the indicator does not light when the ignition is turned on, this may indicate that an electrical fuse or lamp has burned out. It is necessary to immediately restore the functionality of the alarm so that it can warn you of a malfunction at any time.
74. If the indicator continues to light or lights up while driving, this indicates a possible system malfunction.
75. On the driver information center display (if available) a warning message may also appear. Contact a service station immediately.
Warning: If the airbag malfunction indicator does not go out after starting the engine or comes on while the vehicle is moving, this indicates a possible malfunction of the airbag system. Airbags may not deploy in a crash, or they may deploy in the absence of a crash. To avoid injury to you and your passengers, contact a service station immediately.
Front passenger airbag on/off indicator
76. Your vehicle is equipped with a front passenger presence detection system.
Engine power reduction mode indicator
77. This indicator lights up when there is a noticeable decrease in engine power. You can continue driving, but the vehicle's performance and top speed will be reduced. If this indicator comes on again during your next trip and remains on, contact your dealer for repairs as soon as possible.
78. This indicator may also light if there is a malfunction in the electronic throttle control system. If this happens, contact your dealer as soon as possible for repair.
Low fuel level alarm
79. This indicator should light briefly when the engine is started to indicate that it is working.
80. If this indicator continues to light, it means that the fuel level in the tank has dropped to the minimum. Fill the tank with fuel as soon as possible.
Low Tire Pressure Warning Light
81. This indicator should light briefly when the engine is started to indicate that it is working.
82. After the initial lamp check, this indicator comes on if the tire pressure monitor detects a drop in air pressure in one or more tires.
CHECK TIRE PRESSURE message (Check the air pressure in your tires) will appear on the driver information center display(additional equipment).
83. For more details, see. see the Driver Information Center Messages section later in this section.
84. If a message appears indicating low tire pressure, stop as soon as possible, check your tires for damage, and inflate them to the recommended pressure. This warning will reappear each time the engine is started until the fault is corrected.
85. If a malfunction is detected, the indicator light will flash for one minute and then remain on continuously until the ignition is turned off.
86. This warning will reappear each time the engine is started until the fault is corrected. Contact your dealer to have any necessary service performed.
Fuel filler cap not closed tightly indicator (additional equipment)
87. This indicator lights up if the fuel tank filler cap is missing, incorrectly installed or not closed properly.
See the Engine Malfunction Indicator section for more information.
Luggage compartment door not closed indicator
88. If this indicator lights up, it indicates that the luggage compartment door or its glass is not closed tightly.
Close the tailgate and its glass tightly.
89. It is prohibited to drive with the luggage compartment door or its glass not fully closed, even if they are only partially open.
Anti-theft alarm system
90. For more information about the Passlock® system, see Section 3. For more information, see. also paragraph "Anti-theft alarm system".
Speed alarm
91. If this stabilizer is flashing, reduce your driving speed.
All-wheel drive system malfunction indicator (additional equipment)
92. This indicator should light briefly when the engine is started to indicate that it is working.
93. If this indicator does not light when the ignition is turned on, this may indicate that an electrical fuse or lamp has burned out. It is necessary to immediately restore the functionality of the alarm so that it can warn of a malfunction at any time.
94. If the indicator remains on or comes on while driving, this indicates a possible transmission malfunction.
95. Faults in this system can be identified before they become apparent.
Timely maintenance can prevent serious damage to your vehicle. Contact your dealer for repairs.
Cruise control system indicator (additional equipment)
96. This indicator comes on when the cruise control system is turned on. For more information, see. "Cruise control" paragraph.
Driver Information Center (additional equipment)
97. The Driver Information Center provides information on the status of many vehicle systems. The information centre allows you to enter and remember personal settings and receive warning messages.
98. The information center display is located at the bottom of the instrument panel. Control buttons can be located on the steering wheel (additional equipment).
99. When the ignition is turned on, the driver information center is activated. After a short pause, the Driver Information Centre will resume the mode it was in immediately before the engine was switched off.
100. If the system detects that a malfunction has occurred, a warning message will appear on the display. For more information, see. "Driver Information Center Messages" later in this section.
101. This guide shows the most typical types of displays. The display installed in your vehicle may differ from the display shown in the illustrations, depending on the specific vehicle equipment and the language the system is configured to operate.
Driver Information Center Buttons (additional equipment)
Note: If your vehicle is not equipped with steering wheel mounted information center controls, some of the features listed in this section may not be available. To view the total and partial odometer readings, use the trip odometer reset button located on the instrument panel. Click this button to acknowledge receipt of the message or to delete the message. For information on features available on vehicles not equipped with the Driver Information Center controls located on the steering wheel, see "Tripmeter".
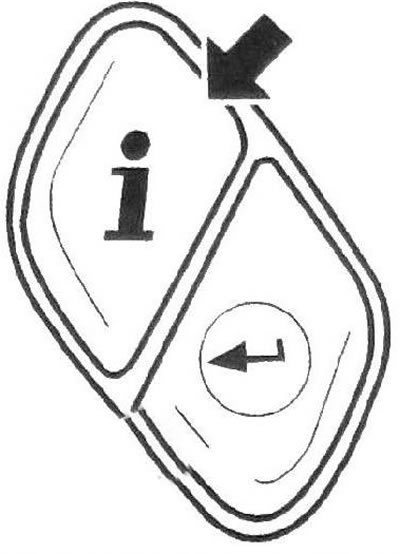
Trip information button
102. When the button is pressed successively (see illustration) the following information is displayed on the display:
1.102 Trip information button
a) ODOMETER (Total mileage counter)
The total mileage counter shows the total mileage of the vehicle since the start of operation.
Readings can be displayed in metric units (kilometers) or in British units of measurement (miles).
To view the trip meter readings when the engine is not running, press the trip meter reset button located on the instrument panel.
b) TRIP A (Trip A) and TRIP B (Trip B)
Your vehicle also has two trip meters called TRIP A and TRIP B.
The trip meter shows the distance traveled by the vehicle since the trip meter was last reset to zero.
Readings can be displayed in metric units (kilometers) or in British units of measurement (miles).
To reset the trip odometer to zero, first display the desired trip odometer, then press and hold the select button for one second. In this case, only the partial mileage counter that was displayed will be reset.
You can also reset the trip odometer using the trip odometer reset button located on the instrument panel.
If you forget to reset the trip odometer to zero at the beginning of a trip, display the desired trip odometer, then press and hold the reset button located on the instrument panel or the Driver Information Center Select button for at least four seconds.
The display will show the mileage since the ignition was last turned off.
c) TIRE PRESSURES (Tire pressure)
The display shows the air pressure in each tire of your car.
Press the button repeatedly to display the following information:
LF TIRE (Left front tire) • RE TIRE (Right front tire) • LR TIRE (Left rear tire)
RR TIRE (Right rear tire) Readings can be displayed in metric units of kPa or imperial units of PSI.
If the system detects low tire pressure in one or more tires, the low tire pressure indicator will illuminate and the message CHECK TIRE PRESSURE will appear in the driver information center display (Check the air pressure in your tires).
d) TIMER
The timer is used as a stopwatch.
After selecting the timer function using the trip information button, press the select button to start or stop the timer. If you stop and then start again while driving, the timer will automatically continue counting from the moment you turned off the ignition.
The timer has fields for indicating hours, minutes and seconds.
The timer will reset to 00:00:00 after reaching 99:59:59.
To stop the timer without resetting, first select the timer function using the trip information button, then press and release the select button.
To reset the timer, first select the timer function using the trip information button, and then press and release the select button.
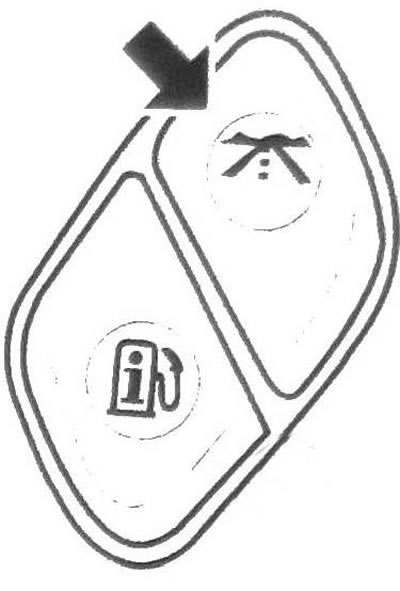
Fuel information button
103. When the button is pressed successively (see illustration) the following information is displayed on the display:
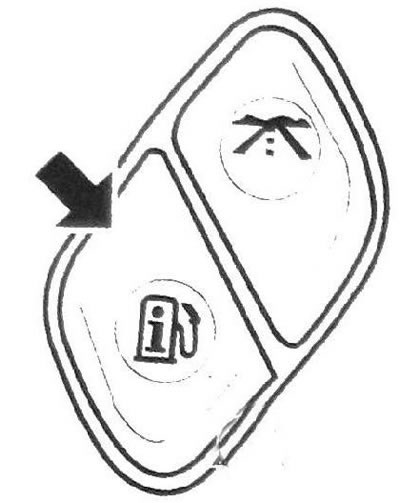
1.103 Fuel information button
a) RANGE (Fuel range) The distance is displayed on the display. for which, according to the computer's estimate, the fuel in the tank will be sufficient.
Readings can be displayed in metric units (kilometers) or in British units of measurement (miles).
If the display shows LOW (Low power reserve), you should fill the tank with fuel as soon as possible.
The fuel range is calculated based on the average fuel consumption over the past period.
This parameter cannot be reset.
b) FUEL USED (Amount of fuel consumed):
Select the FUEL USED option to see the total amount of fuel used since the system was last reset. To reset this indicator, press the fuel information button to select FUEL USED, then press and hold the select button for one second.
Readings can be displayed in metric units (liters) or imperial units (gallons).
c) AVG ECON (Average fuel economy)
The display shows the average fuel economy since the system was last reset to zero
Readings can be displayed in metric or imperial units:
- L/100 KM (fuel consumption in liters per 100 km)
- KM/L (kilometers traveled on one liter of fuel)
- MPG (miles per gallon of fuel).
To reset the average fuel economy value, first display it using the fuel information button, then press and hold the select button for one second.
d) ENGINE OIL LIFE (Service life of motor oil)
The display will show the service life (in percent) engine oil remaining after the last system reset.
104. Depending on operating conditions, the mileage between engine oil changes may vary significantly. The frequency of engine oil changes depends on the vehicle operating conditions, engine speed and engine temperature.
105. The vehicle owner is responsible for regularly checking the engine oil level.
After the engine oil change indicator lights up or the CHANGE ENGINE OIL message appears (Change engine oil), the engine oil should be changed as soon as possible, within the next 500 kilometers.
106. The engine oil and oil filter must be changed at least once a year, even if the system does not indicate the need to change the engine oil.
107. After changing the engine oil, it is necessary to reset the engine oil life monitor to its original state. If this monitor is not reset, it will give incorrect readings. After resetting the system to its initial state, the display will show 100%. The engine oil life monitor can only be reset after changing the engine oil. If you accidentally reset the engine oil life monitor, change the engine oil 5,000 km after the last oil change and reset the monitor again
Personal settings button
Note: Personalized functions except LANGUAGE function (Display language), available only in vehicles equipped with the Driver Information Center controls located on the steering wheel.
Only available functions will be shown on the display.
108. Your vehicle may have the following features that can be customized.
- a) LOCK DOORS (Locking doors)
- b) UNLOCK DOORS (Unlocking doors)
- c) LOCK FEEDBACK (Confirmation of door locking)
- d) UNLOCK FEEDBACK (Confirmation of door unlocking)
- e) HEADLAMP DELAY. (Headlights off delay)
- f) PERIMETER LiOiHTS (Lighting the space around the car)
- g) EASY EXIT SEAT (Automatic seat movement for easy exit from the vehicle)
- h) ALARM WARNING (Anti-theft alarm system signal type)
- !) LANGUAGE (Display language for messages)
- j) UNITS (Units of measurement)
109. Click on the personal settings button (see illustration), to view a list of the customizable features available on your vehicle.
1.109 Personal settings button
To program personal settings, see. "Personal settings" in this section.
Select button
110. Use this button (see illustration) for the following actions:

1.110 Select button
- a) Setting the partial mileage counters to zero. See "Trip Information Button" above.
- b) Start, stop, and reset the stopwatch. See "Trip Information Button" above in this section.
- c) Resetting the fuel consumption counter to zero. See "Fuel Information Button" above in this section.
- d) Resetting the average fuel economy value. See "Fuel Information Button" above in this section.
- e) View customizable features. See "Personalized Function Settings" below in this subsection.
- f) Clearing messages from the Driver Information Center display. See the Driver Information Center Messages section below.
Personalized function settings
111. To program a custom function:
- a) The ignition must be on and the automatic transmission selector must be in the P (Park) position. Turn off the headlights to avoid discharging the battery. Caution: Leaving the vehicle with the ignition on for an extended period of time may cause the battery to discharge.
- b) Click on the personal settings button (see illustration 1.109), to view a list of the customizable features available on your vehicle.
- c) When the desired function is displayed, press the selection button repeatedly to view its possible settings.
- d) When the desired function setting is displayed, press the personal setting button to select that setting and proceed to personal setting of the next function.
LOCK DOORS (Locking doors)
112. You can view and select one of the following settings for this function:
LOCK DOORS: IN GEAR (Door locking: when gear is engaged)
113. All doors are automatically locked when you move the automatic transmission selector out of the P (Park) position.
This setting is set by factory default.
LOCK DOORS: WITH SPEED (Locking doors: when a certain speed is reached)
114. All doors are locked when the vehicle speed exceeds 13 km/h for three seconds.
For more information, see. "Programmable Automatic Door Locks" below.
UNLOCK DOORS (Unlocking doors)
115. You can view and select one of the following settings for this function:
- a) UNLOCK DOORS: IN PARK (Unlocking the doors: when the automatic transmission selector lever is moved to the Park position). All doors are automatically unlocked when you move the automatic transmission selector lever to the P (Park) position. This is the factory default setting.
- b) UNLOCK DRIVER: IN PARK (Unlocking the driver's door: when the automatic transmission selector lever is moved to the Park position) The driver's door will automatically unlock when you move the automatic transmission selector lever to the P(Park) position.
- c) UNLOCK DOORS: KEY OUT (Unlocking doors: when removing the key from the ignition). All doors are automatically unlocked when the key is removed from the ignition.
- d) UNLOCK DOORS: MANUALLY (Door unlocking: manual unlocking). Automatic door unlocking is disabled.
For more information, see. "Programmable Automatic Door Locks" later in this section.
LOCK FEEDBACK (Confirmation of door locking)
116. You can view and select one of the following settings for this function:
a) LOCK FEEDBACK: BOTH (Door lock confirmation: both signals)
The parking lights will flash each time you press the lock button on the remote control. When you press the door lock button on the remote control again, a beep will sound. This setting is set by factory default.
b) LOCK FEEDBACK: LAMPS (Door Lock Confirmation: Lights)
The parking lights will flash each time you press the lock button on the remote control.
c) LOCK FEEDBACK: HORN (Door lock confirmation: sound signal)
When you press the door lock button on the remote control again, a beep will sound.
Note: This feature may not be available on all vehicles.
LOCK FEEDBACK: OFF (Door lock confirmation: off)
There is no confirmation light or sound when pressing the lock button on the remote control.
UNLOCK FEEDBACK (Confirmation of door unlocking)
117. You can view and select one of the following settings for this function:
a) UNLOCK FEEDBACK: LAMPS (Door unlock confirmation: lights)
The parking lights will flash each time you press the unlock button on the remote control.
This setting is set by factory default.
b) UNLOCK FEEDBACK: HORN (Confirmation of door unlocking: sound signal)
When you press the door unlock button on the remote control again, a beep will sound.
Note: This feature may not be available on all vehicles.
c) UNLOCK FEEDBACK: BOTH (Door unlock confirmation: both signals)
The parking lights will flash each time you press the unlock button on the remote control. When you press the door unlock button on the remote control again, a beep will sound.
Note: This feature may not be available on all vehicles.
d) UNLOCK FEEDBACK: OFF (Door unlock confirmation: off)
The interior lights will not flash and the chime will not sound when the door unlock button on the remote control is pressed.
HEADLAMP DELAY (Headlights off delay) (Additional equipment)
118. You can view and select one of the following settings for this function:
- a) HEADLAMP DELAY: 10 SEC (Headlights off delay: 10 seconds). This setting is set by factory default.
- b) HEADLAMP DELAY: 20 SEC (Headlights off delay: 20 seconds)
- c) HEADLAMP DELAY: 40 SEC (Headlights off delay: 40 seconds)
- d) HEADLAMP DELAY: 1 MIN (Headlights off delay: 1 minute)
- e) HEADLAMP DELAY: 2 MIN (Headlights off delay: 2 minutes)
- f) HEADLAMP DELAY: 3 MIN (Headlights off delay: 3 minutes)
- g) HEADLAMP DELAY: OFF (Headlights off delay: off)
119. The headlights turn off immediately after the ignition is turned off. These settings determine the length of time the headlights remain on after the ignition is turned off when it is dark outside.
PERIMETER LIGHTS (Lighting the space around the car)
Note: This feature may not be available on all vehicles.
120. You can view and select one of the following settings for this function:
a) PERIMETER LIGHTS: ON (Lighting around the car: on)
If it is dark outside, pressing the unlock button on the remote control will turn on the headlights and reverse lights and remain on for 40 seconds.
This setting is set by factory default.
b) PERIMETER LIGHTS: OFF (Lighting around the vehicle: off)
121. The exterior lights will not turn on when the doors are unlocked using the remote control.
EASY EXIT SEAT (Automatic seat movement for easy exit from the vehicle)
122. You can view and select one of the following settings for this function:
a) EASY EXIT SEAT: OFF (Automatic seat movement for easy exit from the vehicle is disabled)
The driver's seat will not automatically move to the exit position when the key is removed from the ignition.
This setting is set by factory default.
b) EASY EXIT SEAT: ON (Automatic seat sliding for easy exit from the vehicle is included)
When this feature is enabled, the driver's seat will automatically move to the designated exit position when the key is removed from the ignition. This function makes it easier to get out of the vehicle.
SEAT RECALL (Restoring the seat position)
123. You can view and select one of the following settings for this function:
a) SEAT RECALL: OFF(Seat position recovery disabled) If this setting is selected, the automatic restore of remembered settings function will be disabled.
This setting is set by factory default.
b) SEAT RECALL: AT KEY IN (Restoring the seat position with the ignition key inserted) If this setting is selected, the learned settings will be automatically restored when you insert the key into the ignition switch.
c) SEAT RECALL: ON REMOTE (Seat Position Restoration: Remote)
If this setting is selected, previously stored settings will be automatically restored when the doors are unlocked using the remote control.
ALARM WARNING (Anti-theft alarm system signal)
124. You can view and select one of the following settings for this function:
a) ALARM WARNING: BOTH (Anti-theft alarm system signal: both signals)
When the alarm is triggered, the sound will be heard and the headlights will flash. This setting is set by factory default.
Note: This feature may not be available on all vehicles.
b) ALARM WARNING: HORN (Anti-theft alarm system signal: sound signal)
When the anti-theft alarm system is triggered, an audible signal will sound.
Note: This feature may not be available on all vehicles.
c) ALARM WARNING: LAMPS (Anti-theft alarm system signal: lights)
When the anti-theft alarm system is triggered, the headlights will start flashing.
Note: This feature may not be available on all vehicles.
d) ALARM WARNING: OFF (Anti-theft alarm system signal: off)
The anti-theft alarm system is disabled.
When the alarm is triggered, the horn will not sound and the headlights will not flash.
Note: This feature may not be available on all vehicles.
LANGUAGE (Display language for messages)
125. You can view and select one of the following settings for this function:
a) ARABIC (Arabic)
All information is displayed on the screen in Arabic.
b) ENGLISH (English language)
All information is displayed on the screen in English.
c) FRANCIS (French) All information is displayed on the screen in French.
126. You can also view the possible message display language options by pressing and holding the trip odometer reset button while the trip odometer readings are displayed. Release the button when the language you want appears on the display.
127. You can also reset the message language by pressing and holding the personal settings button and the trip information button at the same time. The display will begin scrolling through the list of available languages. Release the buttons when the language you want appears on the display.
128. The languages listed above are the default set installed at the factory. Your dealer can reprogram this feature. Other possible display languages include:
- a) ESPANIOL) Spanish language) All information is displayed in Spanish.
- b) DEUTSCH (German) All information is displayed on the screen in German.
- c) PORTUGAL(Portuguese) All information is displayed in Portuguese.
- d) ITALIANO (Italian) All information is displayed on the screen in Italian.
DISPLAY UNITS (Units of measurement)
129. You can view and select one of the following settings for this feature:
a) UNITS: US (ENGLISH - units of measurement: US [British]) This setting enables the display of units in the British system of measurement.
b) UNITS: METRIC E/100KM (Units of measurement: metric, l/100 km) This setting enables the display of values in the metric system of units of measurement.
c) UNITS: METRIC L/100KM (Units of measurement: metric, km/l) This setting enables the display of values in the metric system of units of measurement.
Driver Information Center Messages
130. These messages appear when a malfunction occurs in one of the vehicle systems or convey important information about the state of the system. If there are multiple messages, they will appear on the display one after the other. You can clear warning messages from the display by pressing any of the four Driver Information Center buttons located on the steering wheel or by pressing the trip odometer reset button on the instrument cluster. Some messages cannot be deleted until the problem is fixed.
CHANGE ENGINE OIL (Change engine oil)
131. This message appears when the engine oil has reached the end of its service life and should be replaced. This message will disappear from the display after ten seconds, but will continue to appear for ten seconds each time the ignition is turned on until the problem is corrected.
CHECK TIRE PRESSURE (Check the air pressure in your tires)
132. This message appears if the tire pressure monitor detects a decrease in air pressure in one or more tires. The low tire pressure indicator light may also come on on the instrument panel. This message will appear every time the ignition is turned on until the problem is corrected.
133. The display will also show one of the following messages indicating which specific tire needs to be checked:
- a) LF TIRE (Left front tire)
- b) RETIRE (Right front tire)
- c) LR TIRE (Left rear tire)
- d) RR TIRE (Right rear tire)
134. Stop as soon as possible, check the air pressure in your tires and, if necessary, bring it up to normal.
TIRE PRESSURES (Tire pressure)
135. Tire low pressure or emergency status indicator
CHECK WASHER FLUID (Check the washer fluid level)
136. This message appears on the display when the fluid level in the windshield washer reservoir is insufficient. The message will disappear from the screen after you fill the windshield washer reservoir. Otherwise, the message will disappear from the display after ten seconds.
DRIVES DOOR AJAR (The driver's door is open)
137. This message, accompanied by a gong signal, appears if the driver's door is open or not closed tightly. Make sure there are no obstacles to closing the door and close it tightly
ENGINE COOLANT HOT/IDLE ENGINE (Coolant temperature is above normal/Leave engine idling)
138. This message appears accompanied by a gong sound when the coolant temperature rises dangerously.
Caution: If this message appears, stop immediately and turn off the engine to avoid serious engine damage. Do not increase engine speed above normal idle speed.
FUEL LEVEL LOW (Low fuel level)
139. This message warns of insufficient fuel in the tank. It is also accompanied by a single beep. Fill the tank with fuel as soon as possible.
ICE POSSIBLE (Black ice is possible)
140. This message appears when the outside temperature is low enough for ice to form on the road. If the air temperature rises to a safe level, the message will automatically disappear from the display. Otherwise, the message will disappear from the display after ten seconds.
KEY FOB BATTERY LOW (The remote control battery is low)
141. This message appears when the voltage of the door lock remote control battery drops. Replace the battery.
LEFT REAR DOOR AJAR (The left rear door is open)
142. This message, accompanied by a gong signal, appears if the left rear door is open or not closed tightly. Make sure there are no obstacles to closing the door and close it tightly.
OIL PRESSURE LOW/STOP ENGINE (Low engine oil pressure / turn off engine)
143. If this message appears while the engine is running, stop the vehicle immediately and turn off the engine. Further operation of the vehicle is prohibited until then. until the fault is corrected. Check the engine oil level. Contact your dealer for repairs.
Warning: Do not continue driving the vehicle if the engine oil pressure is low. Continuing to drive with low engine oil pressure can cause serious engine damage. Check the engine oil level as soon as possible and, if necessary, contact a service station to service the vehicle.
PASSENGER DOOR AJAR (The front passenger door is open)
144. This message, accompanied by a gong signal, appears if the right front door is open or not closed tightly. Make sure there are no obstacles to closing the door and close it tightly.
REAR ACCESS OPEN (The trunk door is open)
145. This message, accompanied by a gong signal, appears if the luggage compartment door or its glass is open or not tightly closed with the ignition on. Close the tailgate and its glass tightly.
RIGHT REAR DOOR AJAR (The right rear door is open)
146. This message, accompanied by a gong signal, appears if the right rear door is open or not closed tightly. Make sure there are no obstacles to closing the door and close it tightly.
SERVICE AIR BAG (Airbag system malfunction)
147. This message appears when there is a malfunction in the airbag system. Contact your dealer to perform necessary service.
SERVICE BRAKE SYSTEM (The brake system is faulty)
148. This message appears when there is a malfunction in the brake system. Stop and turn off the ignition to reset the system. Turn the ignition back on. If the message appears again, contact a service station to have the fault corrected.
SERVICE CHARGING SYS (Battery charging system malfunction)
149. On some vehicles, this message appears when there is a malfunction in the battery charging system. The battery charging system malfunction indicator may also light up on the instrument panel. The battery will not charge optimally and the vehicle will lose its ability to operate in fuel-saving mode. Contact your dealer to perform necessary service.
SERVICE STABILITRAK (Stabilitrak system malfunction)
150. This message appears if a fault is detected in the dynamic stabilization system. To reset the system, stop the vehicle, then turn off and restart the engine. If this message appears again, the stabilization system is faulty. Contact your dealer for repairs.
When this message appears, it means that the system is malfunctioning and you should take this into account when driving your vehicle.
SERVICE TIRE MONITOR (Tire pressure monitor malfunction)
151. This message appears if the tire pressure monitoring system is not functioning properly. One or more tire sensors may be missing or faulty. Contact your dealer for repairs.
152. The low tire pressure indicator located on the instrument panel may also light up. For more details, see. "Low tire pressure warning light" in the "Warning lights" subsection above.
STABILITRAK ACTIVE (Stabilitrak system activated)
153. This message appears if the dynamic stabilization system has been activated.
This message may appear when any of the following systems are activated: engine management system, traction control system, and electronic stability control system.
STABILITRAK NOT READY (Stabilitrak system is not ready)
154. This message appears if driving conditions delay system initialization. This is a normal phenomenon. It informs you that the system is not yet ready for full functionality. When the system is ready, the message will disappear from the display.
STABILITRAK OFF (Stabilitrak system is disabled)
155. This message appears if you have turned off the dynamic stability control system using the Stabilitrak system button, or if the Stabilitrak system has turned off automatically.
156. This message may also appear under the following conditions:
- a) The transfer case is in all-wheel drive mode with a low gear.
- b) The brake system malfunction indicator is on.
157. If the Stabilitrak system has been disabled automatically, the message will disappear from the display when driving conditions return to normal.
TIGHTEN FUEL SAR (Close the fuel tank cap)
158. This message, accompanied by a gong signal, appears if the fuel tank cap is not installed correctly. Check the lid and make sure it is tightly closed.
At this point, the engine malfunction indicator light should also come on.
159. After some time after starting to move, the connection should disappear from the display and this indicator should go out.
TRACTION CONTROL OFF (Traction control system is disabled)
160. This message appears when the traction control system is disabled.
- a) This changes the algorithm of the engine control system.
- b) The drive wheels may slip.
- c) The dynamic stabilization system and the braking function of the traction control system are operational.
TURN SIGNAL ON (The direction indicator is on)
161. This message, accompanied by a gong, appears to remind you that the direction indicator signal has been on for more than 1.2 km.
(The text of the article was obtained from the website ChevyMan.ru)