
Contents: Audio system ↧ Watch ↧ Rear Seat Audio System (additional… ↧ Audio controls located on the… ↧ Antenna ↧
Warning: It is strongly recommended that you minimize the use of the audio system while driving. Excessive attention to audio system operation while driving significantly increases the risk of a traffic accident, which may result in injury or even death. Road safety must be an absolute priority. Operate the audio system only when road conditions permit safe operation. The driver must always be alert and attentive when driving.
Caution: Installing additional electronic equipment such as a CB radio, mobile phone or radio transmitter may interfere with the proper operation of the engine, audio system and other systems in your vehicle, or even cause them to fail. Consult your dealer before installing such electronic equipment.
Also, check the laws that govern the use of mobile radios and mobile phones. Interference may also be caused by other electronic equipment (mobile phone chargers, electrical accessories, external electronic devices), plugged into the vehicle's electrical outlets. Radio interference is expressed as increased volume of static discharges heard when listening to radio programs. If radio interference or static electricity discharge occurs, it is recommended to disconnect the device from the electrical outlet. Warning signals ("gongs") are generated by your vehicle's audio system. If the audio system has been removed and not replaced with a standard one, or if the gong signal generation module has not been installed, this signal will not be emitted.
Audio system
1. If the vehicle is equipped with a navigation system, the audio control panel is built into the navigation control panel. For more detailed information, please refer to the separate navigation system operating manual.
2. Otherwise, your vehicle is equipped with one of the following audio systems (see illustrations).
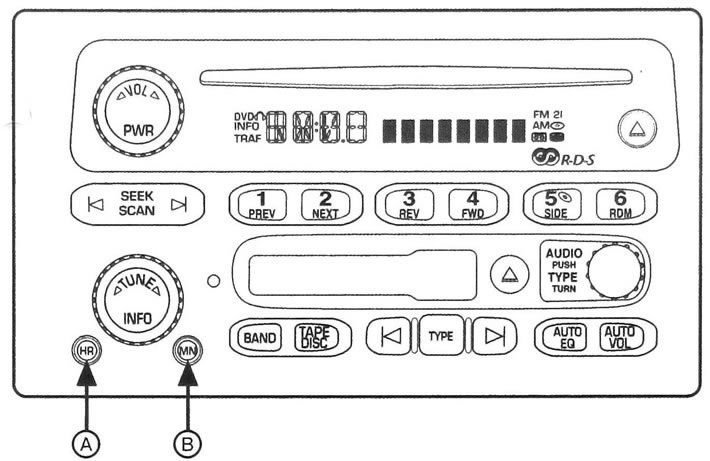
6.1a Audio system with RDS receiver and audio cassette and CD player
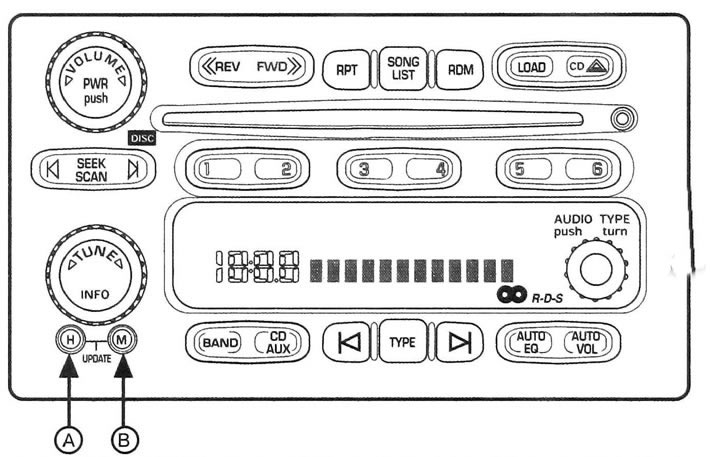
6.1b Audio system with RDS receiver and 6-CD player.
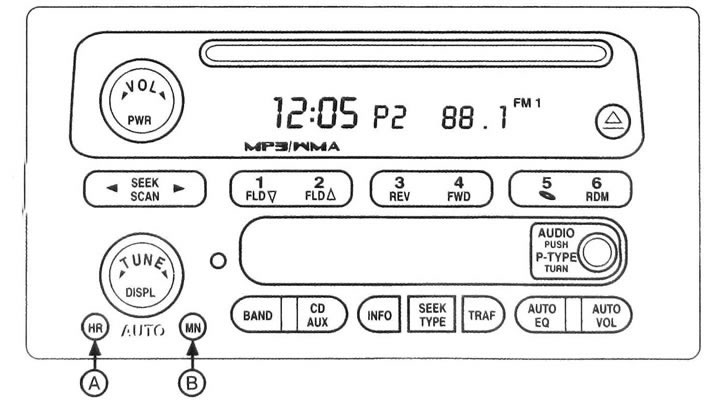
6.1c Audio system with RDS receiver and CD player (with MP3 disc playback function)
a) Audio system with RDS receiver and audio cassette and CD player.
b) Audio system with RDS receiver and 6-CD player.
c) Audio system with RDS receiver and CD player (with MP3 disc playback function.)
3. This system only operates when the ignition or auxiliary power saver function is on.
4. The separate operating instructions for the navigation or audio system, as well as the rear seat entertainment system, provide user instructions.
5. Your car is equipped with an audio system with an RDS radio receiver. RDS stands for Radio Data System, which encodes information and transmits it in the FM frequency range. In areas where the RDS system is not supported, the RDS mode (Radio Data System) your audio system is not functioning and should not be turned on.
Caution: Do not put paper labels on CDs. Labels may cause the CD to become stuck in the player. Insert discs one at a time. Do not use scratched or damaged CDs. Make sure that no foreign objects, debris or liquids enter the loading slot.
Calibration of the radio receiver
6. If the display shows CAL ERR (Calibration error), this means that the radio has not been properly calibrated for this vehicle. Contact your dealer to perform necessary service.
Anti-theft system
7. The anti-theft system is activated automatically and does not require any additional programming.
8. When the ignition is turned off, the system is activated automatically. The system indicator will flash. If your audio system is installed in any other vehicle, the display will show LOCKED. Your audio system will not work if it is stolen.
Watch
Setting local time
9. To set the local time (see illustrations 6.1a, 6.1b and 6.1c):
a) To set the hours, press and hold button A.
b) To set the minutes, press and hold button B.
10. You can set the time on the clock both with the ignition on and with the ignition off.
Correcting the clock using the RDS function (if available)
11. To adjust the time using the RDS radio signal, simultaneously press and hold the hour and minute buttons until UPDATED appears on the display (Corrected).
12. A symbolic image of a clock will appear on the display.
13. If the radio does not transmit current time signals, the display will show the message NO UPDAT or NO UPDATE (Not corrected).
14. RDS radio stations transmit a time signal once per minute. Therefore, it may take some time for your car's clock to set to the correct time.
Rear Seat Audio System (additional equipment)
Caution: This system is intended for use by rear seat passengers only.
15. The system allows passengers sitting in the rear seats to independently select the audio source (aM and FM radio, audio cassette player, CD player or DVD player) (see illustration). Passengers in the rear seats can listen to broadcast programs or music via headphones.
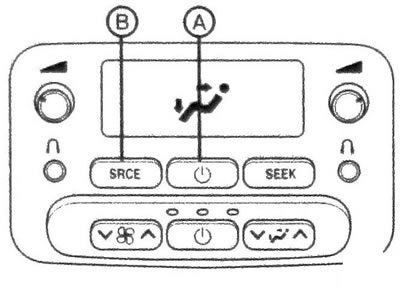
6.15 Rear Seat Audio Control Panel
16. The system allows you to use up to two sets of headphones. Rear seat passengers can only control audio sources that are not being used by the driver and front passenger. The audio system controls used by the driver and front passenger always take priority over those used by rear seat passengers. For example, if the driver and front passenger are listening to AM or FM radio, the rear seat audio controls will not allow you to change frequency bands or tune to other radio stations.
17. The rear seat audio system can be used even when the main audio system is turned off.
Note: DVD player is available in vehicles equipped with rear seat entertainment system (additional equipment). For detailed information, refer to the separate Rear Seat Entertainment System Owner's Manual.
Turning on the power
18. To turn on the rear seat audio system, press button A (see illustration 6.15). To turn off the system, press this knob again. When the rear seat audio system is turned on, the rear speakers are muted.
Adjusting the sound volume
19. The left knob controls the volume for the left set of wired headphones, and the right knob controls the volume for the right set of wired headphones. To increase or decrease the sound volume, rotate the volume control knob.
Selecting a signal source
Press button B to select one of the available audio sources (see illustration 6.15).
a) Radio receiver.
b) Audio cassette player (if available).
c) CD player or
d) 6-disc compact disc player.
e) DVD player (if available).
Audio controls located on the steering wheel (additional equipment)
20. Some vehicles may be equipped with audio control buttons located on the steering wheel (see illustrations).
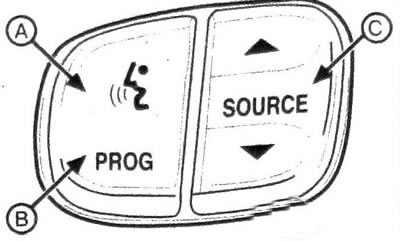
6.20a Button for temporary mute (A), radio program selection (B) and mode switching (C)
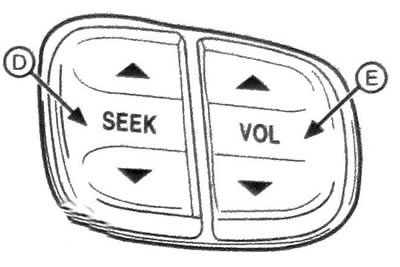
6.20b Radio tuning and volume control buttons located on the steering wheel
21. To temporarily mute the sound, press button A. To turn the sound back on, press this button again or any other button on the audio system.
Using the program button B you can select the radio stations that are programmed using the preset buttons on the radio receiver. If your vehicle is equipped with an audio system with a 6-disc CD player. then, while playing CDs, pressing this button will start playing the next downloaded CD (see illustration 6.20a).
22. In the preset radio station scanning mode, the radio receiver finds only those radio stations that broadcast in the selected frequency range. During the search, the radio receiver will not stop at radio stations with a weak signal level.
23. Press button C to select one of the available audio sources:
a) AM frequency range.
b) FM1 frequency range.
c) FM2 frequency range.
d) CD player or
e) 6-disc compact disc player.
24. When a disc is loaded into the CD player, the CD symbol appears on the display.
25. Press either side of the SEEK (D) key and the radio will find and stop at the next higher or lower frequency radio station. The radio receiver finds only those radio stations that broadcast in the selected frequency range. During the search, the radio will not stop on radio stations with a weak signal level (see illustration 6.20b).
26. When playing a CD, press the up arrow to quickly go to the beginning of the next track on the CD, or the down arrow to return to the beginning of the current track.
27. To increase or decrease the volume, press the upper or lower part of the E key, respectively(see illustration 6.20b).
Antenna
28. The pin antenna installed on your vehicle is not damaged during mechanical car washing. Periodically check the strength of the antenna attachment to the vehicle. 29. If the antenna mount has become loose, tighten it first by hand and then another quarter turn using a wrench. If the antenna is bent, straighten it with your hands. If the antenna is severely damaged, it should be replaced. It is necessary to keep the surface of the whip antenna clean to ensure high quality radio signal reception.
Adjusting the volume of the sound signal ("gong strike")
30. Warning signals ("gong") are generated by your vehicle's audio system. This feature allows you to adjust the volume level of the gong. It is impossible to turn off the gong completely.
31. The system has two levels of gong volume: NORMAL CHIME (Normal gong volume) and LOUD CHIME (Loud gong signal). To change the horn volume, press and hold the radio preset button with the ignition on and the audio system off.
32. If your vehicle's audio system has been removed and not replaced with a factory audio system, or if a gong signal module has not been installed, this signal will not sound.
The original text can be found on the website chevyman